

Yes, you can enable, disable, and even manage how Windows 10 creates dump files during blue screen errors, and in this guide, we'll show you how with Settings and commands.
Windows 10 comes with predefined settings to create crash dump files and take specific actions automatically during a critical error. However, you can customize the experience to tell the system how you want to record the data and what action to take.
A dump file is a special type of file that is created automatically when the system experiences a Blue Screen of Death (BSoD) — commonly known as a "bug check," "stop error," or "system error" — and suddenly reboots or shuts down. There are various types of dump files, but one thing they have in common is that they all contain information about the resources loaded in memory at the time of the crash.
Usually, these files are essential for debugging and troubleshooting purposes, and while Windows 10 comes with the optimal settings for the most case, the system comes with settings to enable or disable the creation of dump files, and actions like writing the event in the System log, restart the computer automatically and choose the type of crash dump you want to create based on the information you need.
In this Windows 10 guide, we will show you the steps of managing dump file configuration options using the Settings app and Command Prompt.
- How to change crash dump settings using Settings app
- How to change crash dump settings using Command Prompt
How to change crash dump settings using Settings app
To change how Windows 10 creates dumps files during a critical error, use these steps:
- Open Settings.
- Click on System.
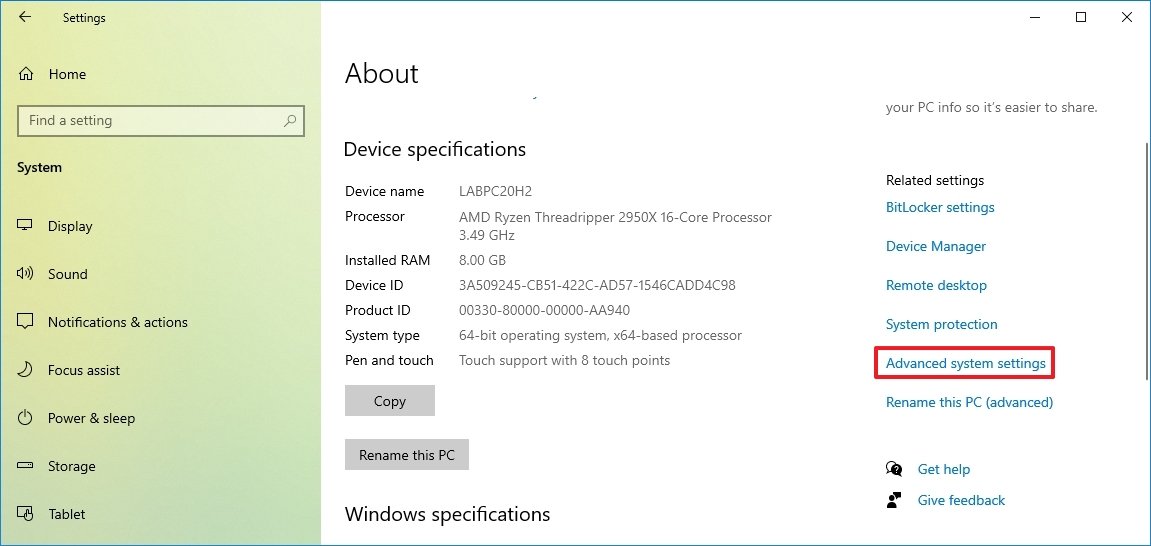
- Click on About.
-
Under the "Related settings" section, click the Advanced system settings option.
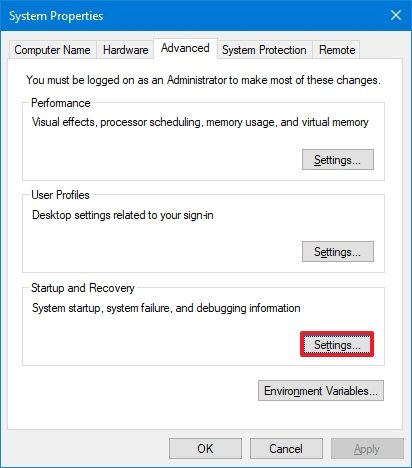
- Click the Advanced tab.
-
Under the "Startup and Recovery" section, click the Settings button.
-
Check or clear the Write an event to the system log option.
Quick note: When a crash occurs, Windows 10 can write the event in the system logs, which you can review in the Event Viewer. If you do not need this information, you can disable the action by clearing the option.
-
Check or clear the Automatically restart option.
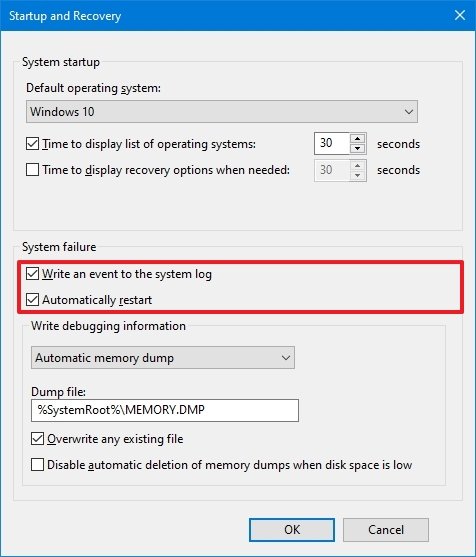
Quick note: During a critical error, the system restarts automatically by default, but if you want to prevent this from happening, you can disable the option.
-
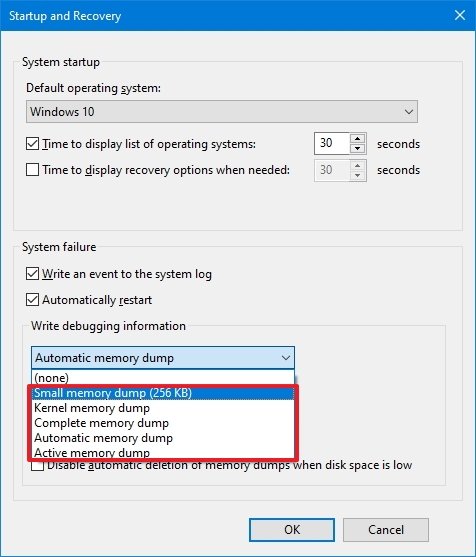
Under the "Write debugging information" section, use the drop-down menu and select the kind of file you want the system to create during a system crash:
- Small memory dump (minidump): This option collects the smallest amount of data about the problem, such as the stop code for the Blue Screen of Death (BSoD), the list of all the loaded drivers, and some processor and kernel information. The dump history is usually saved in the
%SystemRoot%\Minidumpfolder. Although this is an excellent option to save memory, it's limited since a lot of information that might help to find out the problem won't be included. During a second error, the previous file won't be overwritten. - Kernel memory dump: This option records only the information allocated for the system kernel, hardware abstraction layer (HAL), kernel-mode drivers, and other kernel-mode programs. This error dump file is usually less than half of amount of the total physical memory. In most cases, this is the recommended option since it does not take a lot of space and it includes most of the information involved in the crash. The data is saved into the
%SystemRoot%\Memory.dmpfile by default. - Complete memory dump: This option includes everything loaded into the physical memory, except the space used by the device firmware. Since this could be a large file, it requires a "pagefile" that is the total physical memory size. The crash is saved into the
%SystemRoot%\Memory.dmpfile by default. - Automatic memory dump: This option collects the information allocated in memory like the "kernel memory dump," but if the virtual memory is set to "system managed size," Windows 10 can automatically configure the file size to capture the data required to analyze the problem. The crash is saved into the
%SystemRoot%\Memory.dmpfile by default. - Active memory dump: This option collects the same information as the "Complete memory dump." The difference is that it discards information that may not be relevant to troubleshoot the issue. The crash is saved into the
%SystemRoot%\Memory.dmpfile by default.
- Small memory dump (minidump): This option collects the smallest amount of data about the problem, such as the stop code for the Blue Screen of Death (BSoD), the list of all the loaded drivers, and some processor and kernel information. The dump history is usually saved in the
- Under the "Dump file" box, you can specify an alternative location to save the file. (This option requires restarts.)
-
Check or clear the Overwrite any existing file option.
Quick note: When this option is enabled, follow-up dumps using the "kernel memory dump" or "complete memory dump" option will be overwritten.
-
Check or clear the Disable automatic deletion of memory dumps when disk space is low option.
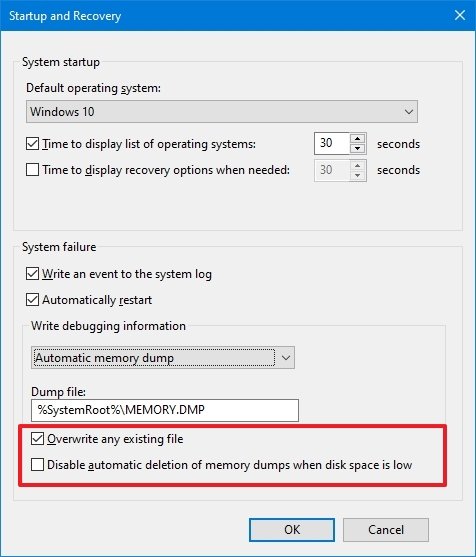
- Click the OK button.
Once you complete the steps, the system will create dumps files depending on your configuration.
Disable crash dumps creation on Windows 10
To prevent Windows 10 from creating dump files during a blue screen, use these steps:
- Open Settings.
- Click on System.
- Click on About.
-
Under the "Related settings" section, click the Advanced system settings option.
- Click the Advanced tab.
-
Under the "Startup and Recovery" section, click the Settings button.
-
Under the "Write debugging information" section, use the drop-down menu and select the (none) option.
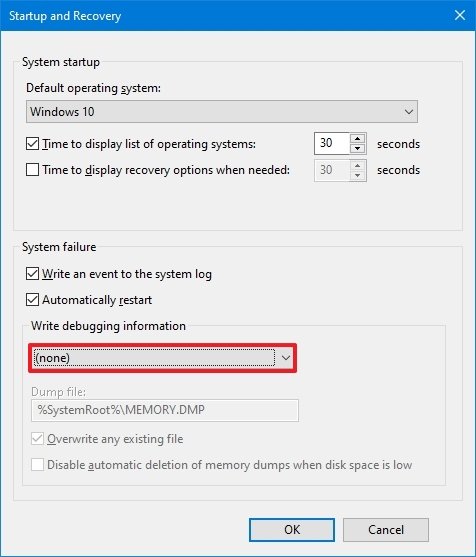
- Click the OK button.
After you complete the steps, the system will no longer create error files.
If you change your mind, you can always revert the settings using the instructions outlined above and selecting the option that suits your situation.
How to change crash dump settings using Command Prompt
Windows 10 also allows you to configure the settings for dump files and actions during system failures using commands, which you can run with Command Prompt or PowerShell.
Command to enable or disable System log events and auto-restart
To enable or disable Windows 10 from writing a System log event or automatically restarting the device upon crash with Command Prompt, use these steps:
- Open Start.
- Search for Command Prompt, right-click the top result, and select the Run as administrator option.
-
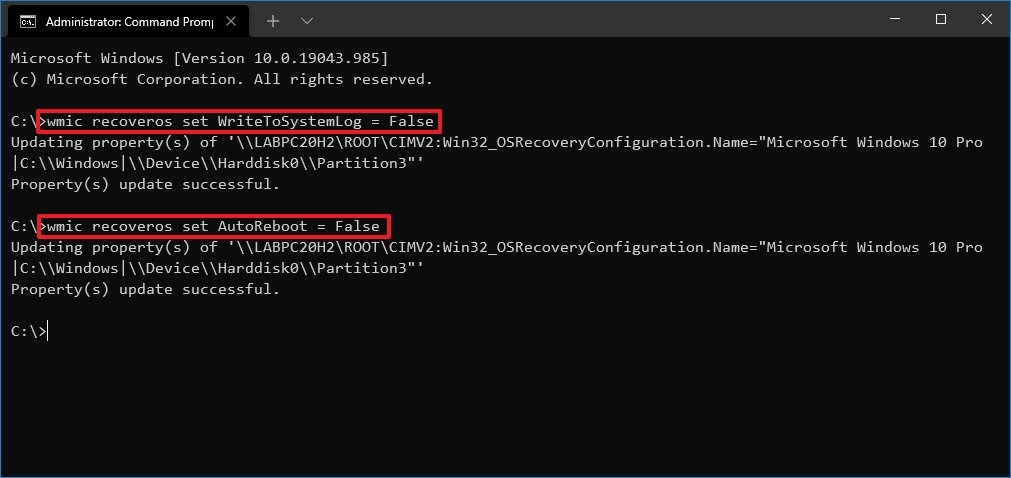
Type the following command to disable the system from writing event crashes logs and press Enter:
wmic recoveros set WriteToSystemLog = FalseIn the command, you can replace False for True to re-enable the option.
-
Type the following command to disable automatic restarts after a blue screen and press Enter:
wmic recoveros set AutoReboot = FalseIn the command, you can replace False for True to re-enable the option.
Once you complete the steps, the system will write logs and restart automatically upon crash according to your configuration.
Command to disable crash dumps on Windows 10
To stop creating dump files after a crash with a command, use these steps:
- Open Start.
- Search for Command Prompt, right-click the top result, and select the Run as administrator option.
-
Type the following command to disable the system from creating crash dump files and press Enter:
wmic recoveros set DebugInfoType = 0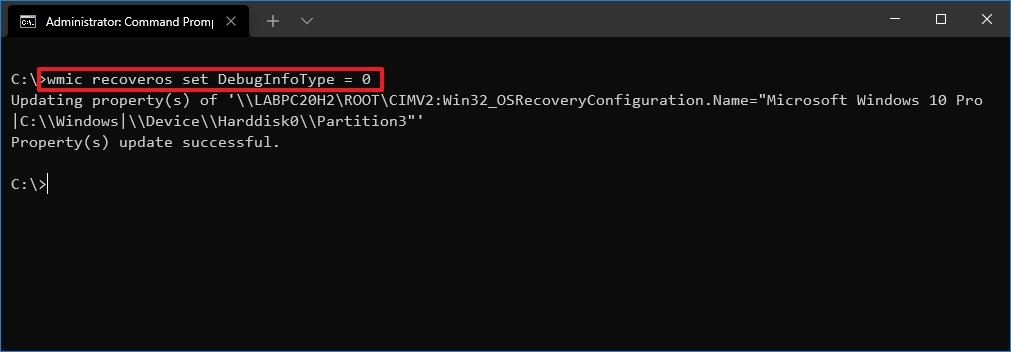
After you complete the steps, Windows 10 will no longer create dumps files during a bug check. If you want to enable the feature again, configure the type of file you want to create with the instructions below.
Command to enable small memory dumps
To enable and set up the system to create small memory dumps with a command, use these steps:
- Open Start.
- Search for Command Prompt, right-click the top result, and select the Run as administrator option.
-
Type the following command to specify the system to create small memory dumps and press Enter:
wmic recoveros set DebugInfoType = 3
Once you complete the steps, the system will collect the smallest amount of information about the crash in a file no larger than 64KB.
Command to enable kernel memory dumps
To enable and configure the system to create kernel memory dumps, use these steps:
- Open Start.
- Search for Command Prompt, right-click the top result, and select the Run as administrator option.
-
Type the following command to specify the system to create small memory dumps and press Enter:
wmic recoveros set DebugInfoType = 2
After you complete the steps, Windows 10 will create a file smaller than the complete option with system kernel allocated information, hardware abstraction layer (HAL), kernel-mode drivers, and other kernel-mode programs.
Command to enable complete memory dumps
To enable and configure complete memory dumps creation, use these steps:
- Open Start.
- Search for Command Prompt, right-click the top result, and select the Run as administrator option.
-
Type the following command to specify the system to create complete memory dumps and press Enter:
wmic recoveros set DebugInfoType = 1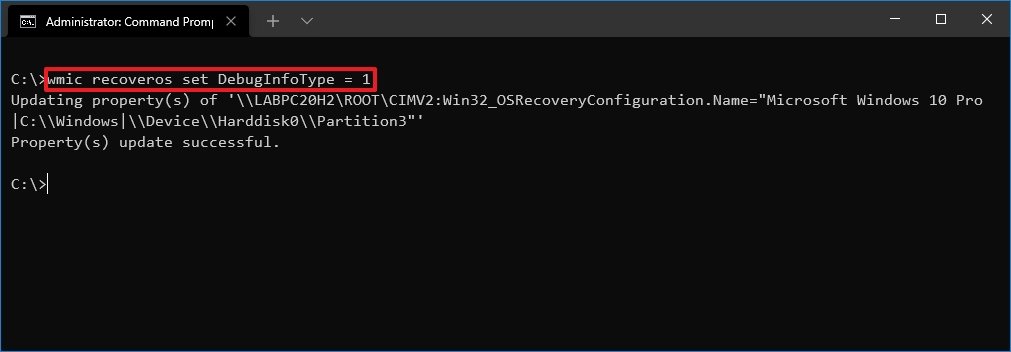
Once you complete the steps, during a Blue Screen of Death error, a file with everything loaded in memory will be created for debugging and troubleshooting.
Command to enable automatic memory dumps
To enable and set up the system to create automatic memory dumps, use these steps:
- Open Start.
- Search for Command Prompt, right-click the top result, and select the Run as administrator option.
-
Type the following command to specify the system to create automatic memory dumps and press Enter:
wmic recoveros set DebugInfoType = 7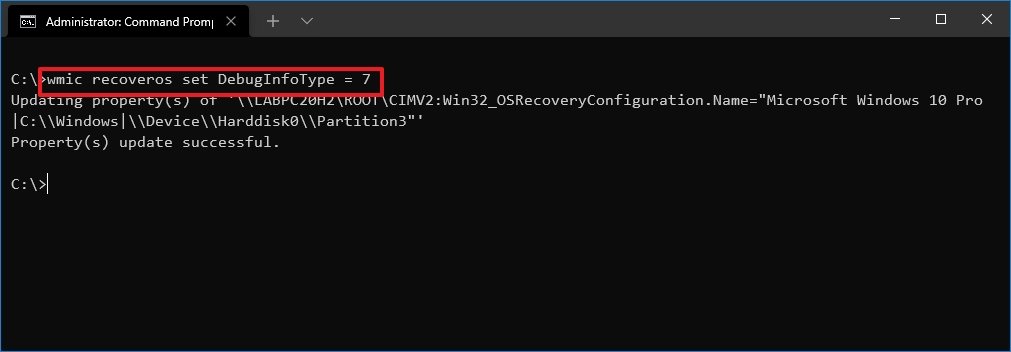
After you complete the steps, the system will create a dump file similar to the one from when using the "kernel memory dump" option, but the system will automatically manage the file's size.
Command to change default dump store location
To change the default folder location to store dumps with commands, use these steps:
- Open Start.
- Search for Command Prompt, right-click the top result, and select the Run as administrator option.
-
Type the following command to specify the folder location to store the dumps and press Enter:
wmic recoveros set DebugFilePath = PATH\TO\FOLDERIn the command, replace PATH\TO\FOLDER with the path to the folder location.
This example tells Windows 10 to store the "dumps" in the dumps folder inside the "E:" drive.
wmic recoveros set DebugFilePath = E:\dumps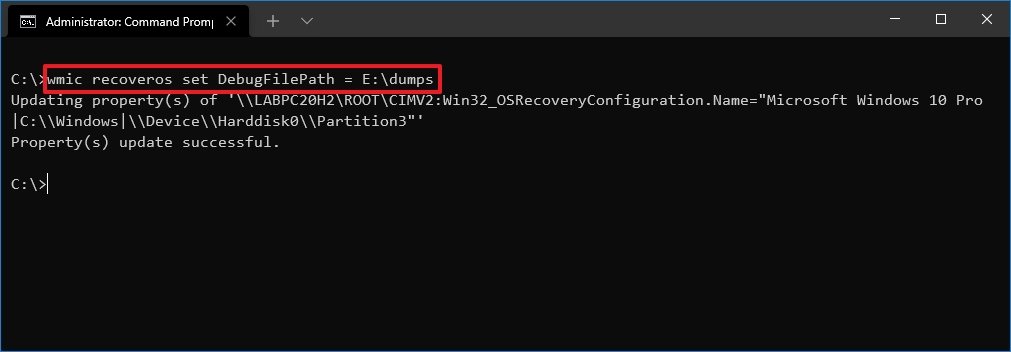
Once you complete the steps, the dump file will be saved in the location you specified in the command during a critical error.
Command to enable or disable overwrite existing files
To enable or disable the ability to overwrite older files, use these steps:
- Open Start.
- Search for Command Prompt, right-click the top result, and select the Run as administrator option.
-
Type the following command to disable the ability to overwrite previously created dumps after a new error needs to be written to file and press Enter:
wmic recoveros set OverwriteExistingDebugFile = 0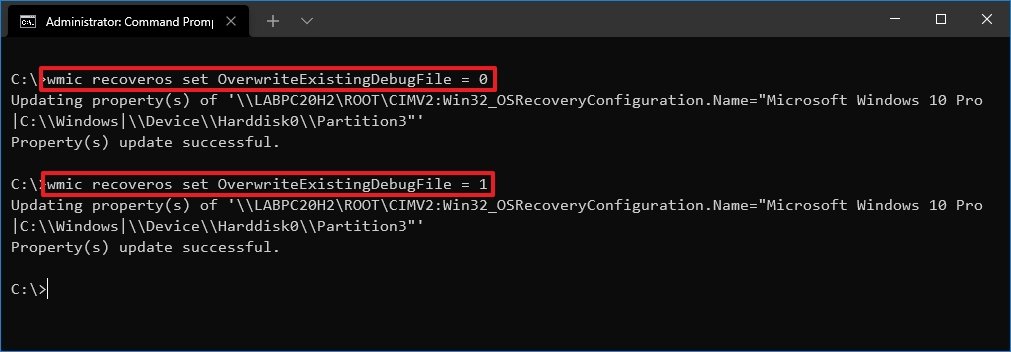
- Type the following command to enable the ability to overwrite previously created dumps after a new error needs to be written to file and press Enter:
wmic recoveros set OverwriteExistingDebugFile = 1
After you complete the steps, depending on the system failure configuration, the previous file will be overwritten, according to your settings, when a second dump file needs to be created.
More Windows 10 resources
For more helpful articles, coverage, and answers to common questions about Windows 10, visit the following resources:


0 comments:
Post a Comment