
Here are nine features that can help you to make the most out of Microsoft Edge.
Although the original release of Microsoft Edge did not reach the same popularity as other browsers like Google Chrome and Mozilla Firefox, the new version is different, and it offers (arguably) the best web experience for Windows 10 users.
In part is because the new browser is now based on the Chromium engine designed by Google that offers better compatibility, faster loading times, improved security and support, and better tools for developers. Also, it is because, since the default browser for Windows 10 became available, Microsoft has been proactively releasing updates to improve and tweak the experience to stand out above the rest with features to surf the net more privately, tools to shop online and save money, optimize performance, cross-device support, and much more.
In this Windows 10 guide, we will highlight and teach you how to use nine features to make the most out of Microsoft Edge.
- Create multiple profiles on Microsoft Edge
- Control your privacy on Microsoft Edge
- Collect stuff from the web on Microsoft Edge
- Save money when shopping online on Microsoft Edge
- Take screenshots on Microsoft Edge
- Create strong passwords on Microsoft Edge
- Read websites without clutter on Microsoft Edge
- Optimize memory usage on Microsoft Edge
- Sync history and open tabs on Microsoft Edge
1. Create multiple profiles on Microsoft Edge
On Microsoft Edge, the ability to set up multiple profiles is designed to help you share the browser with other users without sharing your information or preferences. However, it is also a handy tool that you can use to keep your personal and work stuff separate.
When you add new profiles to the browser, each profile can connect to a different Microsoft account, and they will have their own favorites, history, and other settings. Microsoft Edge even includes a feature to switch between profiles automatically. If you have multiple Microsoft accounts configured in the browser, the browser will prompt you to change to the correct profiles when opening a page or link.
Create new profile
To create multiple profiles on Microsoft Edge, use these steps:
- Open Microsoft Edge.
- Click the Settings and more (ellipsis) button and select the Settings option.
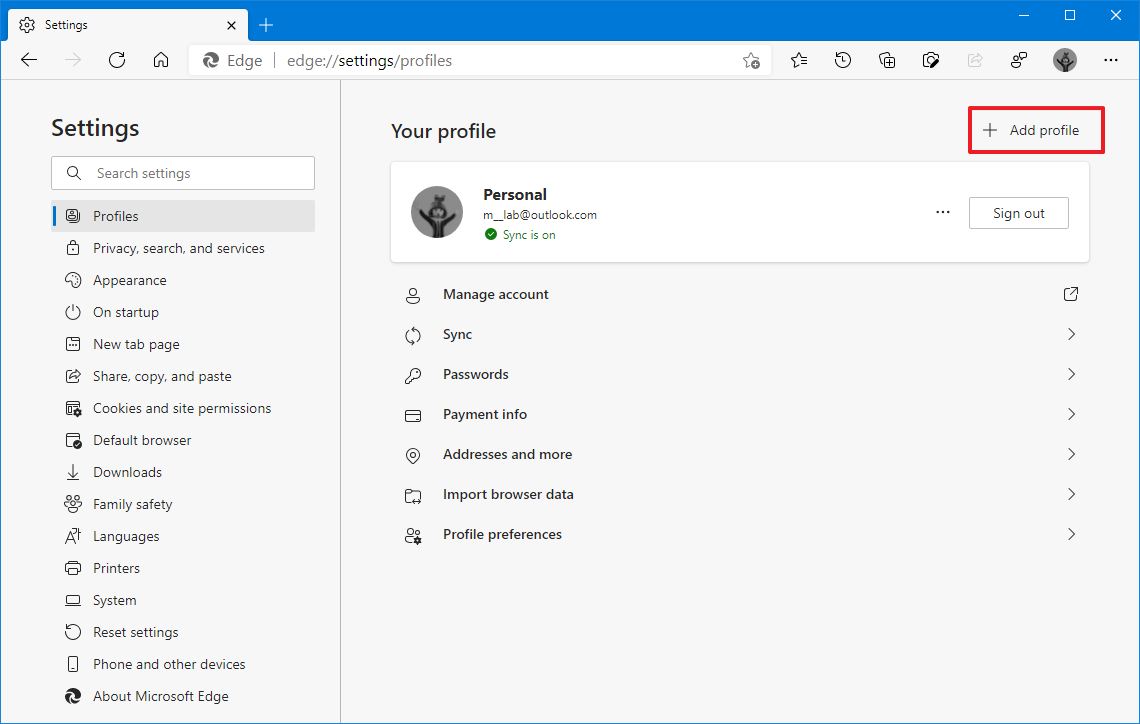
- Click on Profiles.
-
Click the Add profile button from the top-right corner.
- Click the Add button.
-
(Optional) Click the Sign in to sync data button.
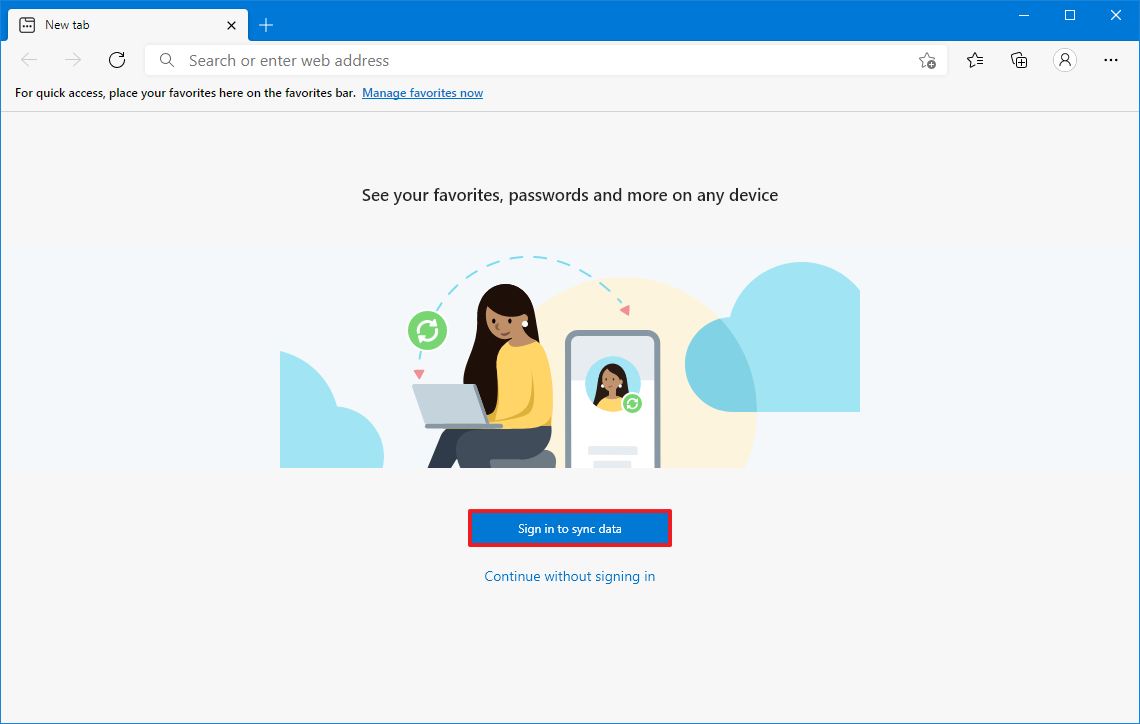
Quick tip: If you do not want to sync your settings, click the Continue without signing in in option. You can always enable syncing from the profile settings page.
- Select your Microsoft account.
- Click the Continue button.
- Click the OK button.
-
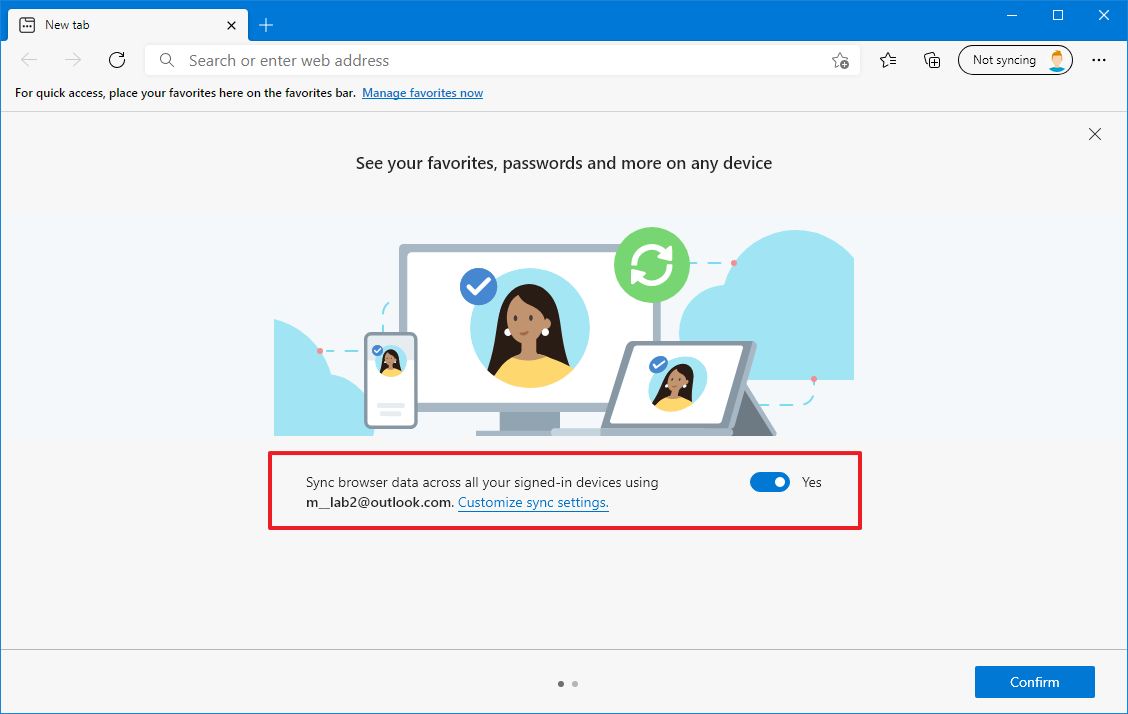
(Optional) Turn on the Sync browser data across all your signed-in devices toggle switch.
Quick tip: You can click the Customize sync settings to select the items you want to sync.
-
Click the Confirm button.
- (Optional) Turn on the option to allow Microsoft to collect browsing information toggle switch.
- Click the Confirm button.
Once you complete the steps, the new profile will be created and ready to use. You can also update the name and change the main picture to use as visual queues when switching between profiles. If you want to use even more profiles in the browser, you can also use the option available from the toolbar's profile menu.
Change profile name
To rename browser profile, use these steps:
- Open Microsoft Edge.
- Click the Settings and more (ellipsis) button and select the Settings option.
- Click on Profiles.
- Click the Switch button to choose the profile you want to update (if applicable).
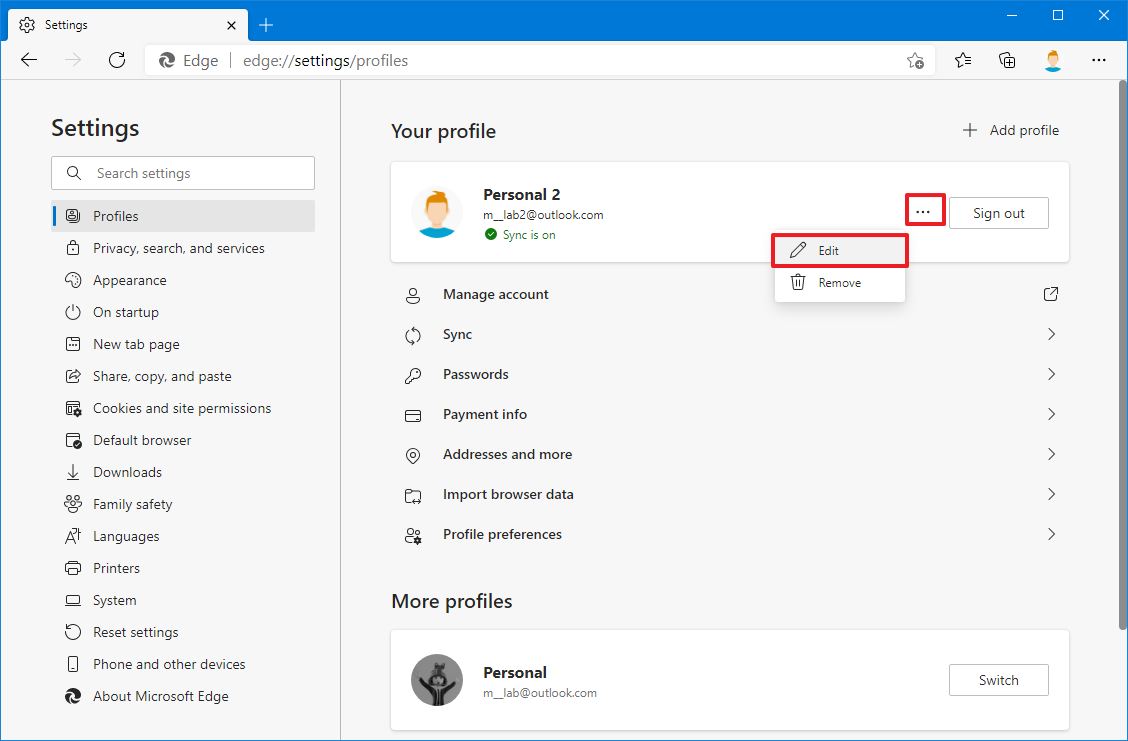
-
Click the More actions (ellipsis) button and click the Edit option.
-
Confirm the new name for the profile – for example, Work.
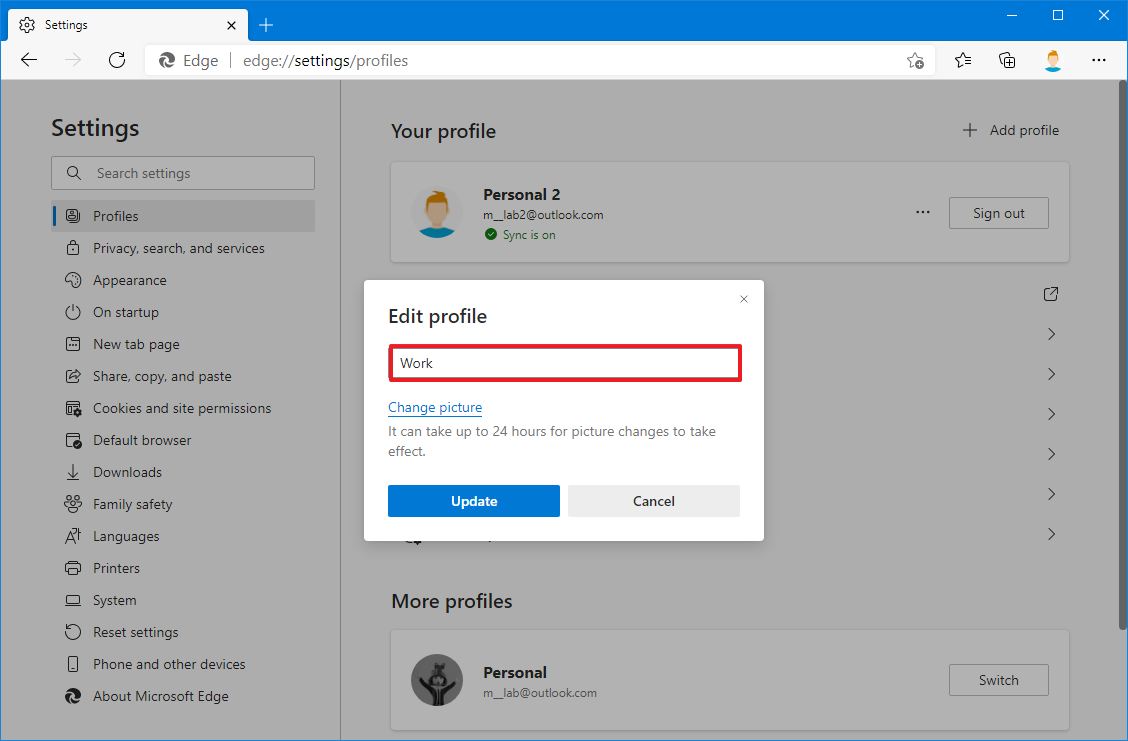
- Click the Update button.
After you complete the steps, the new name will be reflected on the profile.
Change profile picture
To change the browser profile picture, use these steps:
- Open Microsoft Edge.
- Click the Settings and more (ellipsis) button and select the Settings option.
- Click on Profiles.
- Click the Switch button to choose the profile you want to update (if applicable).
-
Click the More actions (ellipsis) button and click the Edit option.
- Click the Change picture option.
-
Click the New picture to select the image.

Quick tip: You can also click the Remove option to keep the profile without an image. If you are not using a Microsoft account, then you will be able select from one of the avialable pictures.
- Click the Open button.
Once you complete the steps, the new image will be applied to the browser profile.
Quick access to profile
After you create the profiles to separate your online activities from work or other stuff, you can quickly switch between them in at least three different ways.
Method 1
To switch profiles from the toolbar, use these steps:
- Open Microsoft Edge.
-
Click the Profile button from the top-right corner.
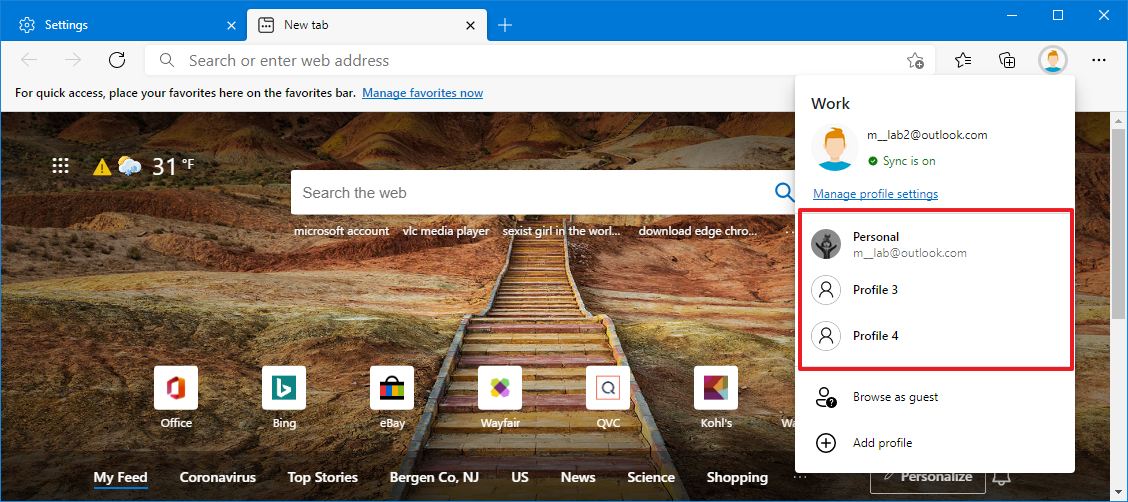
- Select the profile you want to use.
Method 2
To change profiles from the settings page, use these steps:
- Open Microsoft Edge.
- Click the Settings and more (ellipsis) button and select the Settings option.
- Click on Profiles.
-
Click the Switch button to choose the profile you want to use.

Method 3
To switch profiles from the taskbar, use these steps:
- Open Microsoft Edge.
- Switch to a different profile (see above steps).
-
Right-click the app button in the taskbar and select the Pin to taskbar option.
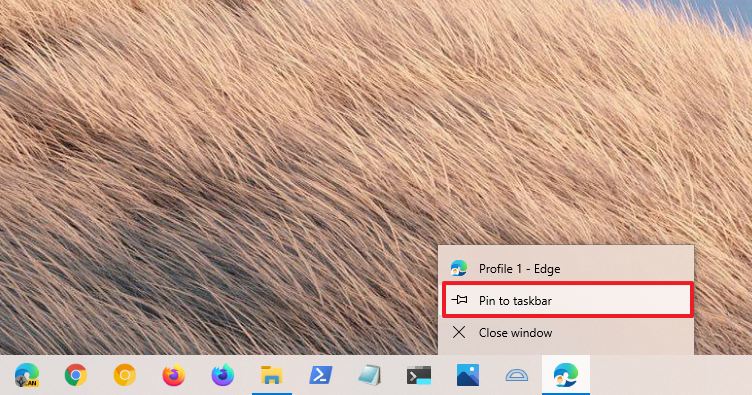
- Repeat steps No. 2 and 3 and pin all the profiles to the taskbar.
-
Click the button on the taskbar to access the profile you want.
Quick note: Use the badge in the app button to distinguish each profile. Hovering over the app button will also reveal the name of the profile.
Method 4
To enable automatic profile switching on Edge, use these steps:
- Open Microsoft Edge.
- Click the Settings and more (ellipsis) button and select the Settings option.
- Click on Profiles.
-
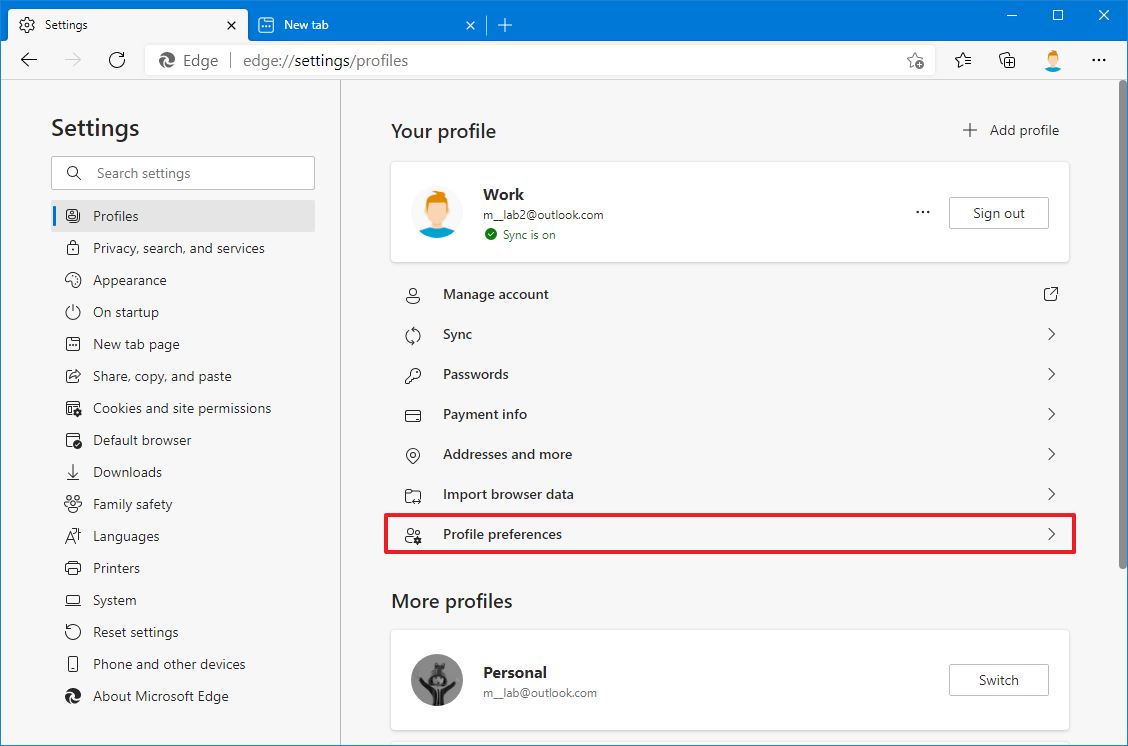
Under the "Your profile" section, click the Profile preferences option.
-
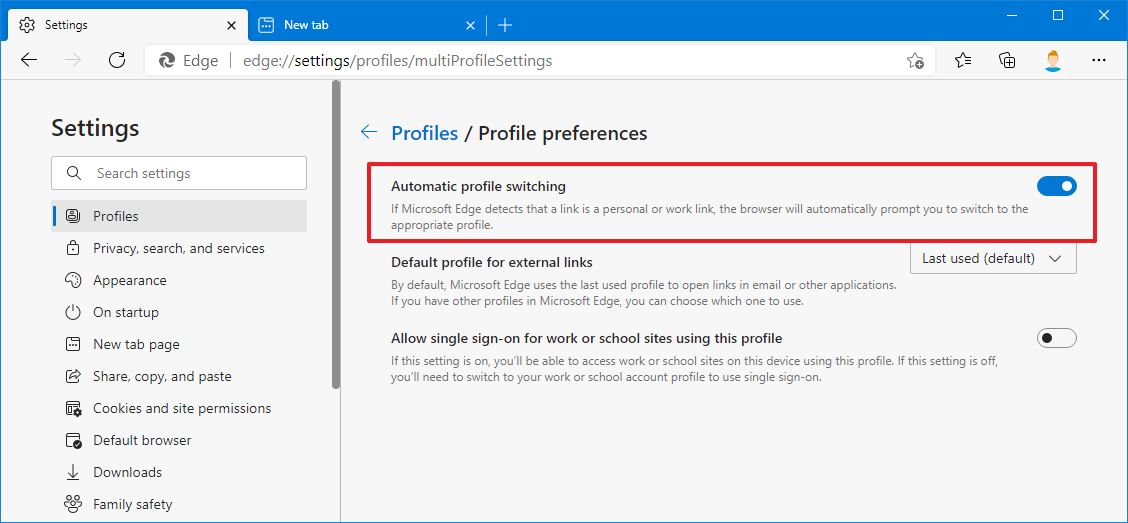
Turn on the Automatic profile switching option.
Once you complete the steps, you will understand the different ways you can quickly switch between profiles.
Delete profile
To delete a profile on Microsoft Edge, use these steps:
- Open Microsoft Edge.
- Click the Settings and more (ellipsis) button and select the Settings option.
- Click on Profiles.
- Click the Switch button to choose the profile you want to delete (if applicable).
-
Click the More actions (ellipsis) button and click the Remove option.

- Click the Remove profile button.
This will permanently delete browsing data like favorites, history, and passwords from this device. However, any data that was previously synced to your profile will remain associated with your Microsoft account.
2. Control your privacy on Microsoft Edge
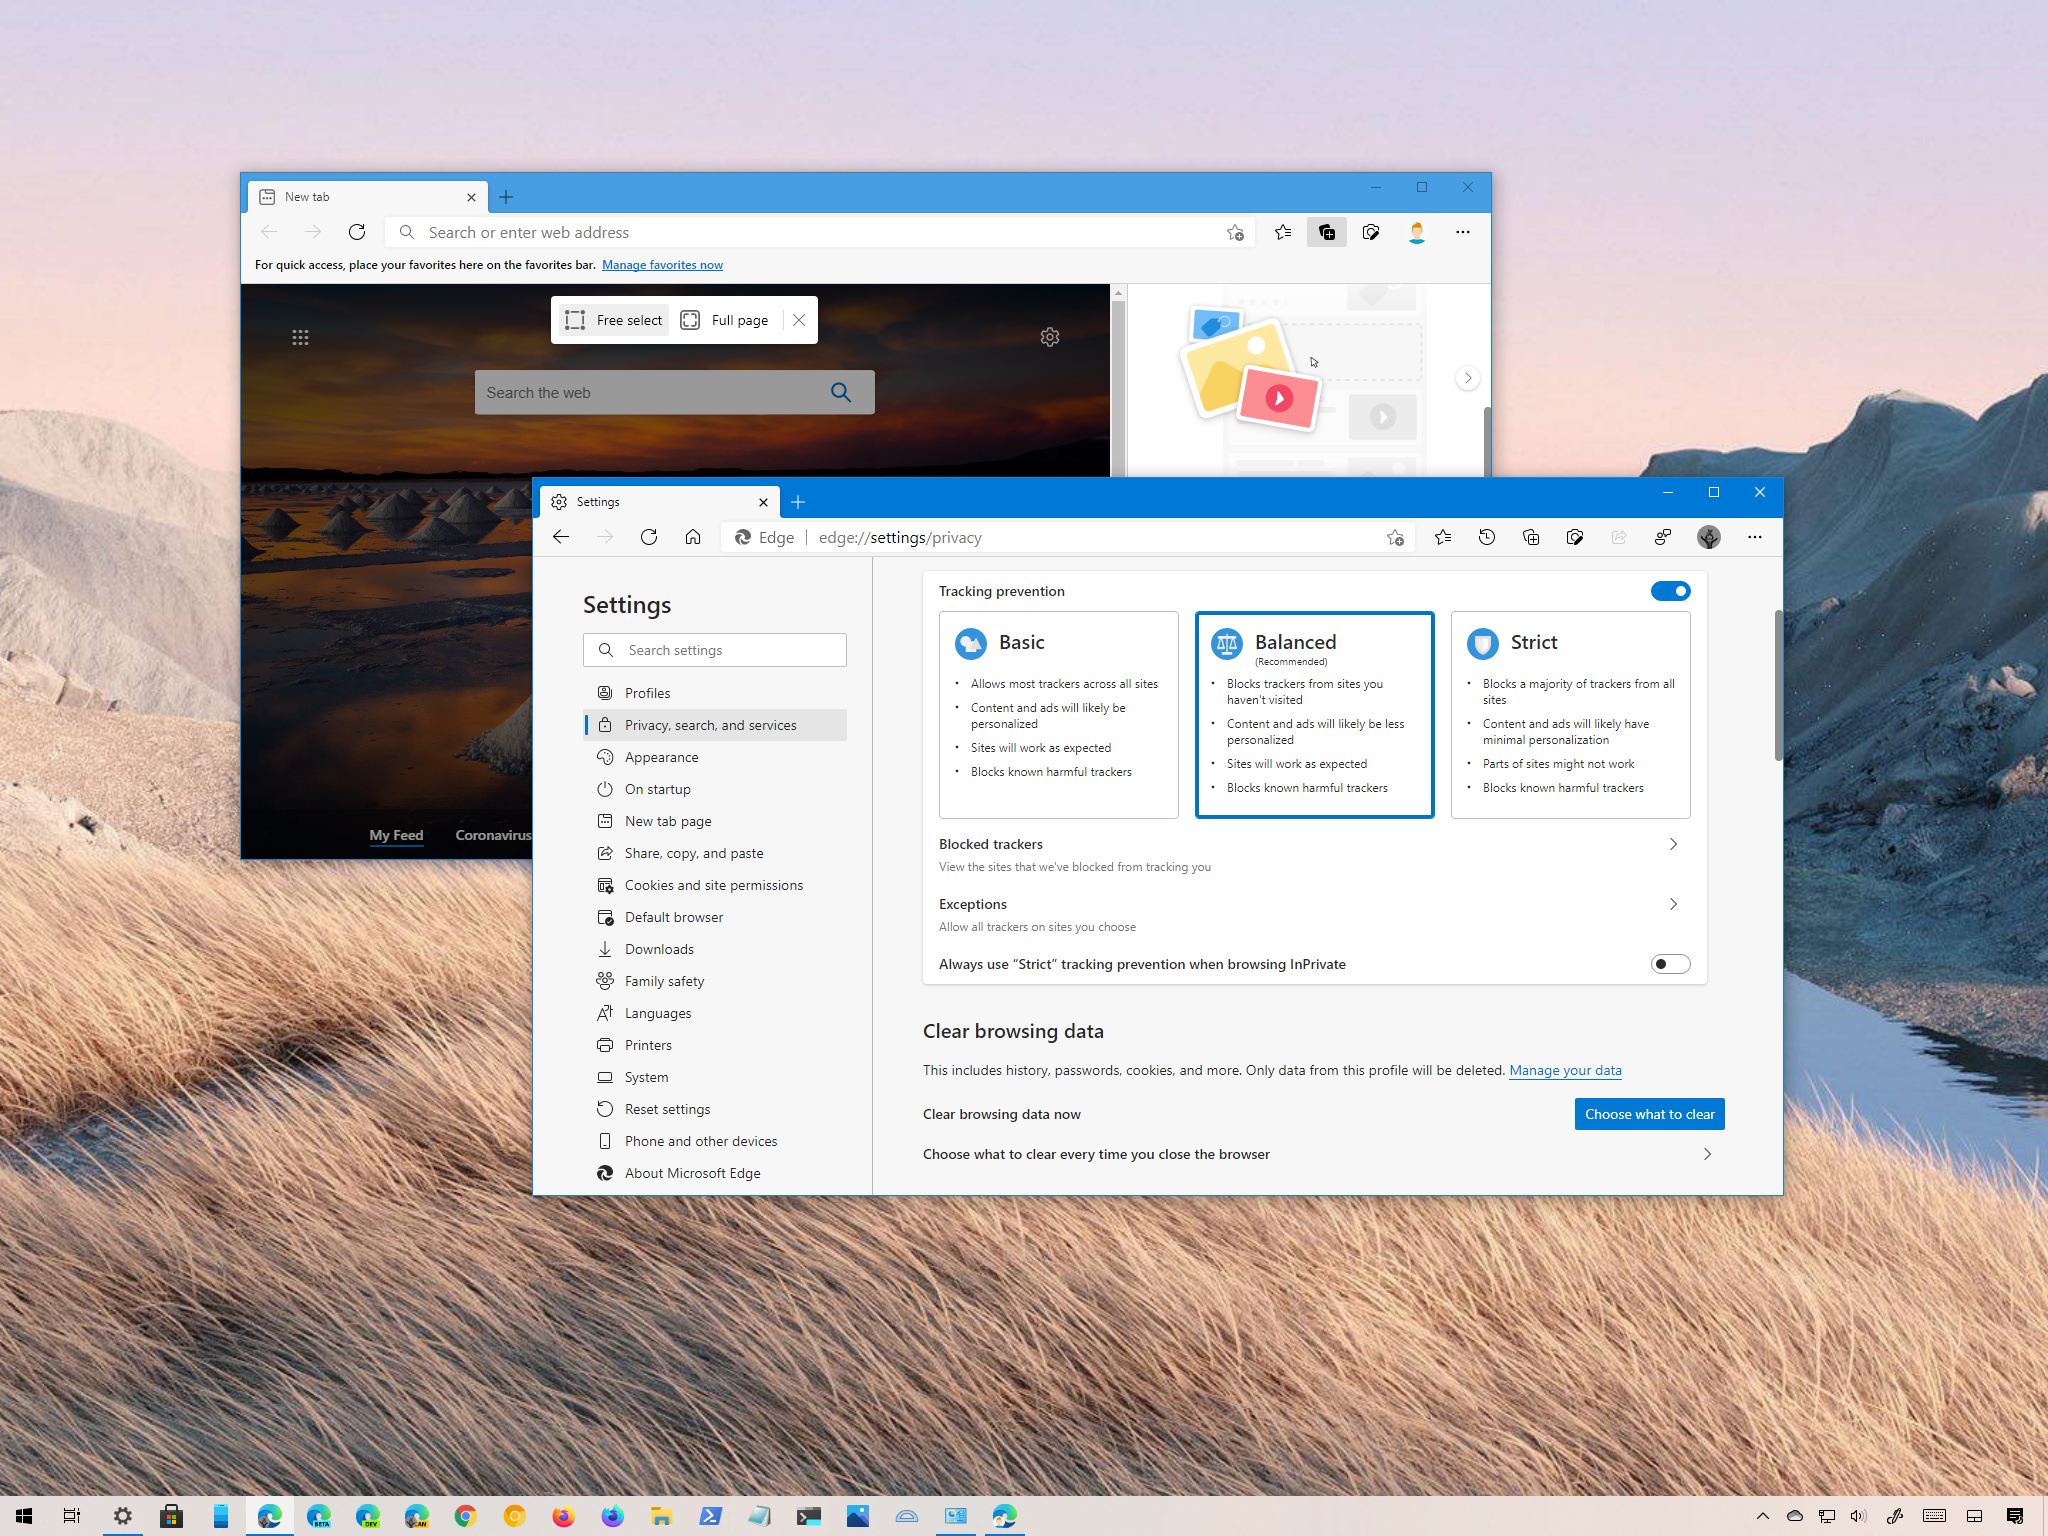
Tracking prevention is a feature designed to prevent online trackers (such as advertisers, social media, analytics, etc.) from collecting and tracking your online activities and other information to make your browsing experience a little more private and less personalized.
When you enable the feature, you can choose from three levels of privacy (basic, balanced, and strict), view blocked trackers, configured exceptions, and even use a stricter InPrivate session.
Enable tracking prevention
To enable tracking prevention on Microsoft Edge, use these steps:
- Open Microsoft Edge.
- Click the Settings and more (ellipsis) button and select the Settings option.
- Click on Privacy, search, and services.
-
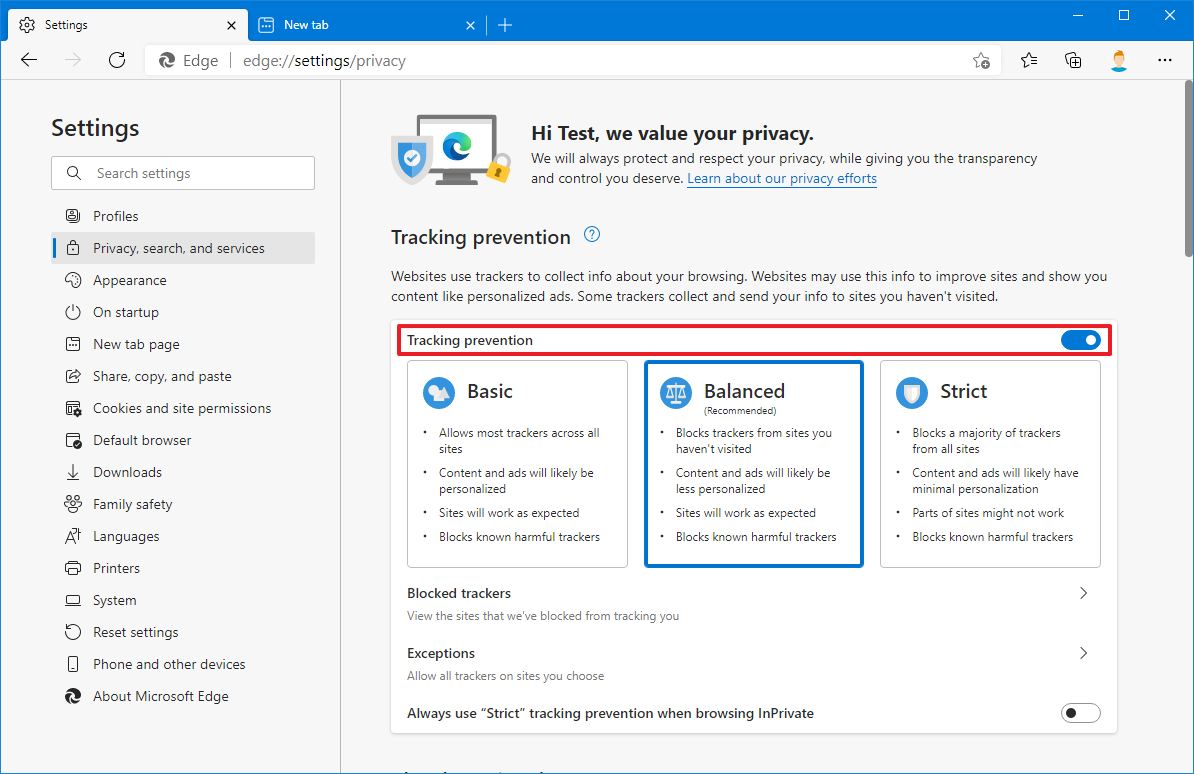
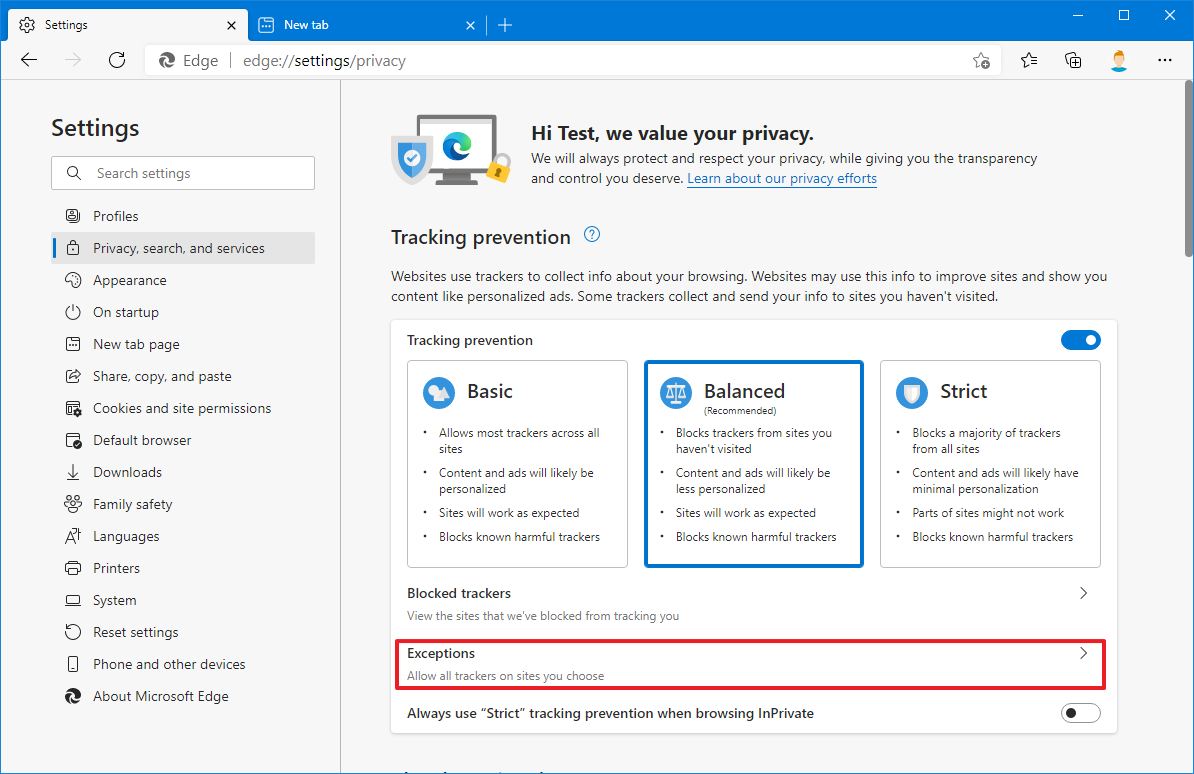
Turn on the Tracking prevention toggle switch to enable the feature.
-
Select the level of protection, including:
- Basic – allows most online trackers, content and ads will be personalized based on your behavior, sites will work as designed, and known harmful trackers will be blocked.
- Balanced (recommended) – blocks trackers from websites you have not opened, ads and content won't be as personalized, sites should work as expected, and known harmful trackers will be blocked.
- Strict – blocks most trackers, content, and ads will only have some personalization, parts of the website won't work, and harmful trackers will be blocked.
After you complete the steps, Microsoft Edge will try to block online trackers based on your configuration.
Configure tracking prevention
To configure the level of privacy you have on the web, use these steps:
- Open Microsoft Edge.
- Click the Settings and more (ellipsis) button and select the Settings option.
- Click on Privacy, search, and services.
-
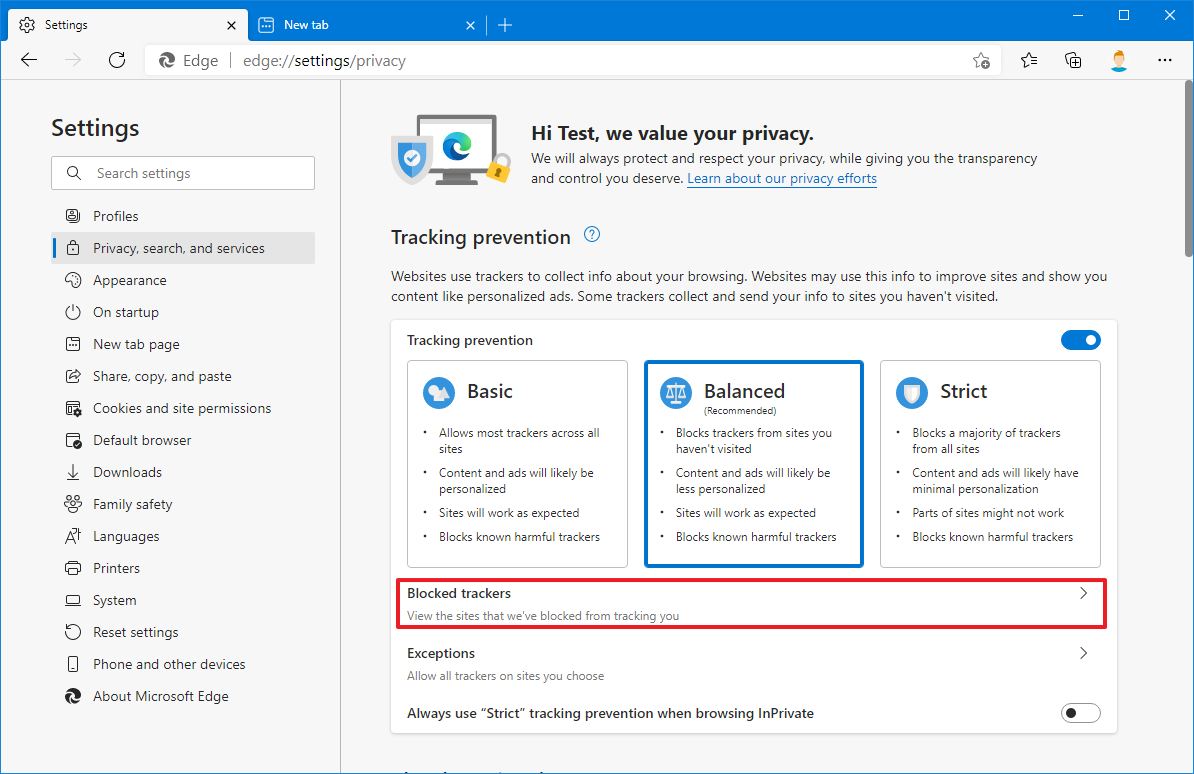
Under the "Tracking prevention" section, click the Blocked trackers option.
- Confirm the trackers that have been blocked.
-
(Optional) Click the Clear data button.
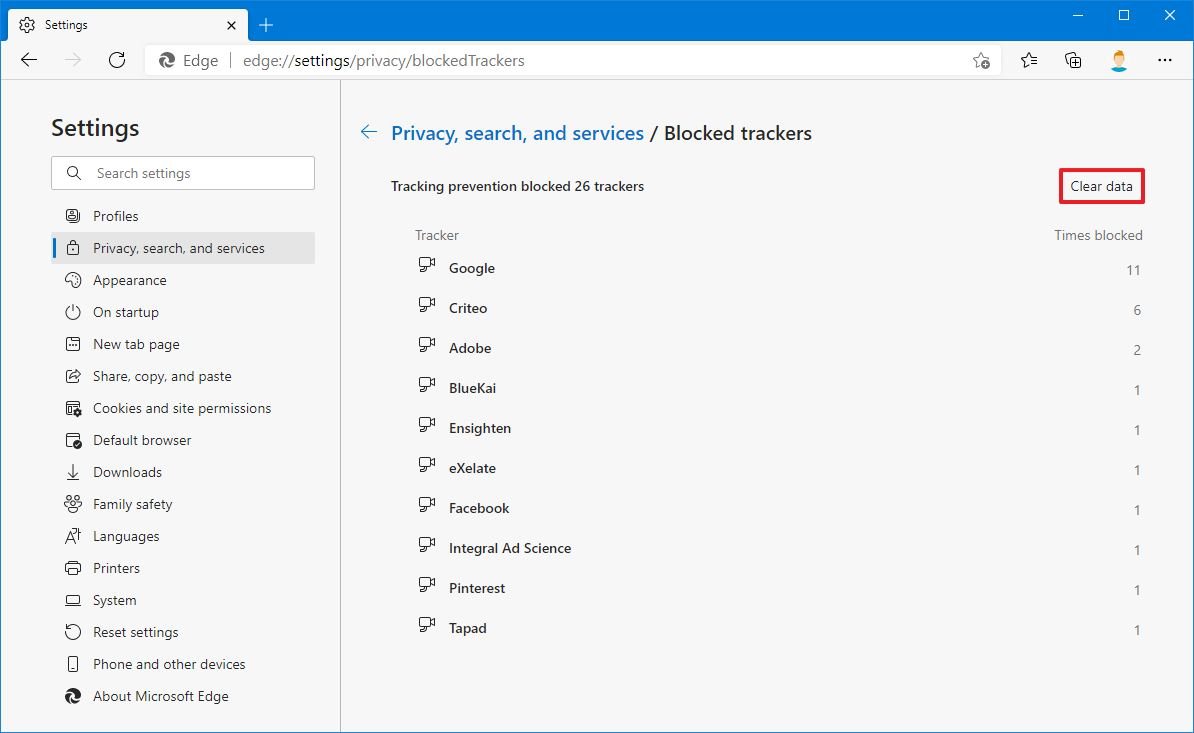
- Click the Clear button to remove all the tracking data from the profile.
-
(Optional) Click the Tracking prevention exceptions option.
- Click the Add a site button.
-
Specify the domain name of the site that you want to allow tracking.
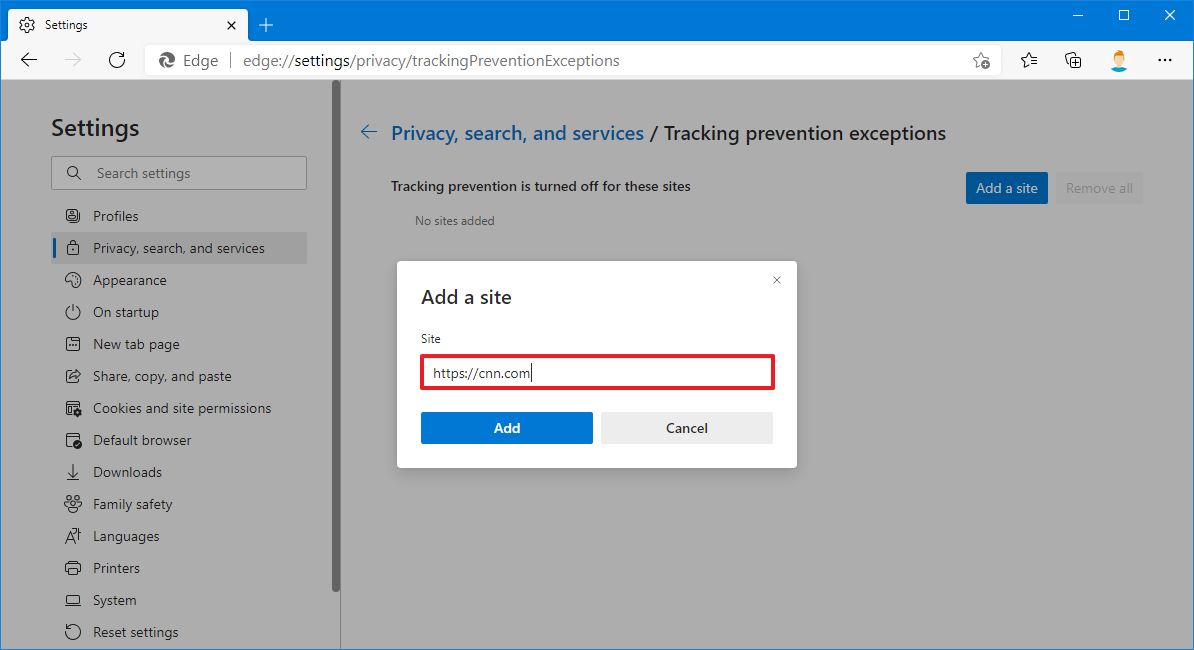
Quick note: Usually, you want to use this option when using the feature breaks parts of a site.
- (Optional) Click the Remove all button.
- Click the Remove all button again to all exceptions from the profile.
-
(Optional) Click the Always use "Strict" tracking prevention when browsing InPrivate toggle switch.
Quick note: If you are using the "Basic" or "Balanced" option, you can enable this option to improve your privacy while browsing with InPrivate mode.
After you complete the steps, you will better understand how to customize the tracking prevention feature on Microsoft Edge.
Disable tracking prevention
To disable tracking prevention on Microsoft Edge, use these steps:
- Open Microsoft Edge.
- Click the Settings and more (ellipsis) button and select the Settings option.
- Click on Privacy, search, and services.
-
Turn off the Tracking prevention toggle switch to disable the feature.
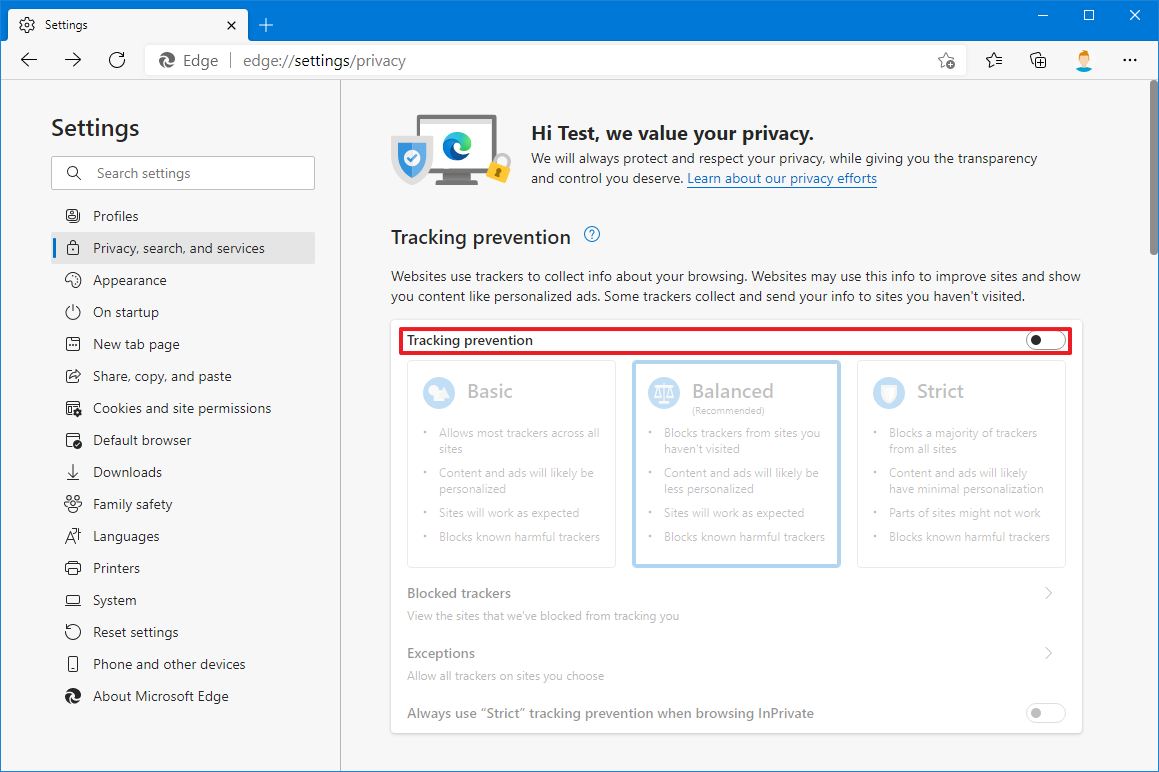
Although it might be recommended to use the feature, sometimes it may cause problems browsing specific sites, mostly shopping and services websites. Disabling the tracking protection may be the best option for particular situations.
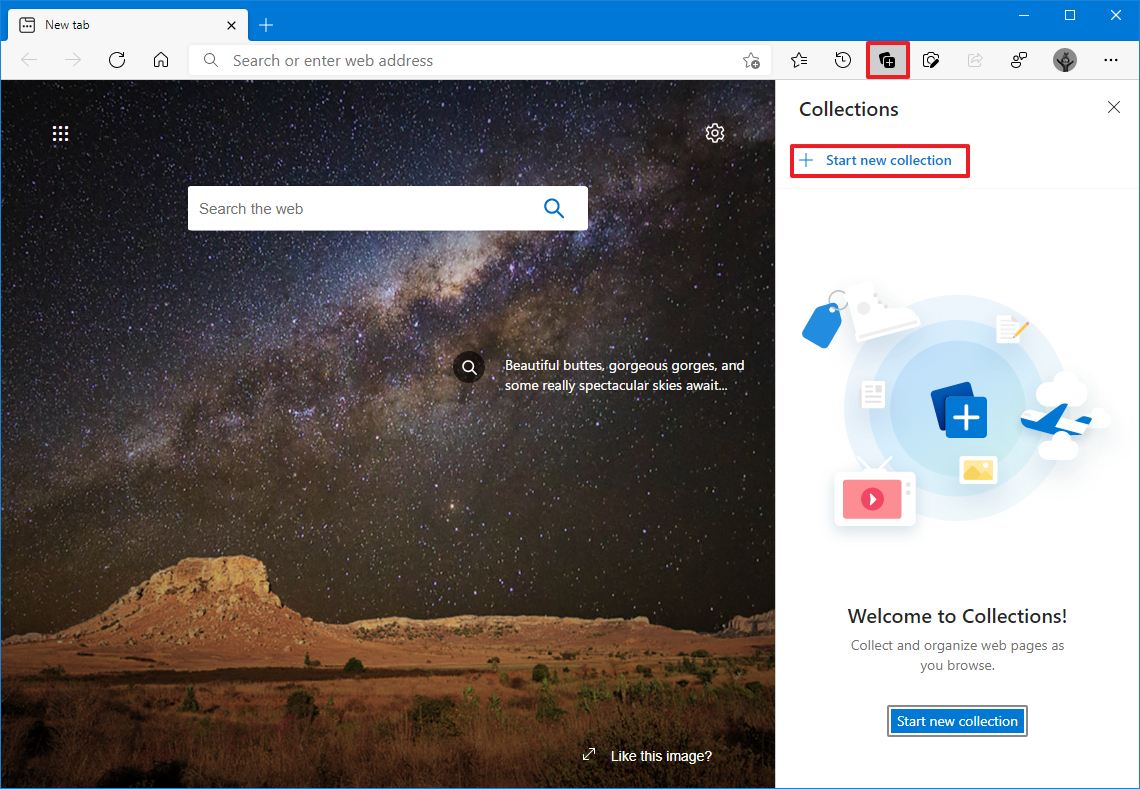
3. Collect stuff from the web on Microsoft Edge
Collections is another useful feature available on Microsoft Edge that allows you to collect any stuff from the web and organize them into lists. For instance, using the feature, you can create shopping lists and compare prices. You can collect ideas from the web to plan a trip or event. Or you can grab images, text, and links for lesson plans or research. It is up to your imagination what you can do with Collections.
Start new collection
To create a collection with Microsoft Edge, use these steps:
- Open Microsoft Edge.
-
Click the Collections button next from the toolbar.
Quick tip: You can enable or disable the button from Settings > Appearance page and click the Show Collections button toggle switch on or off.
-
Click the Start new collection button from the top.
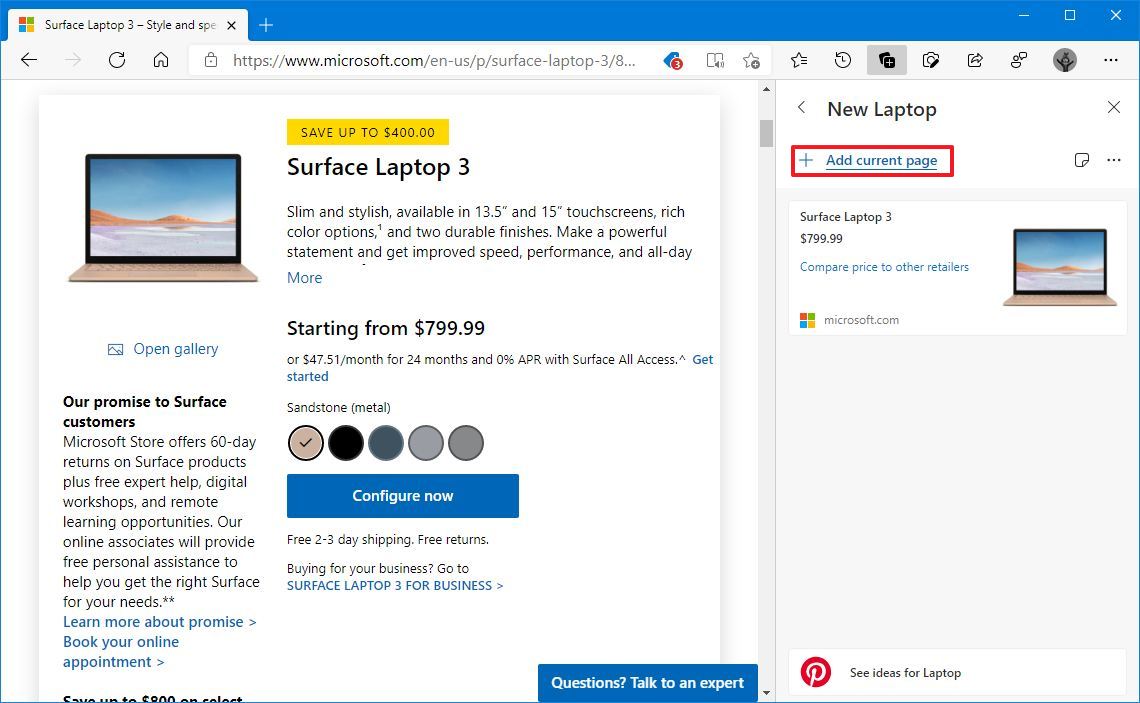
- Specify a name for the collection.
-
Click the Add current page button when you want to add a page to the collection.
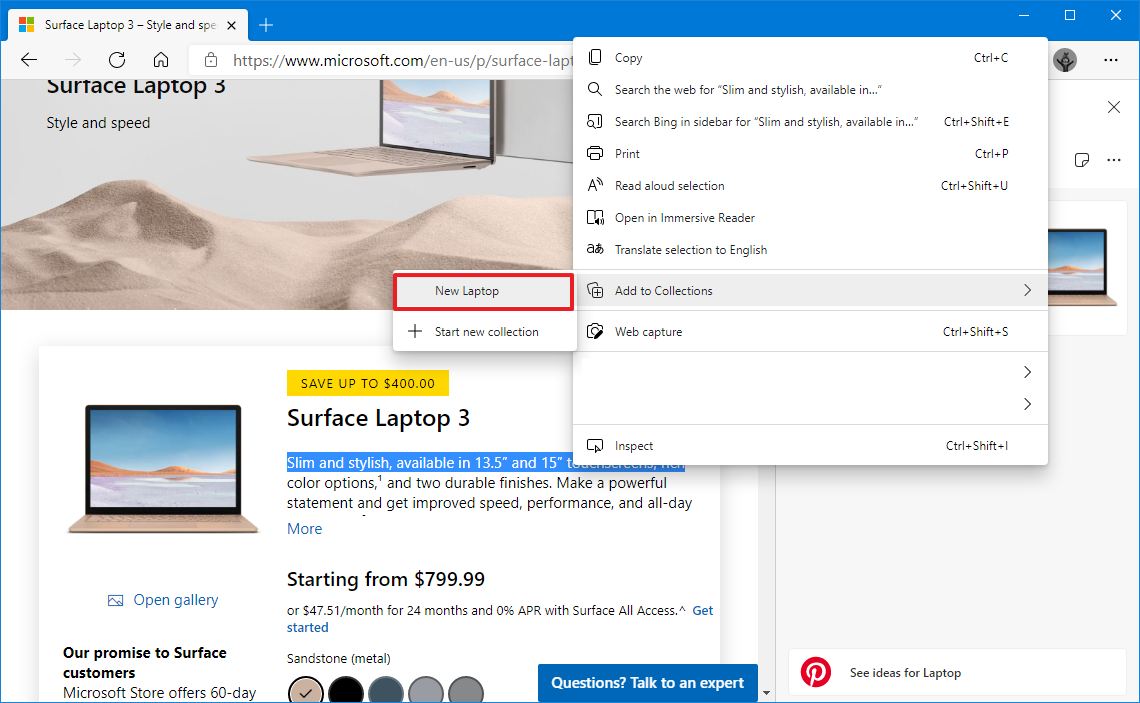
- (Optional) Right-click an image on the page, select the Add to Collections submenu and choose the collection to add the image.
-
(Optional) Select a portion of text on a page, right-click the selection, select the Add to Collections submenu, and choose the collection to save the text.
- Click the Add note from the top-right.
-
Compose a note for the collection as needed.
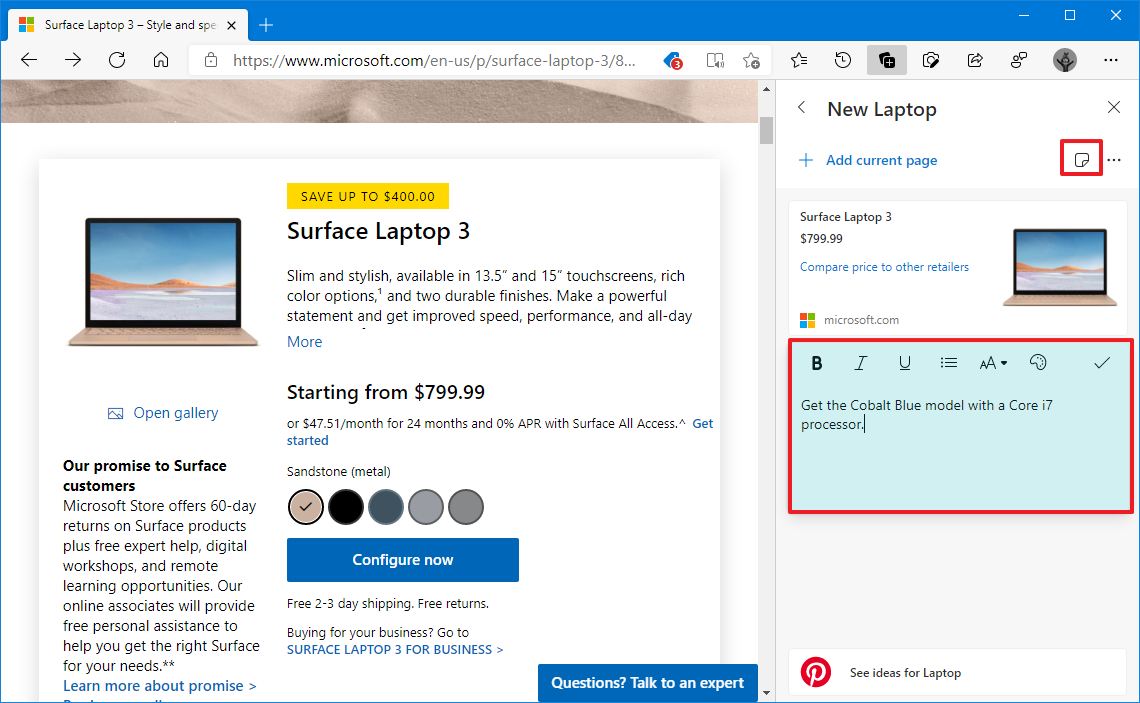
Quick tip: This feature is similar to Sticky Notes on Windows 10, which means you can change the color, create lists, and use styling.
-
Right-click an item to open the context menu with options to edit, copy, delete, and more.
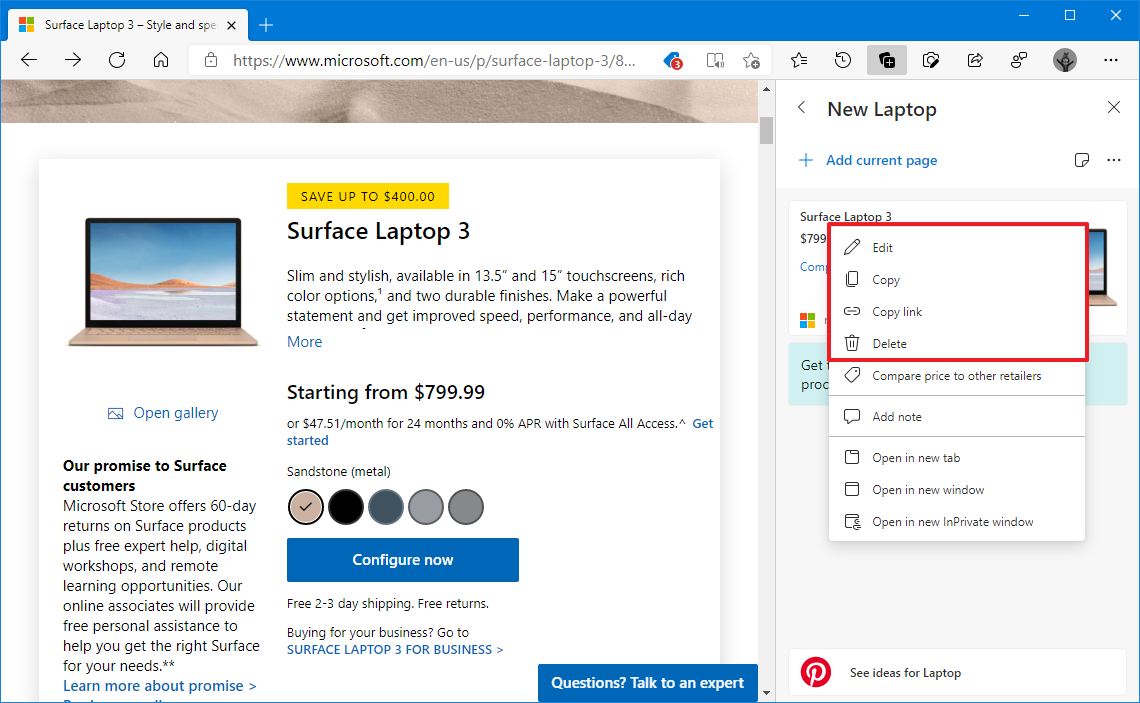
Once you complete the steps, the collection will be created. If you have sync enabled, you can pick up where you left off on other devices, even on your phone.
Add Pinterest suggestions
When using Collections, you can also get Pinterest suggestions, but it is a feature that you must enable manually.
To get Pinterest suggestions for Collections, use these steps:
- Open Microsoft Edge.
- Click the Settings and more (ellipsis) button and select the Settings option.
- Click on Privacy, search, and services.
-
Under the "Services" section, turn on the Show suggestions from Pinterest in Collections toggle switch.
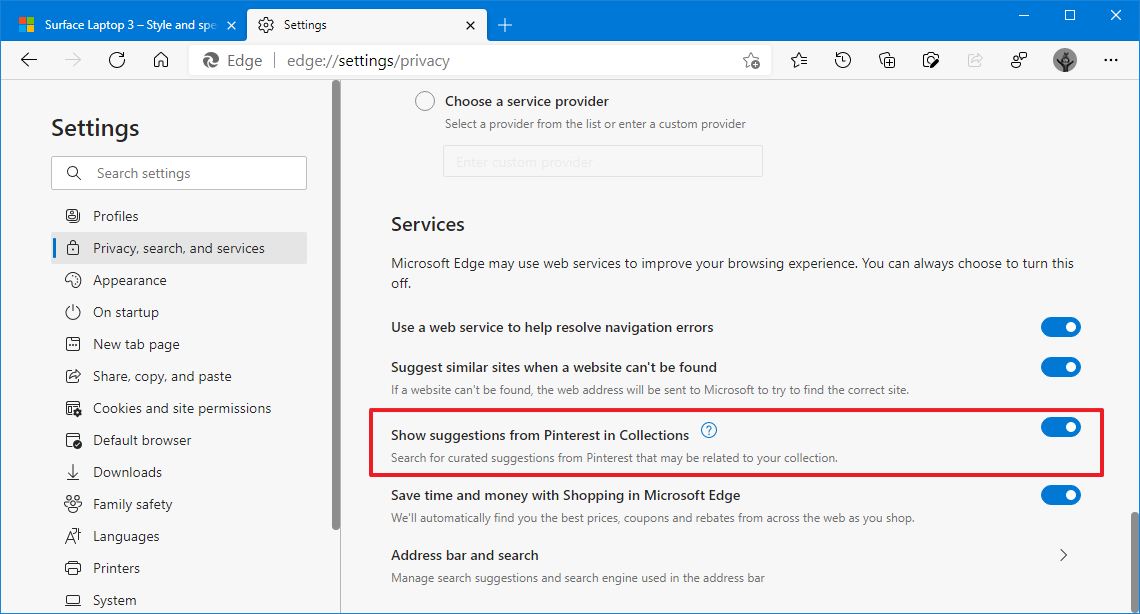
After you complete the steps while using Collections, you may receive related suggestions from Pinterest to add to your list.
Compare prices online and save with coupons
Collections on Microsoft Edge is more than just a feature to collect stuff from the web. It can also help you shop online and save money with the ability to compare and show the lowest price for products you add to a list.
To compare prices with Collections, use these steps:
- Open Microsoft Edge.
- Click the Collections button next from the toolbar.
-
Click the Start new collection button from the top.
- Specify a name for the group.
- Open an online store with the product you wish to purchase.
-
Click the Add current page button.
- Repeat steps No. 5 and 6 to add other products of interest.
-
Click the Compare price to other retailers option in the item (if available).
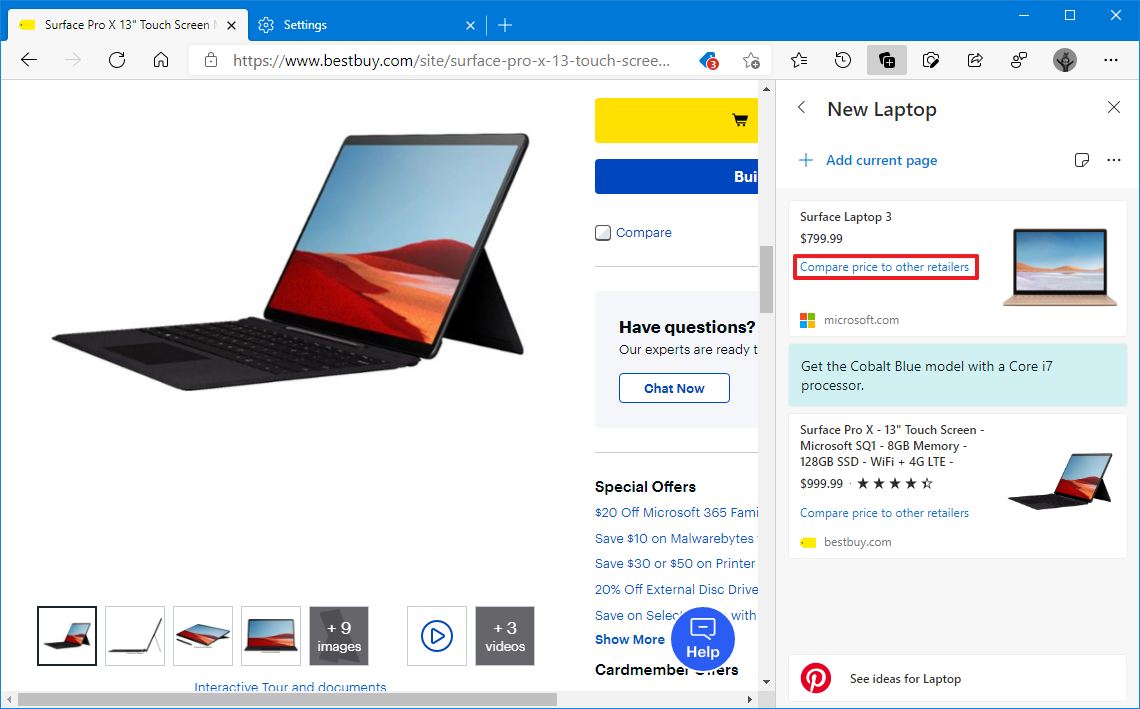
- (Optional) Click the Show more sellers option.
-
Choose the online retailers with the lowest price. (Or click the Add result to collection button.)

- Click the item to open the page.
- Continue with your purchase.
Once you complete the steps, you will be able to see the website that can potentially save you money when purchasing a specific product.
4. Save money when shopping online on Microsoft Edge
Alongside Collections, Microsoft Edge can also help you save money when you shop online with relevant coupons and discount codes.
The shopping feature works automatically (when using Bing as the default search engine), and if enabled, you will receive an alert when an offer is available.
To save money when shopping with Microsoft Edge, use these steps:
- Open Microsoft Edge.
- Open the product web page.
- If an offer is available, you will see a blue price tag icon on the right side of the address bar.
- Click the price tag icon.
-
If there is a better price elsewhere, you will see a list of retailers with different prices.
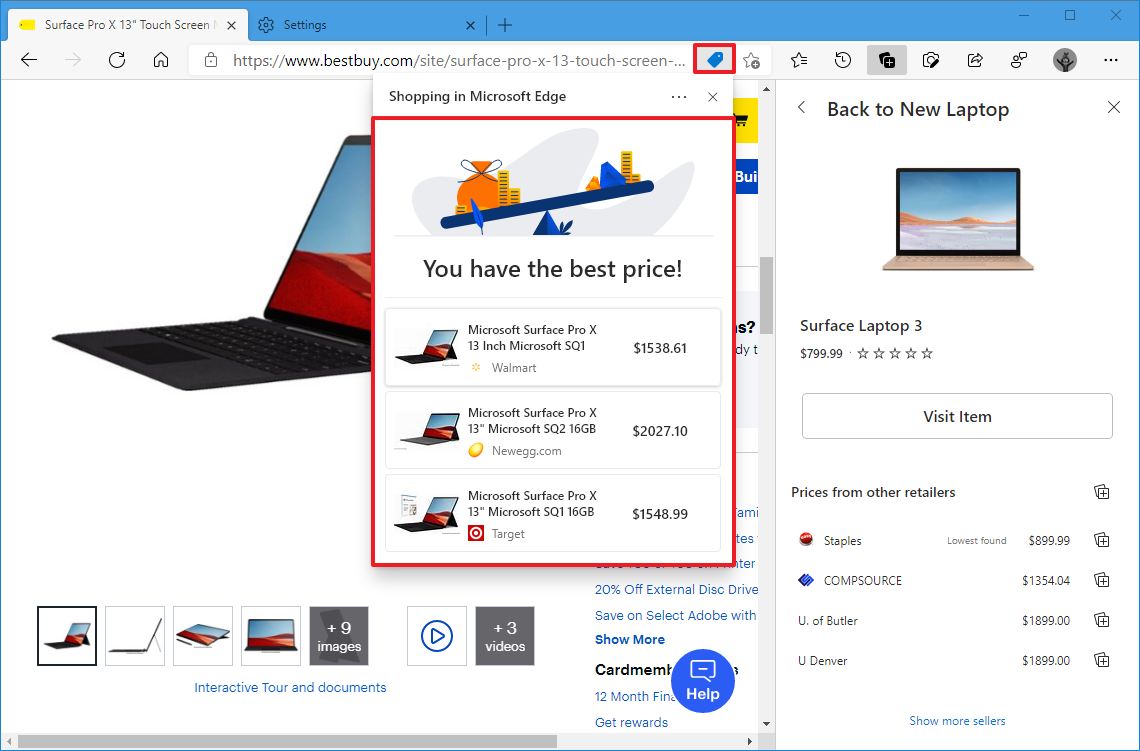
Quick note: You can also the See more retailers button to view more offers in search results by Bing.
-
If there are only coupons available, hover over the deal, and click the Copy code button.
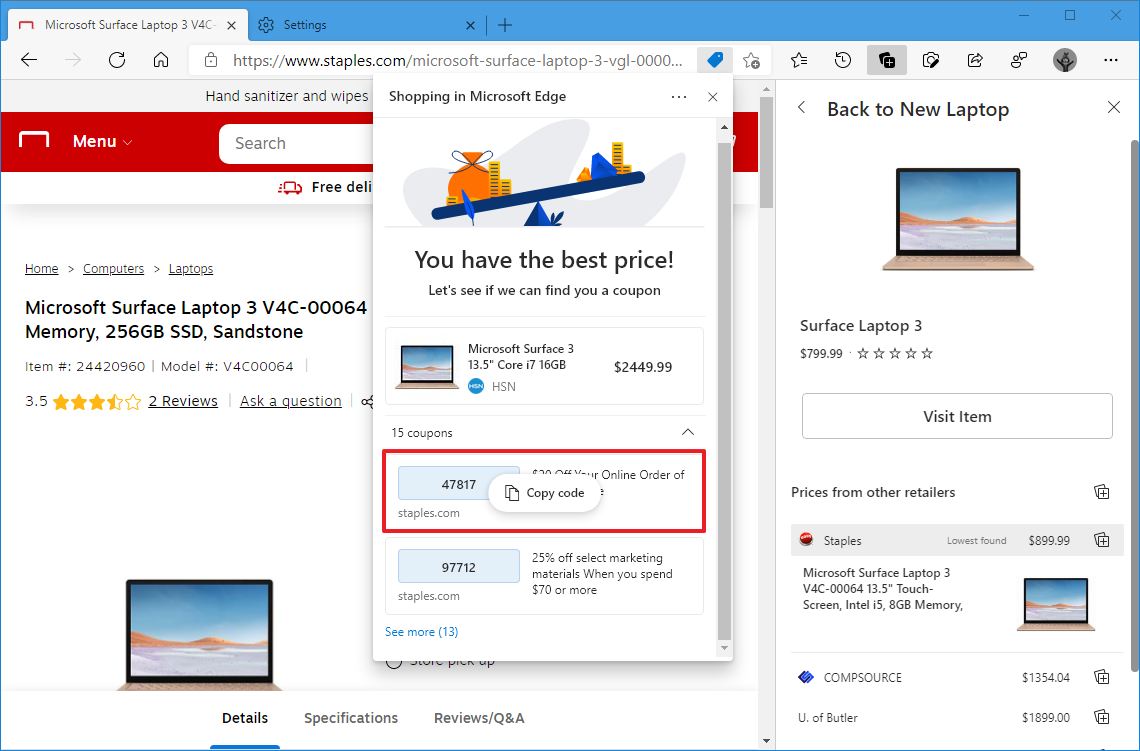
- (Optional) Click the See more option to view the rest of the offers.
After you complete the steps, you can add the item to the card, and during the checkout process, you should be able to paste the code to save some money.
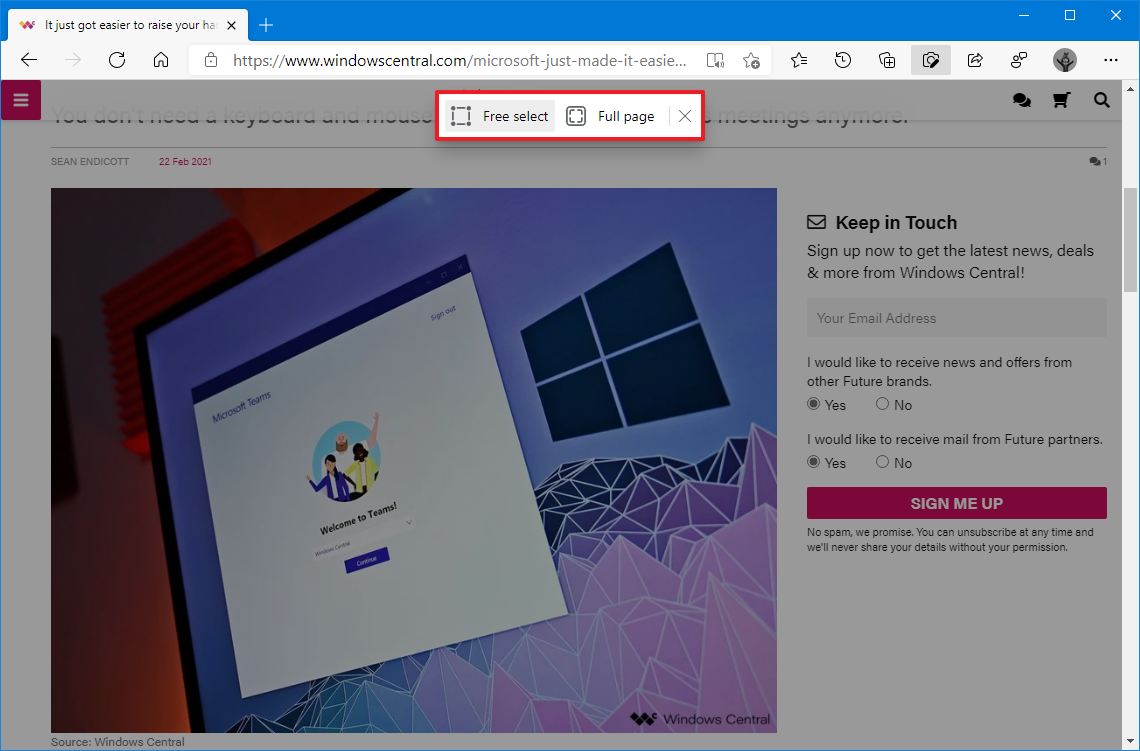
5. Take screenshots on Microsoft Edge
Microsoft Edge also includes a fully-featured screen capture tool that allows taking screenshots of pages without the need for third-party applications. The feature offers an option to capture part of the screen, or you can take a screenshot of the entire page without the need for scrolling, which can come in handy in many situations. For example, when you want to save a recipe, receipt, or any kind of information you want to keep for future reference or to share with other people.
To take screenshots on Microsoft Edge, use these steps:
- Open Microsoft Edge.
-
Click the Web capture button from the toolbar.
Quick tip: If the option is not available, you can enable it on Settings > Appearance, and under the "Customize toolbar" section, turn on the Show web capture button toggle switch.
-
Select the screen capture option:
- Free select – allows you to use the mouse to select the portion of the page you want to capture.
- Full page – takes a screenshot of the entire page without the need of scrolling.
-
If you use the Free select option, then as you select a region, a context menu with two options:
- Copy – saves the web capture in the clipboard, which you can paste in a document or email.
- Add notes – opens the web capture editor in the browser to edit the image.

- If you use the Full page option, then the screenshot will open with the web capture editor.
-
While in the web capture editor, use the Draw tool to annotate the capture with different colors and thicknesses.

- Select the Erase button to remove drawing strokes.
- Click the Copy button from the top-right to copy the screenshot to the clipboard.
- Click the Save button to save the screenshot as an image file.
Once you complete the steps, you can save the web capture as image file, which you can then share or attach to a presentation.
6. Create strong passwords on Microsoft Edge
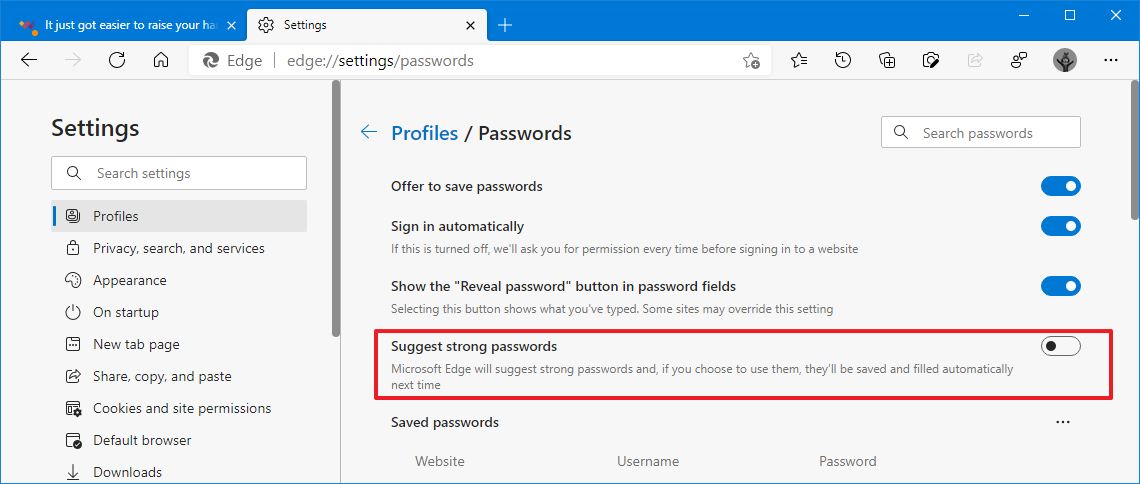
On Windows 10, the default web browser also includes a password generator that can suggest strong passwords when setting up an online account for an online service or when you have to update an account. If you choose to use the sugestion, the browser will save and sync the information across your devices.
Enable password generator
To enable the password generator on Microsoft Edge, use these steps:
- Open Microsoft Edge.
- Click the Settings and more (ellipsis) button and select the Settings option.
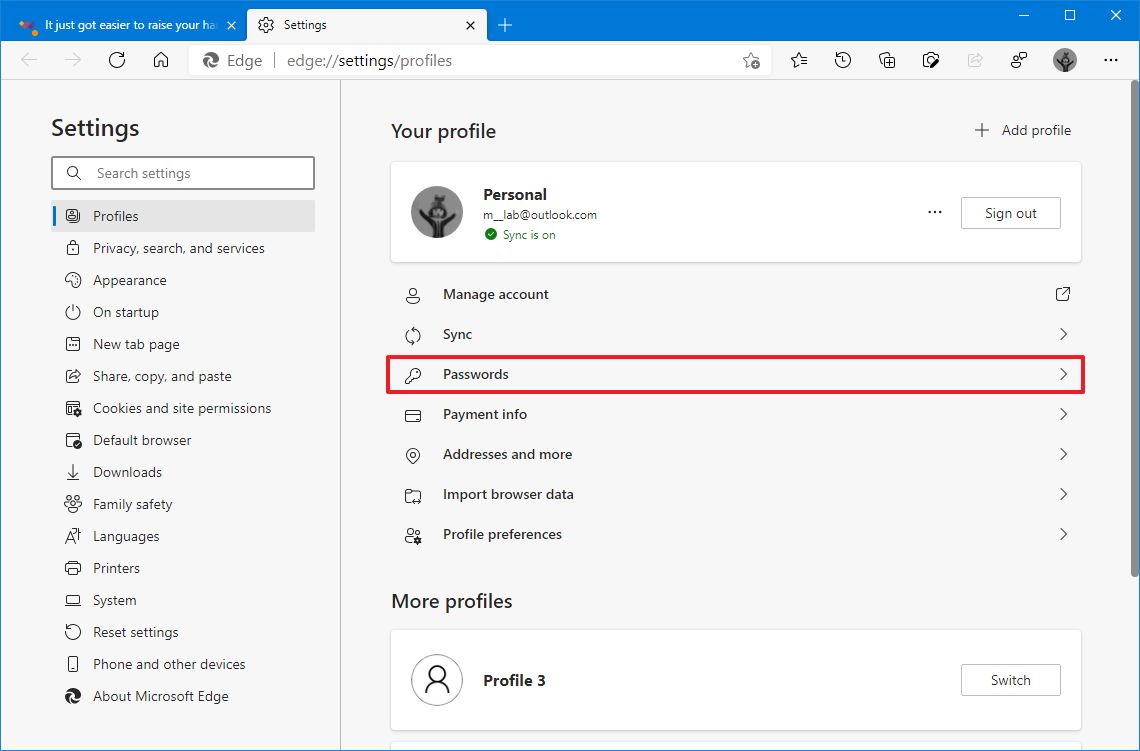
- Click on Profiles.
-
Under the "Profiles" section, click the Passwords option.
-
Turn on Suggest strong passwords toggle switch.
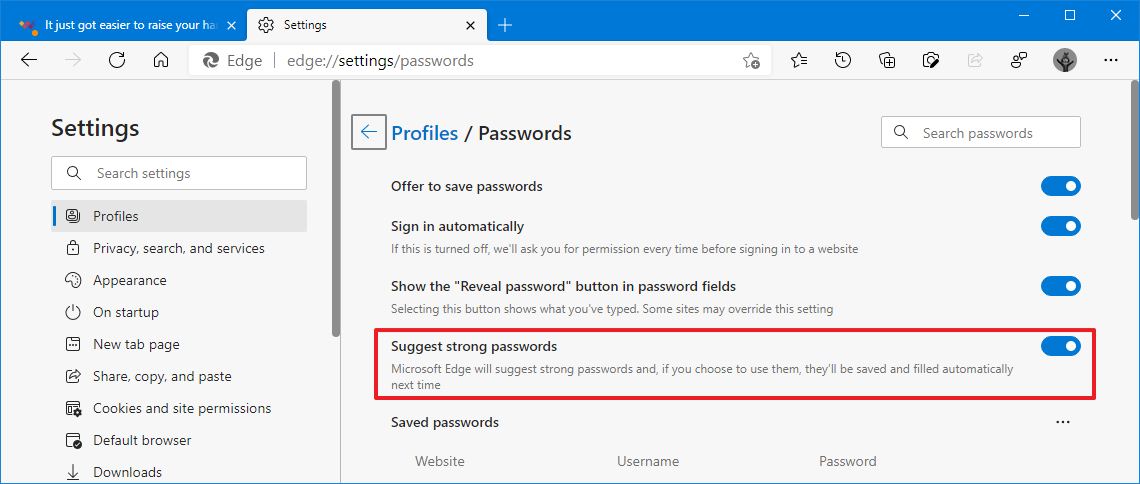
After you complete the steps, the next time you create an account for an online service, Microsoft Edge will suggest a strong password to keep it safe.
Disable password generator
To disable the password generator, use these steps:
- Open Microsoft Edge.
- Click the Settings and more (ellipsis) button and select the Settings option.
- Click on Profiles.
-
Under the "Profiles" section, click the Passwords option.
-
Turn off Suggest strong passwords toggle switch.
After you complete the steps, the default browser on Windows 10 will no longer suggest passwords.
7. Read websites without clutter on Microsoft Edge
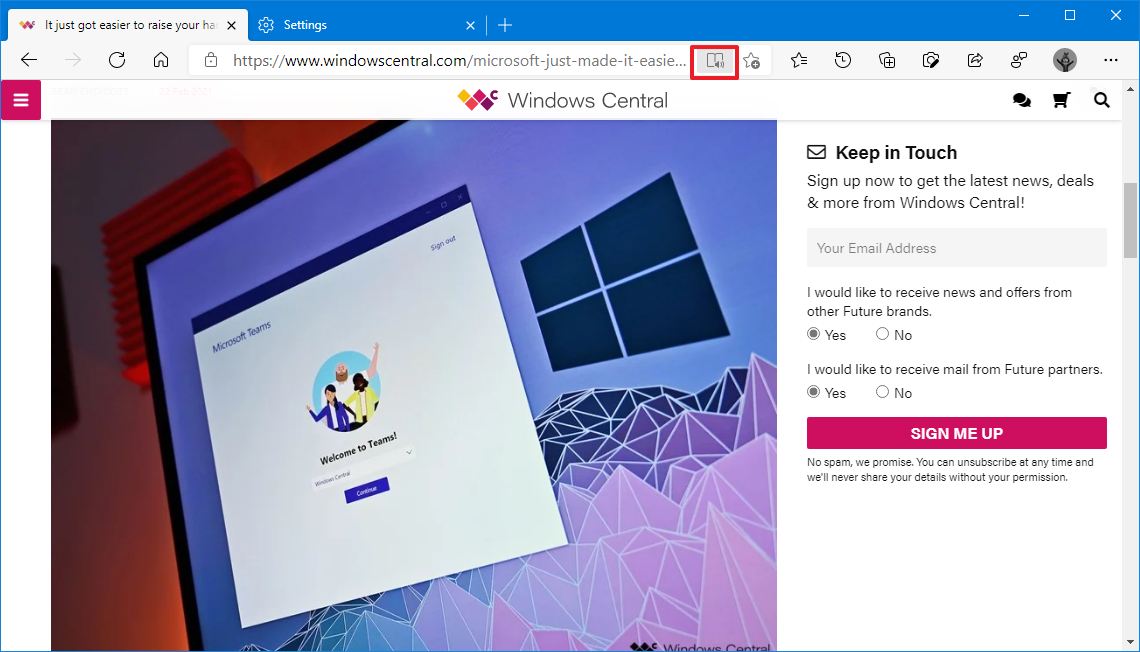
When reading an interesting article, sometimes it is difficult to focus on the story because of all the visual elements, advertisements, and links around the content. Immersive reader is a feature that removes the clutter with one click, allowing you to focus on the content.
In addition, the feature includes tools to help you improve the reading experience, including line focus, picture dictionary, grammar tools, text preferences, and read aloud.
Enable immersive reader
To enable immersive reader, use these steps:
- Open Microsoft Edge.
- Open the web page you want to read.
-
Click the Enter Immersive Reader button at the end of the address bar.
Quick tip: You can also use the F9 key to toggle the view on or off.
Once you complete the steps, you can start reading online content without distractions.
Customize immersive reader view
To customize immersive reader, use these steps:
- Open Microsoft Edge.
- Open the web page you want to read.
- Click the Enter Immersive Reader button at the end of the address bar.
-
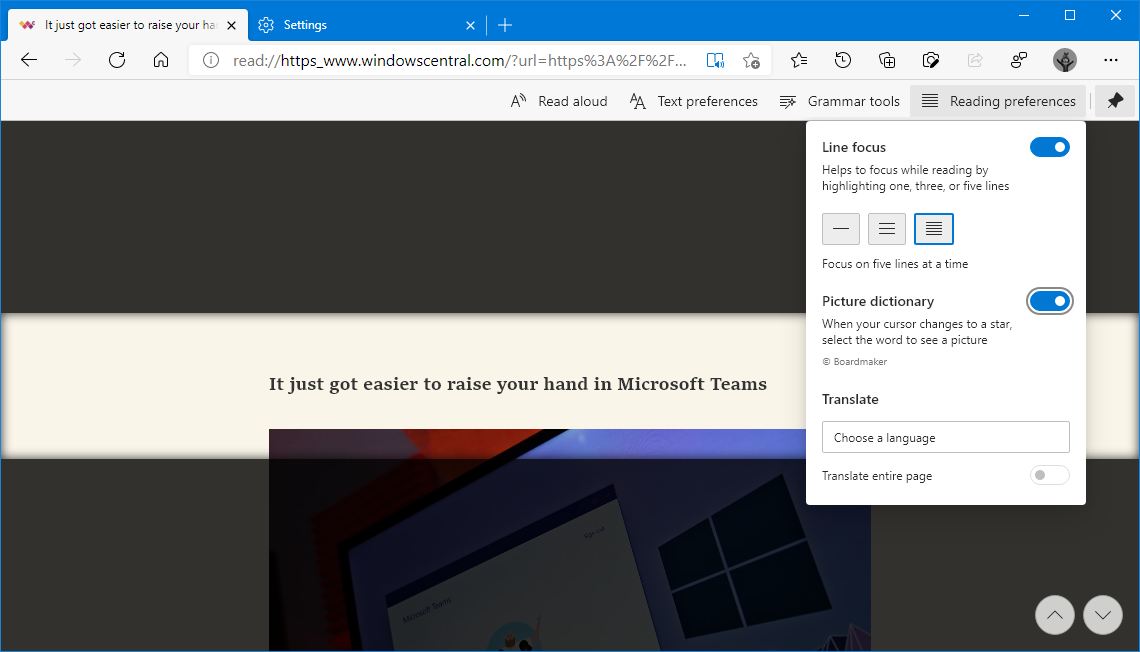
Click the Reading preferences menu.
-
Turn on the feature you want to use, including:
- Line focus – helps to focus reading by highlighting one or more lines at a time.
- Picture dictionary – allows you to select a word to see a picture description.
-
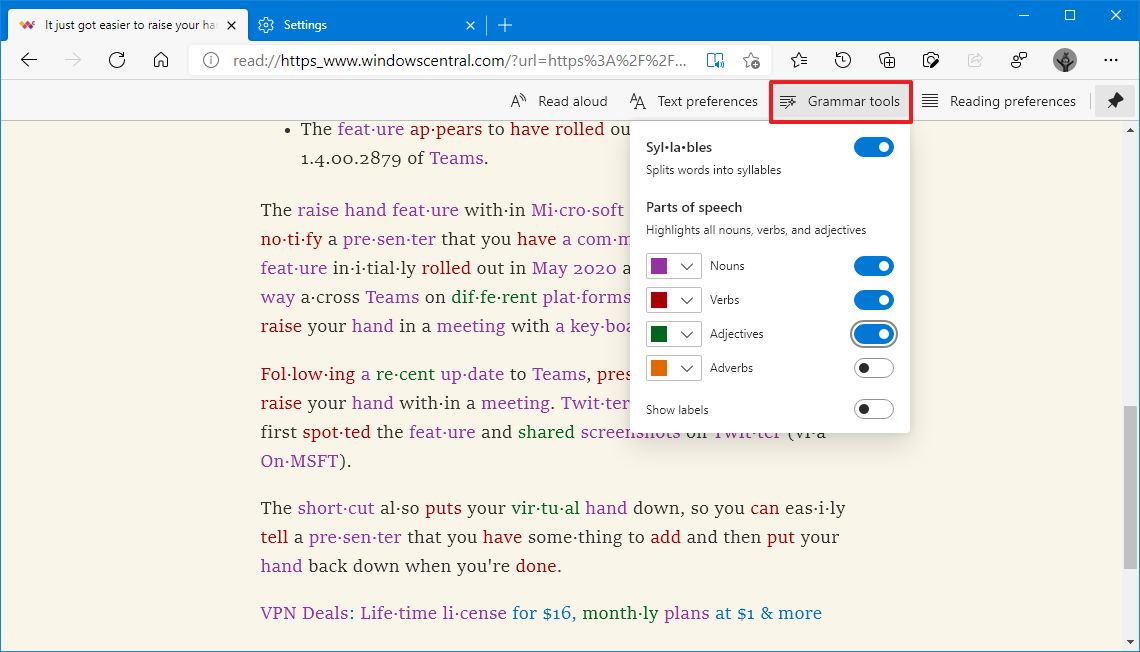
Click the Grammar tools menu.
-
Turn on the feature you want to use, including:
- Syl-la-bles – splits words into syllables.
- Parts of speech – highlights nouns, verbs, and adjectives on the page.
-
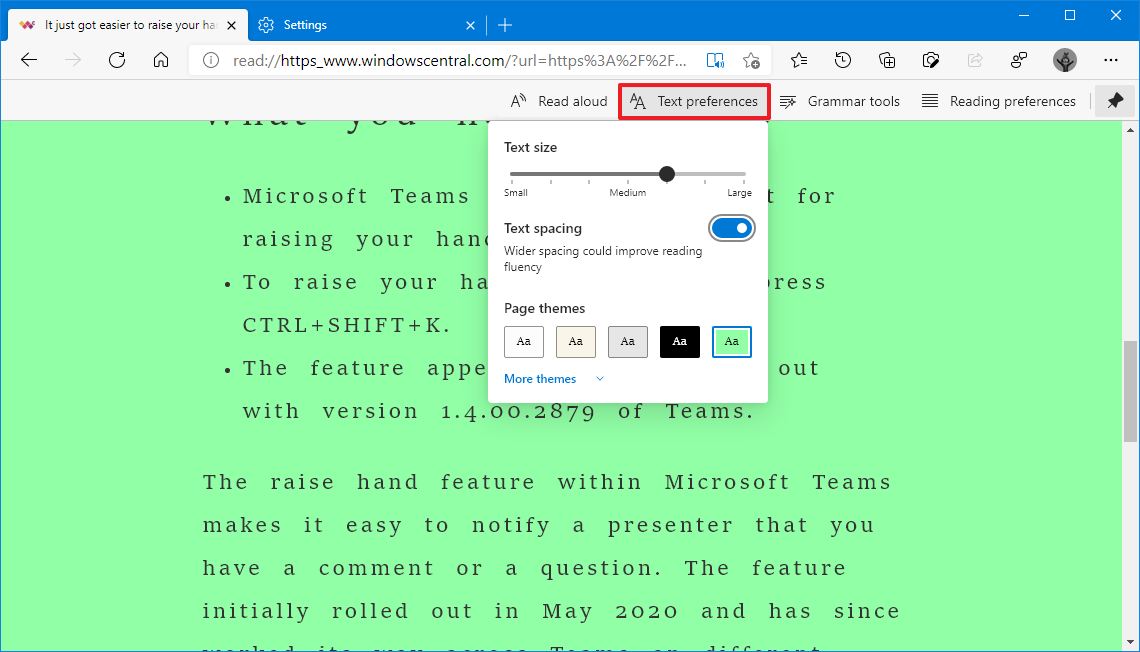
Click the Text preferences menu.
-
Customize the preference you want, including:
- Text size – makes text on the page smaller or larger.
- Text spacing – adds spacing to improve reading fluency.
- Page themes – allows you to change the background color of the experience.
-
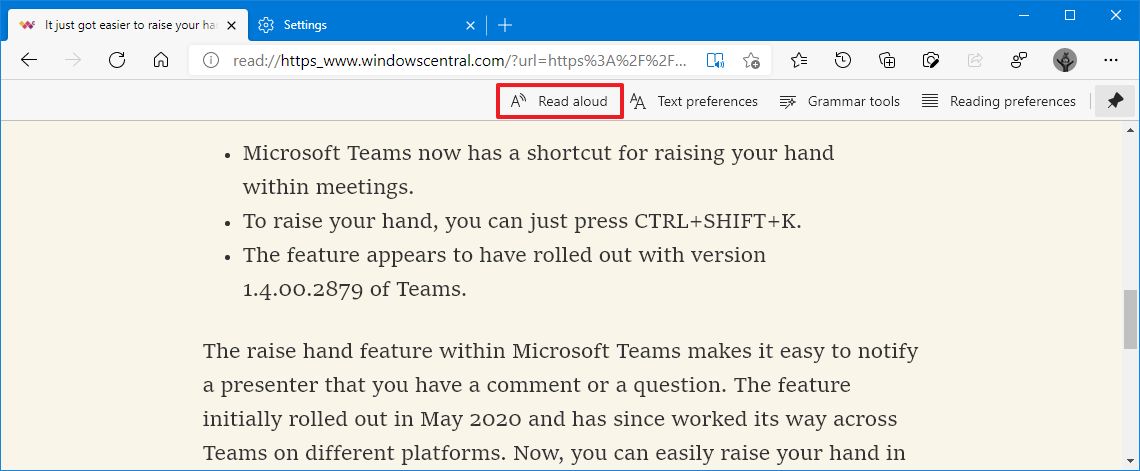
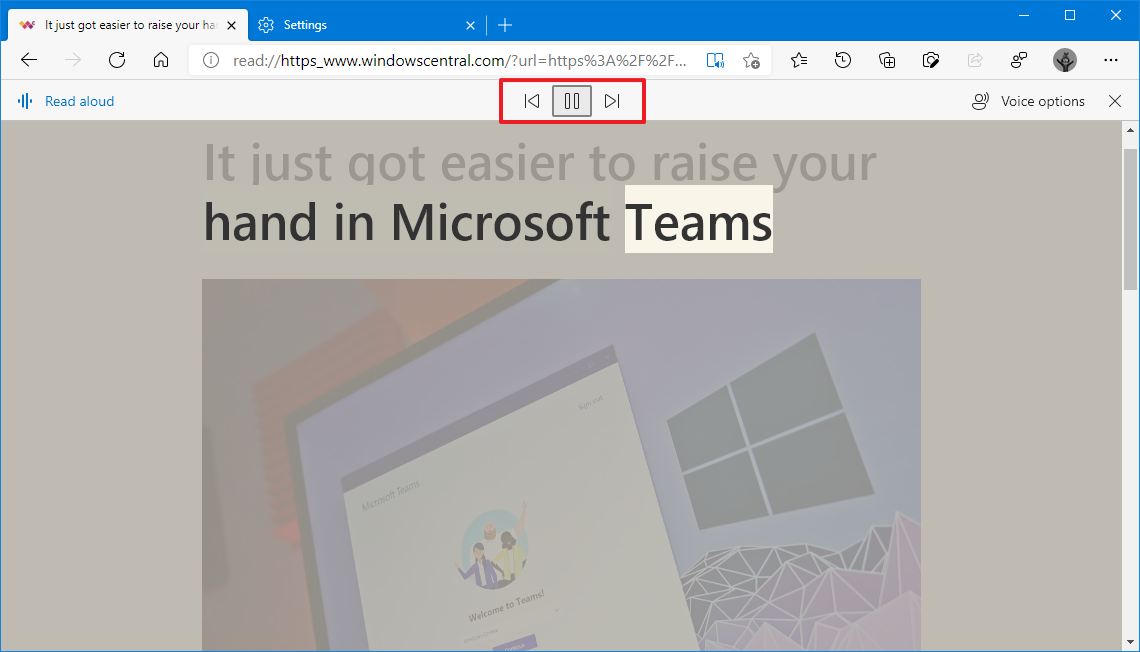
Click the Read aloud button.
-
Use the toolbar's controls to start or pause and jump to the previous or next paragraph.
After you complete the steps, you will have a better experience reading online content.
8. Optimize memory usage on Microsoft Edge
On Microsoft Edge, each site you open on a tab requires some system resources (for example, memory, processor, etc.). The more tabs you open, the more system resources will be needed, which can negatively affect the experience. Sleeping tabs is a feature designed to overcome this problem by putting inactive taps to sleep to reclaim resources to improve performance and preserve battery life. The next time you open the tab, the page will wake up automatically.
Enable sleeping tabs
To enable sleeping tabs on Microsoft Edge, use these steps:
- Open Microsoft Edge.
- Click the Settings and more (ellipsis) button and select the Settings option.
- Click on System.
-
Under the "Save resources" section, turn on the Save resources with sleeping tabs toggle switch.
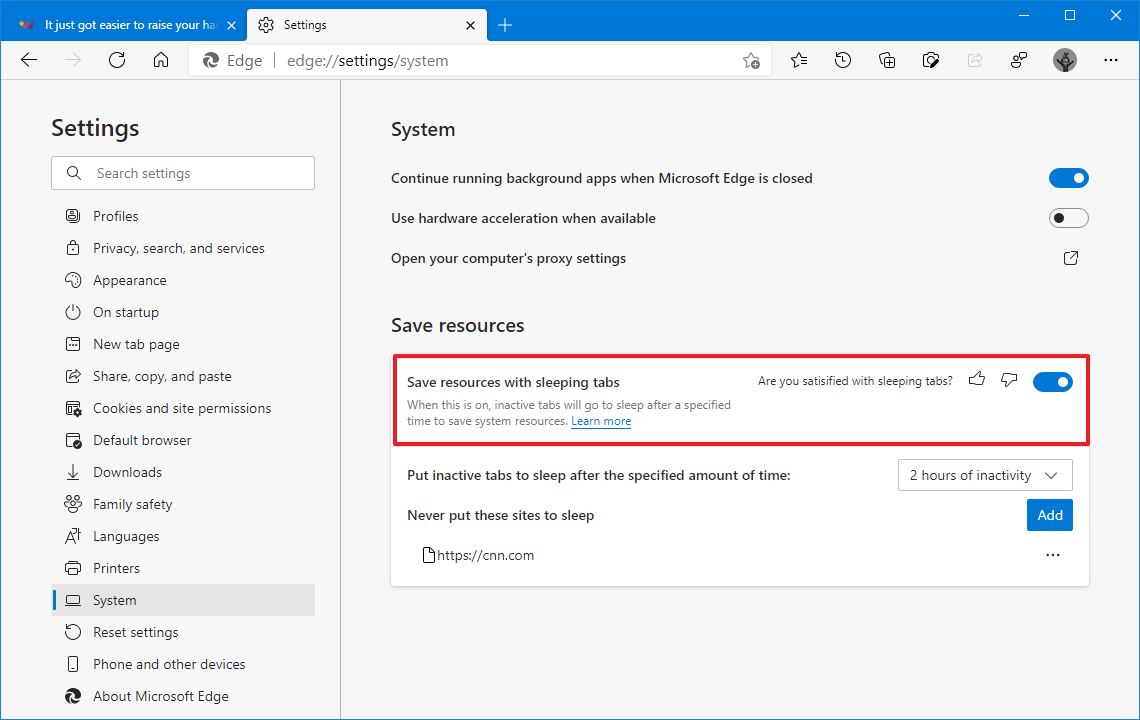
Once you complete the steps, tabs you do not interact with after two hours (default) will enter into the sleep mode to free up resources.
Change settings sleeping tabs
To determine when tabs should sleep or what sites should not use the feature, use these steps:
- Open Microsoft Edge.
- Click the Settings and more (ellipsis) button and select the Settings option.
- Click on System.
-
Under the "Save resources" section, use the available drop-down menu to determine when the browser should put to sleep inactive tabs. You can select as low as five minutes and as high as 12 hours.
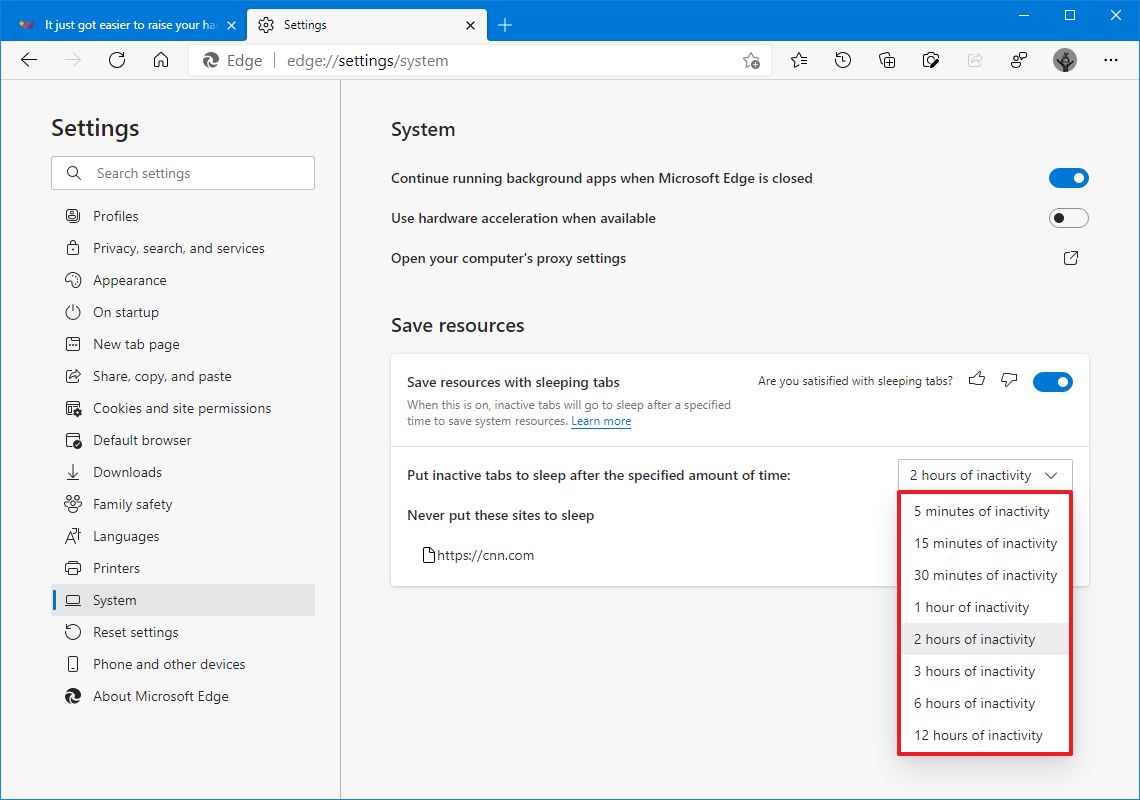
- (Optional) Click the Add button for the "Never put these sites to sleep" option.
-
Confirm the site you want to keep active without sleeping.
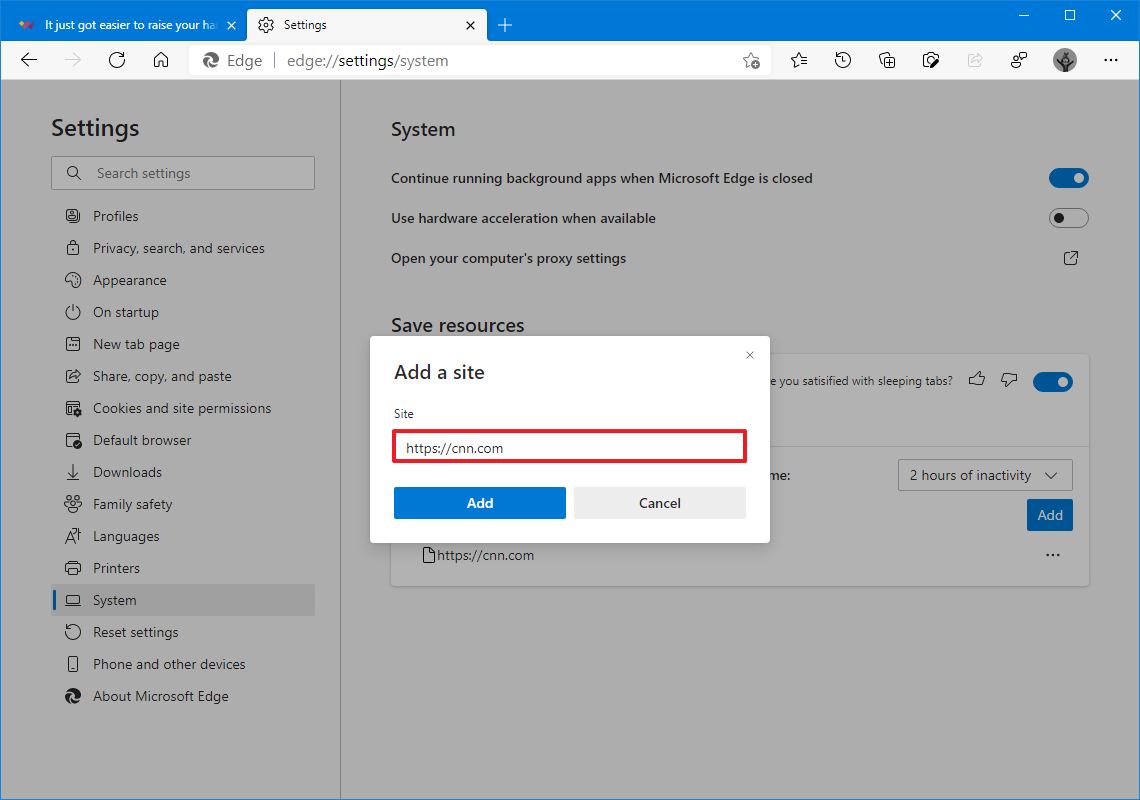
- Click the Add button.
-
Repeat steps No. 5 through 7 to add more sites as needed.
Quick tip: To remove a site, click the ellipsis button next to the site you want to delete, and choose the Remove button.
After you complete the steps, inactive tabs will enter the sleeping mode or be excluded according to your configuration.
Disable sleeping tabs
To disable sleeping tabs on Microsoft Edge, use these steps:
- Open Microsoft Edge.
- Click the Settings and more (ellipsis) button and select the Settings option.
- Click on System.
-
Under the "Save resources" section, turn off the Save resources with sleeping tabs toggle switch.

Once you complete the steps, Microsoft Edge will no longer send inactive tabs to sleep.
9. Sync history and open tabs on Microsoft Edge
The ability to sync your browsing history and open tabs make it easier to return to a website or pick up where you left off on another device. The only caveat is that these items won't sync unless you turn these options manually.
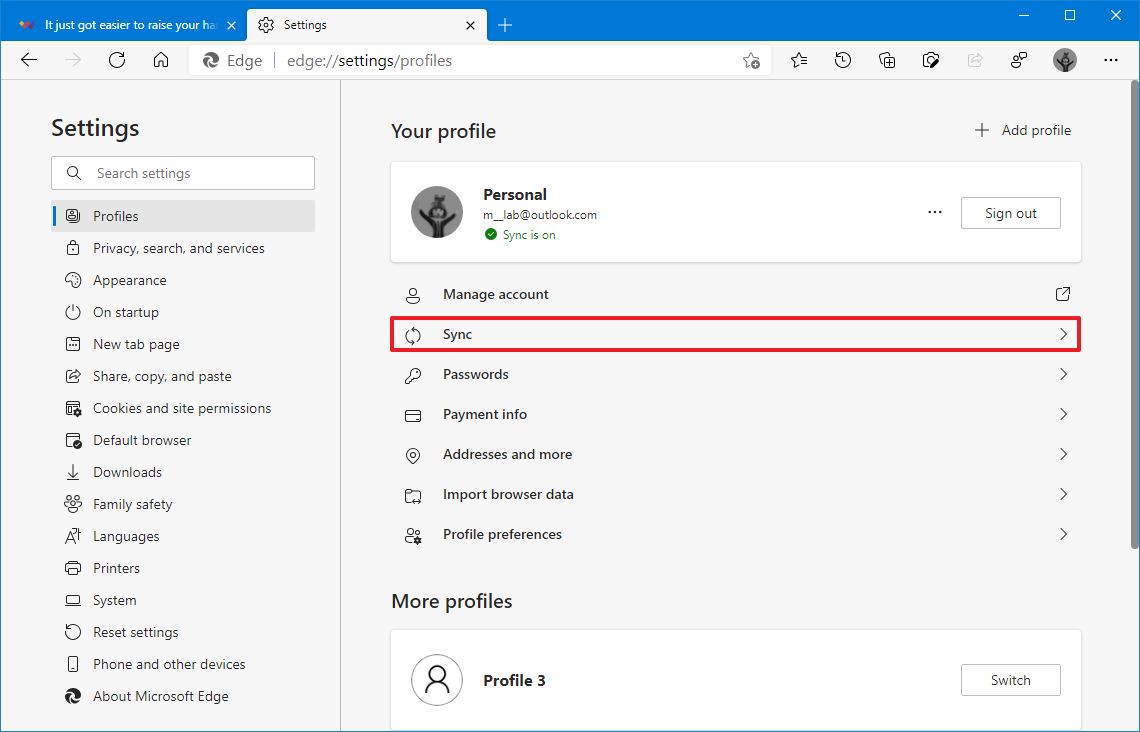
Enable history and open tabs sync
To sync history and open tabs on Microsoft Edge, use these steps:
- Open Microsoft Edge.
- Click the Settings and more (ellipsis) button and select the Settings option.
- Click on Profiles.
-
Under the "Your profile" section, click the Sync option.
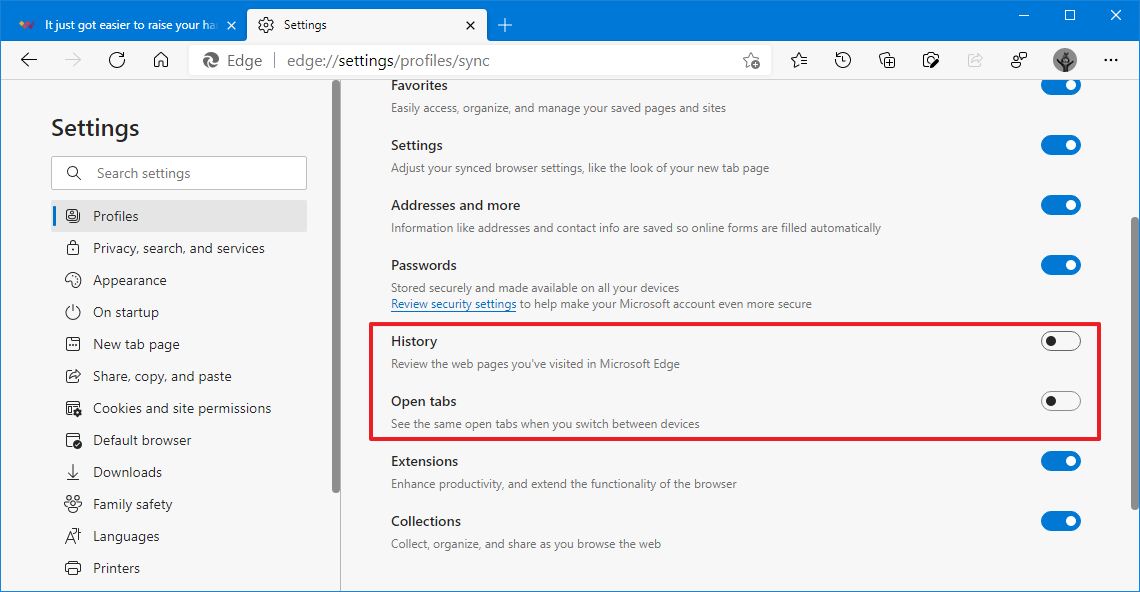
- Turn on the History toggle switch.
-
Turn on the Open tabs toggle switch.

Once you complete the steps, your browsing history and open tabs will sync to the cloud and across devices, allowing you to pick up where you left off or quickly open a previously visited site from another device.
Disable history and open tabs sync
To prevent Edge from syncing history and open tabs, use these steps:
- Open Microsoft Edge.
- Click the Settings and more (ellipsis) button and select the Settings option.
- Click on Profiles.
-
Under the "Your profile" section, click the Sync option.
- Turn off the History toggle switch.
-
Turn off the Open tabs toggle switch.6.
After you complete the steps, Microsoft Edge will no longer try to sync tabs or browsing history.
Microsoft is always testing and shipping new features and improvements for Microsoft Edge. Since there are tons of great features built into the browser, we are only listing some of our favorites available for everyone in the stable channel. We are not listing extension support because this guide's scope only covers features available in the browser.
Are you using Microsoft Edge on your computer? What's your favorite feature? Let us know in the comments below.
More Windows 10 resources
For more helpful articles, coverage, and answers to common questions about Windows 10, visit the following resources:


0 comments:
Post a Comment