It's possible to disable PowerShell, and in this guide, we'll show three methods to complete this task on Windows 10.
On Windows 10, PowerShell is a powerful cross-platform tool that allows you to run scripts and commands to change system settings, manage features, troubleshoot problems, and automate tasks.
Although it is a useful command-line shell, in some situations, you may need to disable it to make sure that users do not make unwanted changes or execute scripts with malicious commands. And other times, you may need to restrict access to PowerShell to comply with the company's policies.
Whatever the reason it might be, Windows 10 offers multiple ways to disable access to the built-in version of PowerShell or the standalone version of the tool, PowerShell 7.
In this Windows 10 guide, we will walk you through three different ways to disable access to PowerShell, including PowerShell 7.
- How to block PowerShell access using Group Policy
- How to block PowerShell access using Security Policy
- How to block PowerShell 7 access uninstalling app
How to block PowerShell access using Group Policy
If you use Windows 10 Pro (or Enterprise), the easiest way to disable access to PowerShell is using the Local Group Policy Editor.
To disable PowerShell on Windows 10, use these steps:
- Open Start.
- Search for gpedit.msc and select the top result to open the Local Group Policy Editor.
-
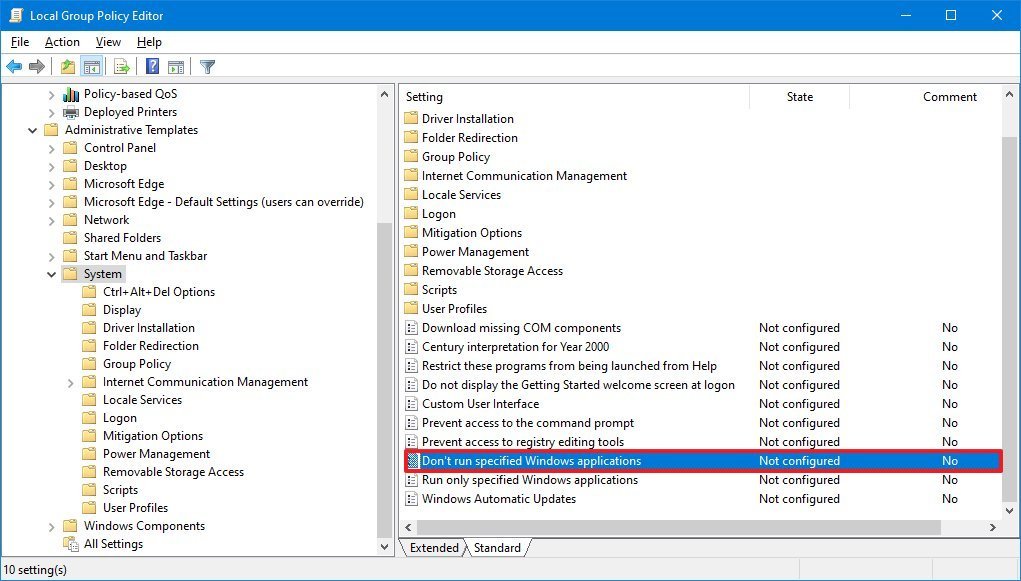
Browse the following path:
User Configuration > Administrative Templates > System -
On the right side, double-click the Don't run specified Windows applications policy.
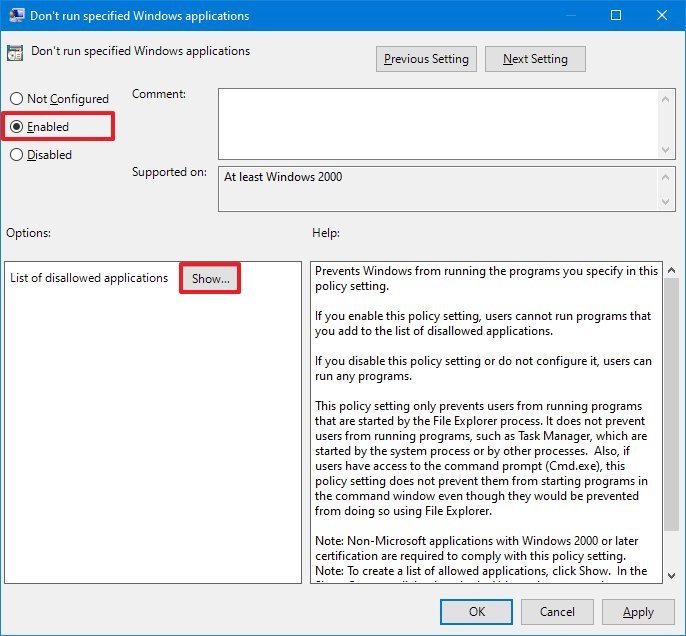
- Select the Enabled option.
-
Under the "Option"s section, click the Show button.
-
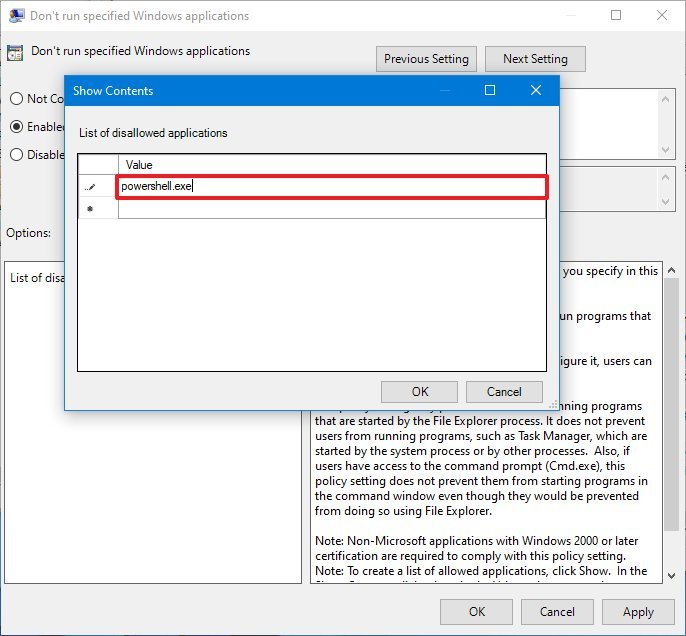
In the "Value" column, type powershell.exe to disable the PowerShell experience.
- (Optional) In the "Value" column, type powershell_ise.exe in a new cell to disable the PowerShell ISE interface.
- (Optional) In the "Value" column, type pwsh.exe in a new cell to disable PowerShell 7.
- Click the Apply. button
- Click the OK button.
Once you complete the steps, users will no longer be able to launch and use PowerShell.
In the case you change your mind, you can roll back the previous settings using the same instructions, but on step No. 5, select the Not Configured option.
We are focusing this guide on disabling PowerShell for all users, but you can also restrict access to the shell for specific users with these instructions.
How to block PowerShell access using Security Policy
Alternatively, you can achieve the same effect using the Local Security Policy console.
To prevent users from launching PowerShell settings up a Local Security Policy, use these steps:
- Open Start.
- Search for Local Group Policy and click the top result to open the app.
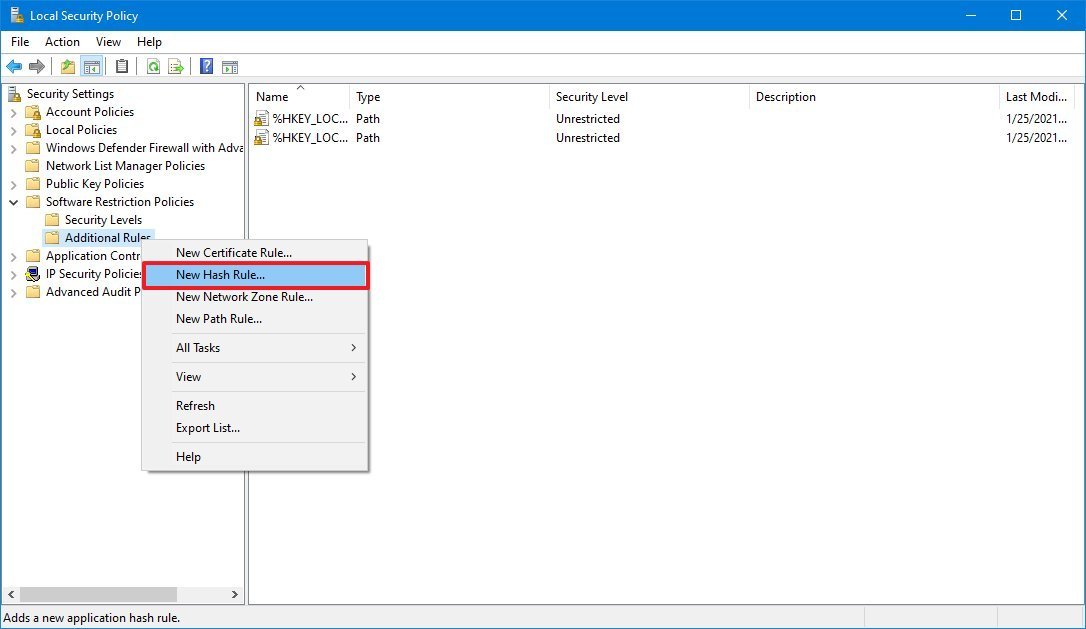
- Double-click to expand the Software Restriction Policies branch.
-
Right-click the "Additional Rules" category, and select the New Hash Rule option.
Quick tip: If the category is not available, right-click the Software Restriction Policies branch and select the New Software Restriction Policies option.
-
Click the Browse button.
-
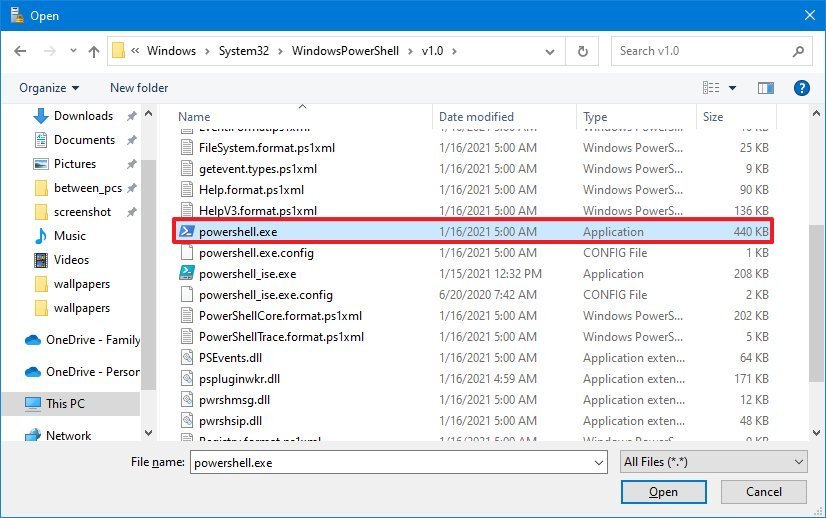
Copy and paste the following path in the address bar to locate the 32-bit version of PowerShell and press Enter:
%SystemRoot%\system32\WindowsPowerShell\v1.0 -
Select the powershell.exe executable.
- Click the Open button.
- Click the Apply button.
- Click the OK button.
- Right-click the "Additional Rules" category and select the New Hash Rule option.
- Click the Browse button.
-
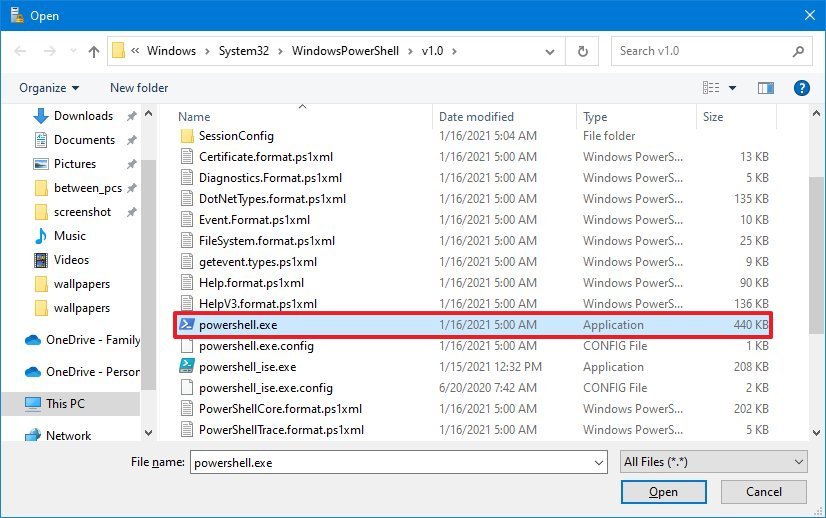
Copy and paste the following path in the address bar to locate the 64-bit version of PowerShell and press Enter:
%SystemRoot%\SysWOW64\WindowsPowerShell\v1.0Quick tip: If you want to disable access to PowerShell version 7, then you can create another hash rule with this path:
"%SystemRoot%\Program Files\PowerShell\7\pwsh.exe. Or uninstall the app with the steps below. -
Select the powershell.exe executable.
- Click the Open button.
- Click the Apply button.
- Click the OK button.
- Restart the computer.
After you complete the steps, users will no longer be able to launch the 32-bit or 64-bit version of PowerShell.
Disable access PowerShell ISE
Although the above steps can restrict access to the command-line tool, users can still get around this limitation using the PowerShell ISE interface. However, you can also disable access to this tool with the Local Security Policy app.
To disable access to PowerShell ISE, use these steps:
- Open Start.
- Search for Local Group Policy and click the top result to open the app.
- Double-click to expand the Software Restriction Policies branch.
-
Right-click the "Additional Rules" category, and select the New Hash Rule option.
-
Click the Browse button.
-
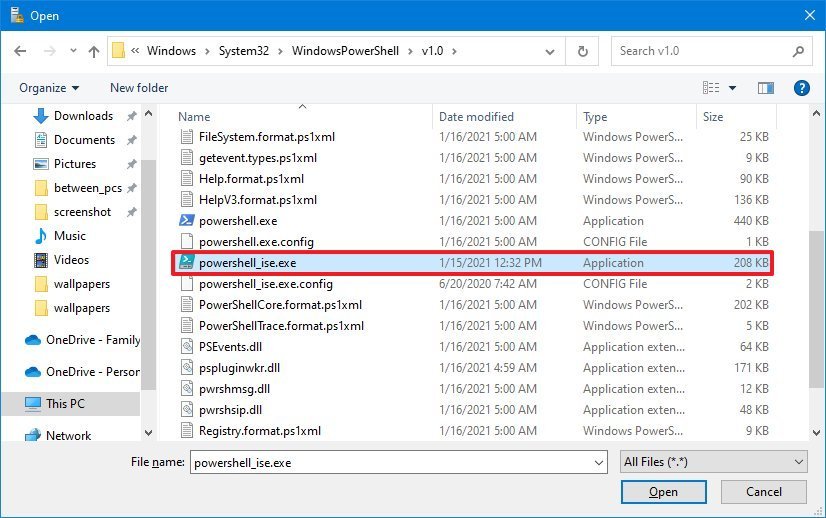
Copy and paste the following path in the address bar to locate the 32-bit version of PowerShell ISE and press Enter:
%SystemRoot%\system32\WindowsPowerShell\v1.0 -
Select the powershell_ise.exe executable.
- Click the Open button.
- Click the Apply button.
- Click the OK button.
- Right-click the "Additional Rules" category and select the New Hash Rule option.
- Click the Browse button.
-
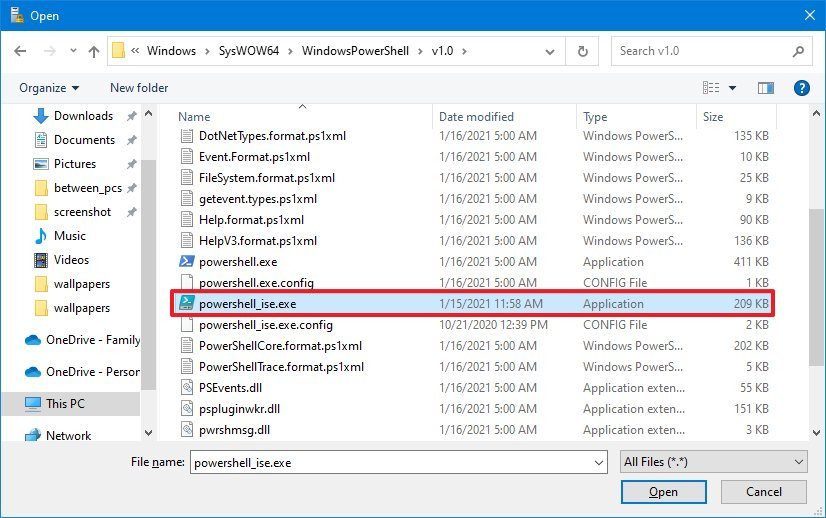
Copy and paste the following path in the address bar to locate the 64-bit version of PowerShell and press Enter:
%SystemRoot%\SysWOW64\WindowsPowerShell\v1.0 -
Select the powershell_ise.exe executable.
- Click the Open button.
- Click the Apply button.
- Click the OK button.
- Restart the computer.
Once you complete the steps, the built-in version of PowerShell ISE will no longer be accessible.
If you want to revert the changes, you can use the same instructions outlined above, but on step No. 4, right-click each hash rule you created, select the Delete option, and restart the computer.
How to block PowerShell 7 access uninstalling app
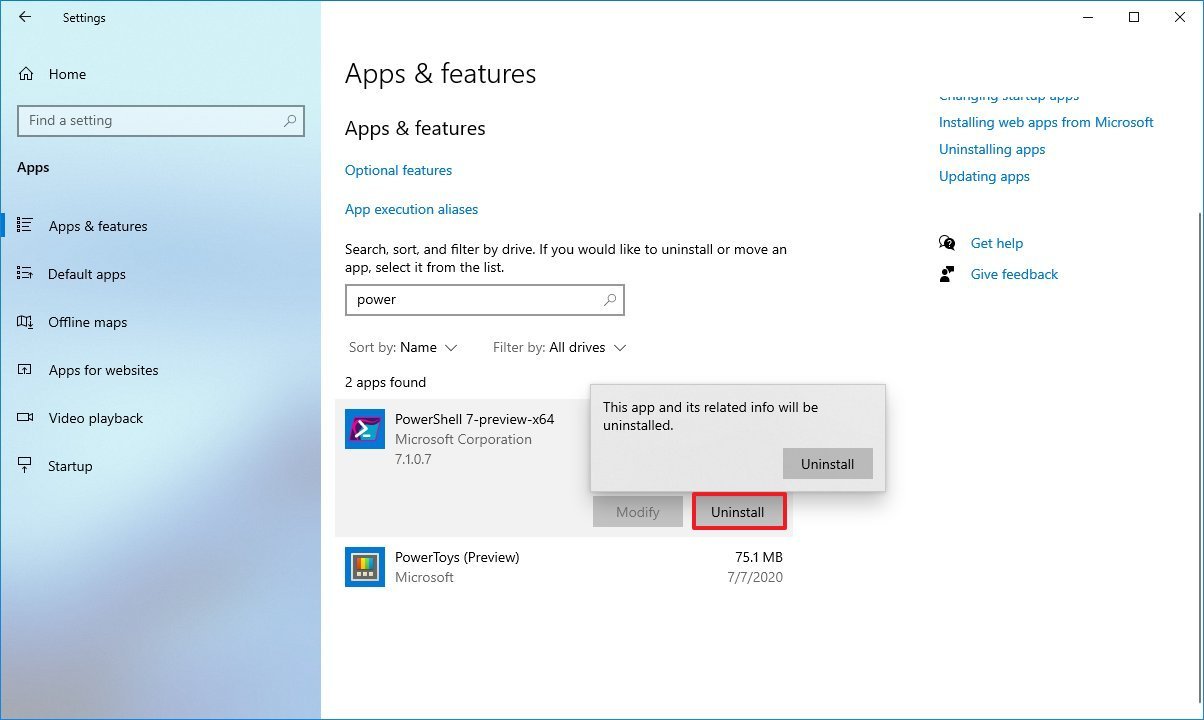
If the device also has PowerShell 7, you can restrict access by removing the app from Windows 10.
To uninstall PowerShell 7, use these steps:
- Open Settings.
- Click on Apps.
- Click on Apps & features.
- Under the "Apps & features" section, select the PowerShell app.
-
Click the Uninstall button.
- Click the Uninstall button again.
- Continue with the on-screen directions (if applicable).
After you complete the steps, no one will have access to PowerShell version 7 since it's no longer installed on the device. Of course, you can always download and install the app again.
If you are trying to prevent users from making unwanted system changes, in addition to restricting access to PowerShell, you can also disable Command Prompt, Task Manager, and Registry. Furthermore, you can even try switching the account type to "Standard User" to prevent users from making system changes and make the account more secure. However, users will still have access to PowerShell, Command Prompt, and Task Manager to perform some common tasks.
More Windows 10 resources
For more helpful articles, coverage, and answers to common questions about Windows 10, visit the following resources:





0 comments:
Post a Comment