Microsoft Defender Antivirus includes an option to scan network files, and in this guide, we'll show you the steps to enable the feature.
On Windows 10, Microsoft Defender Antivirus comes built into the Windows Security experience, and it offers real-time protection from viruses, ransomware, spyware, and other malware and hacker attacks.
In addition to scanning local files, the security feature also allows you to enable an option to scan network files. The option used to be enabled out of the box on Windows 10, but it's no longer the case with the latest version of the antivirus.
Usually, it's not recommended to enable this feature. However, there are still some situations when you may need to use it, for instance, when the antivirus isn't able to scan certain files, or you receive a specific error that will only be resolved by enabling scan for network files.
In this Windows 10 guide, we'll walk you through the steps to enable scan network files on Microsoft Defender Antivirus.
Related: Best Antivirus Software 2020
- How to enable Microsoft Defender scan network files with Group Policy
- How to enable Microsoft Defender scan network files with PowerShell
- How to enable Microsoft Defender scan network files with Registry
How to enable Microsoft Defender scan network files with Group Policy
If you're running Windows 10 Pro (or Enterprise), the easiest way to enable scan network files is using the Local Group Policy Editor.
To scan network files with Microsoft Defender Antivirus, use these steps:
- Open Start.
- Search for gpedit and click the top result to open the Group Policy Editor.
-
Browse the following path:
Computer Configuration > Administrative Templates > Windows Components > Microsoft Defender Antivirus > Scan -
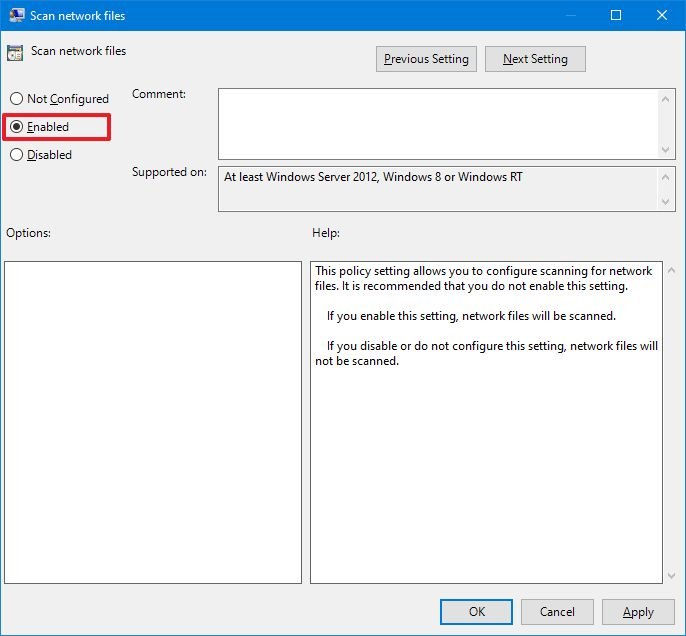
Double-click the Scan network files policy on the right side.
-
Check the Enabled option.
- Click the Apply button.
- Click the OK button.
Once you complete the steps, network files will be scanned during automatic and manual scans.
If you want to revert the changes, you can use the same instructions, but on step No. 5, make sure to select the Not configured option.
How to enable Microsoft Defender scan network files with PowerShell
To allow Microsoft Defender to network files with PowerShell, use these steps:
- Open Start.
- Search for PowerShell, right-click the top result, and click the Run as administrator option.
-
Type the following command to enable scan network files and press Enter:
Set-MpPreference -DisableScanningNetworkFiles 0 -
(Optional) Type the following command to disable scan network files and press Enter:
Set-MpPreference -DisableScanningNetworkFiles 1
After you complete the steps, Microsoft Defender Antivirus will be able to scan network files. You can check this guide to learn more about the different ways to manage the antivirus using PowerShell commands.
How to enable Microsoft Defender scan network files with Registry
Alternatively, it's also possible to enable network file scan option using the Registry.
To allow the Windows 10 default antivirus to scan network files modifying the Registry, use these steps:
Warning: This is a friendly reminder that editing the Registry is risky and can cause irreversible damage to your installation if you don't do it correctly. It's recommended to make a full backup of your PC before proceeding.
- Open Start.
- Search for regedit and click the top result to open the Registry.
-
Browse the following path:
HKEY_LOCAL_MACHINE\SOFTWARE\Policies\Microsoft\Windows DefenderQuick tip: On Windows 10, you can now copy and paste the path in the Registry's address bar to quickly jump to the key destination.
-
Right-click the Windows Defender (folder) key, select New, and click on Key.
- Name the key Scan and press Enter.
-
Right-click the newly created key, select New, and click on DWORD (32-bit) Value.
- Name the key DisableScanningNetworkFiles and press Enter.
-
Double-click the newly created DWORD and make sure the value is 0.
- Click the OK button.
- Restart your computer.
Once you complete the steps, during the next scan, network files will be checked for malware.
In the case that you want to undo the changes, you can use the same instructions, but on step No. 4, make sure to right-click the Scan key and select the Delete option.
More Windows 10 resources
For more helpful articles, coverage, and answers to common questions about Windows 10, visit the following resources:


0 comments:
Post a Comment