

Are you getting a black screen on Windows 10? Use this guide to troubleshoot and fix the issue.
On Windows 10, one of the most annoying problems you can stumble upon is a black screen, because you won't see an error code or message printed on the screen to get a hint on where to start troubleshooting.
A black screen could happen for many reasons. It might be related to an issue with a recent graphics driver update, or it could occur during the installation of a feature update that includes a compatibility problem. It could also happen as a result of a buggy system update. Or it could be a hardware related issue with the display, connection, or video adapter.
Whatever the reason it might be, there are several ways to determine the cause and solve this problem on Windows 10, whether you have access to the desktop or not.
In this Windows 10 guide, we'll walk you through the instructions to troubleshoot and fix black screen problems.
- How to fix black screen troubleshooting connection problems on Windows 10
- How to fix black screen with desktop access on Windows 10
- How to fix black screen using safe mode on Windows 10
- How to fix black screen using System Restore on Windows 10
- How to fix black screen rolling back to previous version of Windows 10
- How to fix black screen during installation of Windows 10*
How to fix black screen checking connection problems on Windows 10
When you stumble upon a black screen, many things could be the reason, including problems with hardware, software, or a combination of both. In the following instructions, you'll find troubleshooting steps to resolve this issue on Windows 10.
Check connection issues
If the black screen appears before you can sign into the account, then it's likely a connection problem between the display and computer.
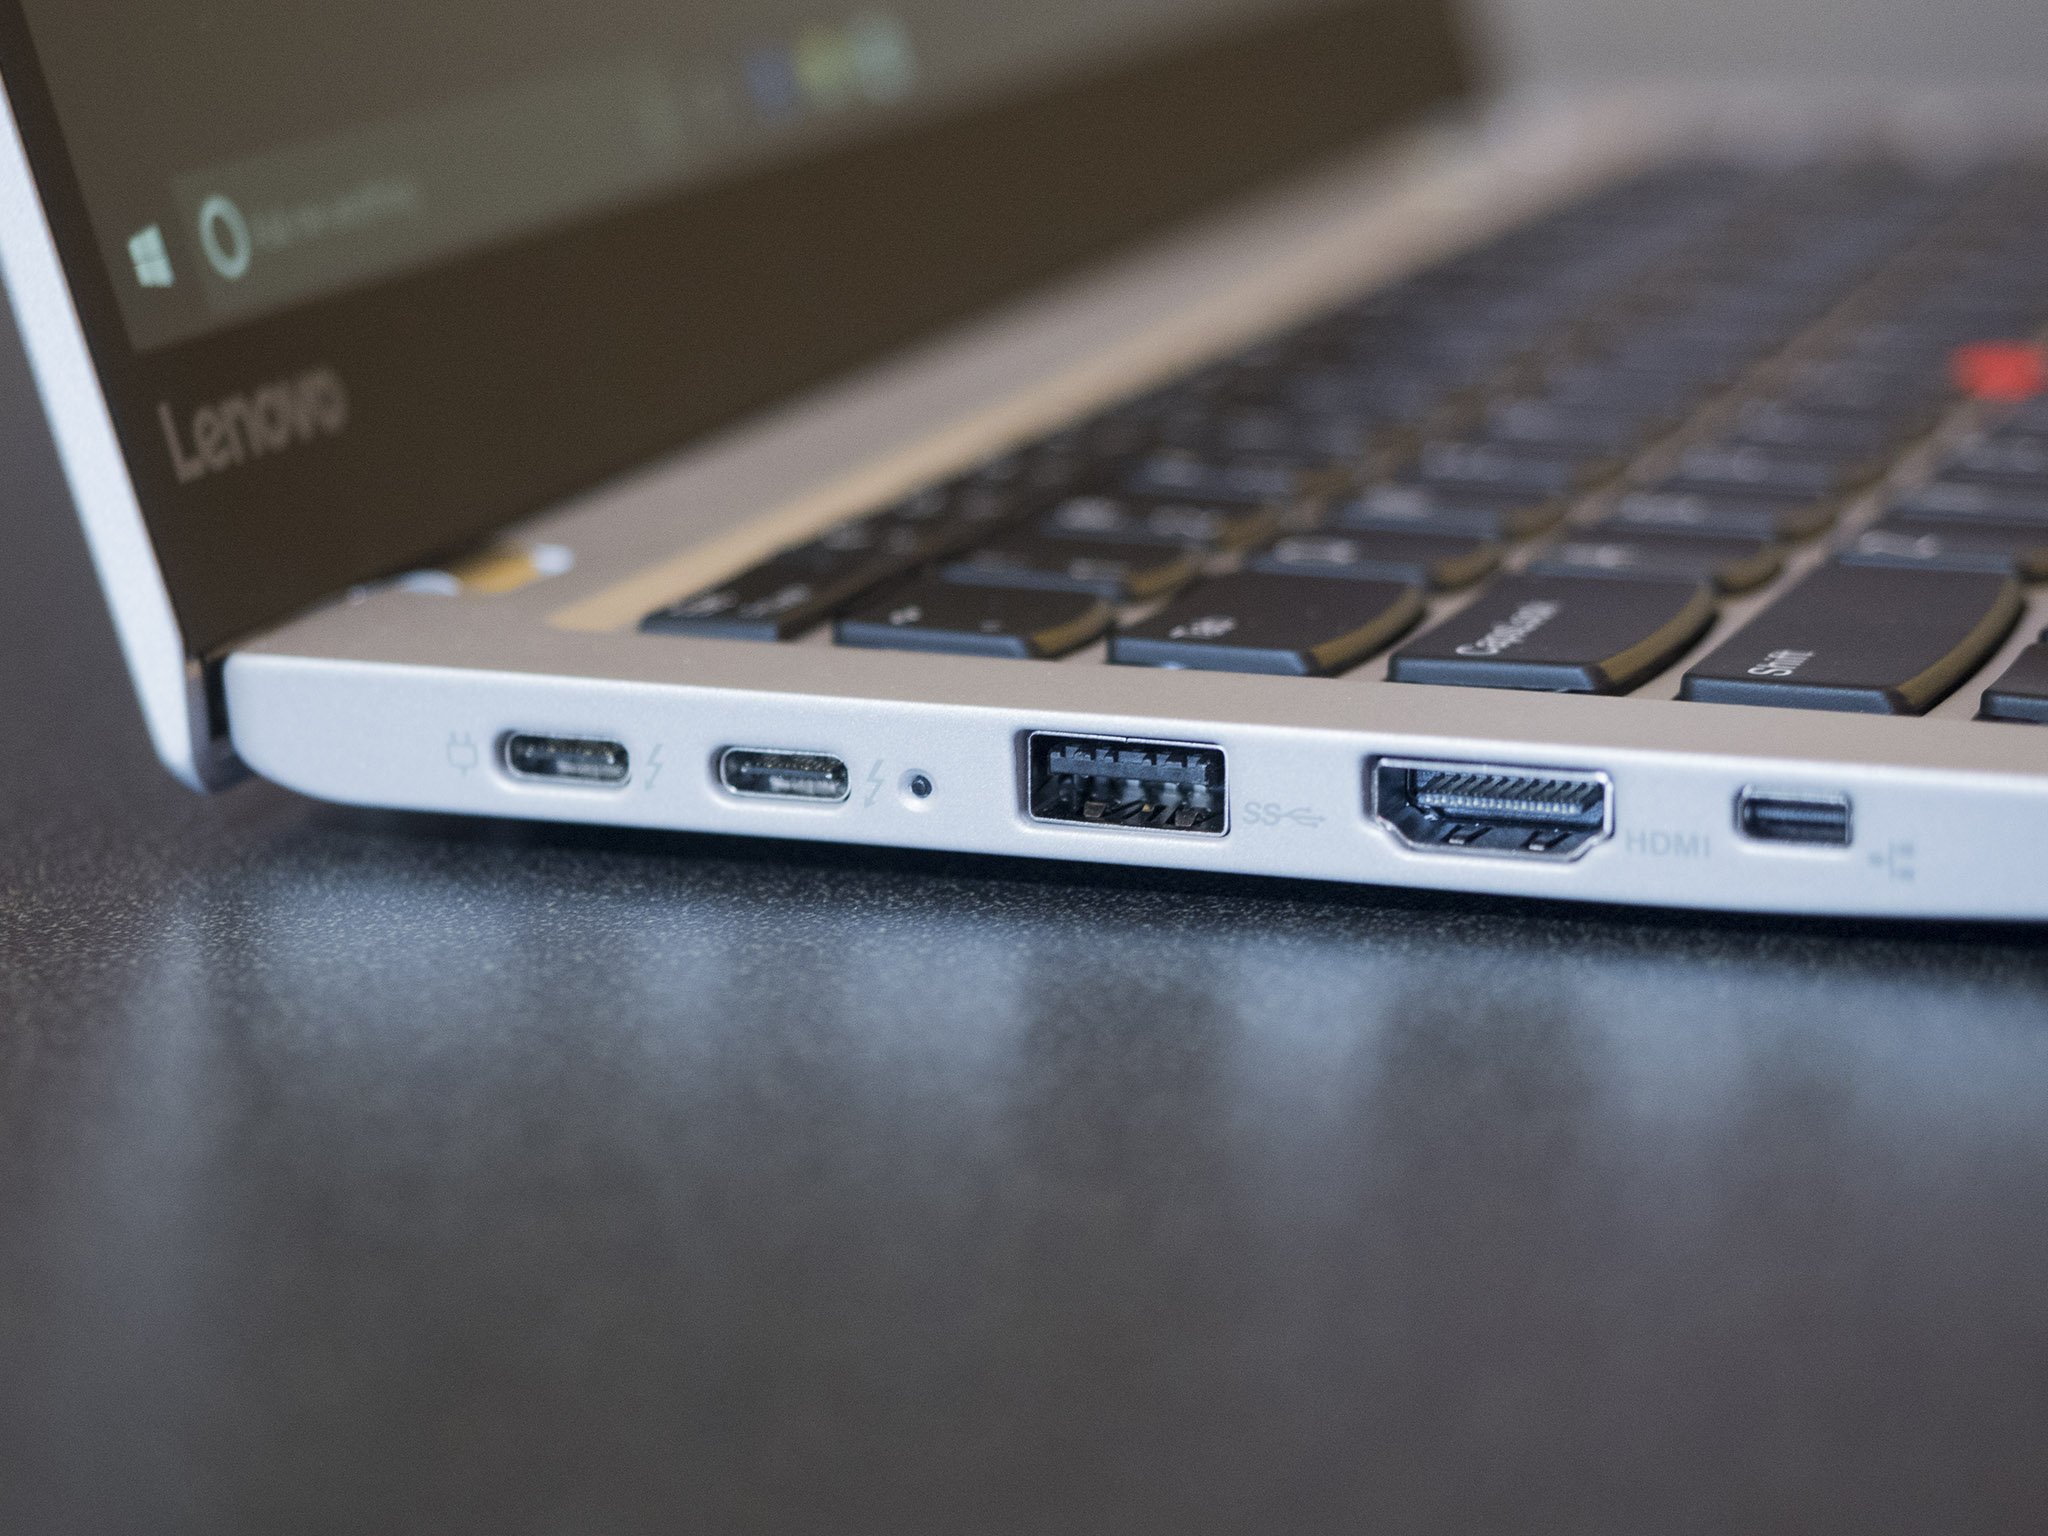
In this situation, re-check the physical connection and make sure both ends of the video signal cable are connected correctly, and it's using the correct output port. Disconnect the video signal cable from both, reconnect it again, and move the mouse to see if the display wakes up.
Also, make sure that the monitor is receiving power, and the power button is turned on. (You may need to check your manufacturer support website for more specific details.)
If you have multiple video outputs, try to switch the connection to a different port and move the mouse around or press any key on the keyboard to wake up the display. Sometimes, a driver update could include changes, which can send the video signal to the wrong port (DisplayPort, HDMI, DVI, Thunderbolt, VGA).
If the system has a discrete and integrated graphics card, you can switch the connection to the embedded video processor to confirm whether the problem is with the discrete card. Also, many times, after a system or BIOS (basic input/output system) update, the discrete video card might get disabled, and you'll need to re-enable in the motherboard settings.
When using an external monitor, you can open the onboard monitor settings and increase the brightness as it may be the reason for the black screen. While in the settings menu, it's also a good idea to check if the monitor uses the correct input. (If you don't know how to access your monitor settings, check your manufacturer support website for specific details.)
If you have a laptop, use the keyboard shortcut to increase the display brightness. Usually, you'll need to click the Function (Fn) key and one of the Functions keys (such as F8 or F10).
You can also try to connect the monitor to a different computer or use a different video signal cable (DisplayPort, HDMI, DVI, VGA, or Thunderbolt) to determine if you're dealing with a broken display or video card, or damaged cable.
Detect display
Sometimes, you may see a black screen as a result of Windows 10 losing its connection with the display. You can use the Windows key + Ctrl + Shift + B keyboard shortcut to restart the video driver and refresh the link to the monitor.
On tablets (such as Surface Pro), you can wake up the screen pressing the volume up and volume down buttons simultaneously three times quickly.

When you perform this action, you'll hear a beep and activity on the screen indicating that Windows 10 can respond to the command, and it's re-establishing a connection with the display.
Alternatively, assuming that Windows 10 is responsive, you can use the Windows key + P keyboard shortcut to bring up the "Project" menu. Then hit the P key again, and hit the Enter key to switch between the different display modes to see if the black screen disappears. (You'll need to repeat the steps four times to allow cycling through all the possible modes.)
If you don't see anything on the screen, press and hold the power button for about 10 seconds to shut down the device. Then the press the power button again to restart.
Disconnect non-essential devices
Peripherals connected to the computer may be the reason for the black screen or black screen with the spinning dots during startup for a long time. (Usually, spinning dots during startup indicates that an update is installing, and you need to wait a few moments, but if it takes a long time, then it could be a compatibility problem with the hardware.)
If you experience something similar, disconnect all peripherals, including printers, cameras, removable drives, Bluetooth, docking station, and other USB devices from your computer.
Restart the device one more time, and if everything works normally, then the problem is one of the peripherals. You can determine which device is causing the problem by reconnecting one at a time until you stumble upon the one causing the conflict.
Once you know the peripheral causing the issue, disconnect it, restart the computer, search online to find a solution, or contact your device manufacturer for additional assistance.
How to fix black screen with desktop access on Windows 10
If you see a black screen after signing into Windows 10 and can still use the mouse pointer, it could be a problem with the Windows Explorer process.
To resolve Windows Explorer process issues, use these steps:
-
Use the Ctrl + Shift + Esc keyboard shortcut to open Task Manager.
Quick tip: You can also use the Ctrl + Alt + Del keyboard shortcut and then click the Task Manager button.
- Click the More details button (if in compact mode).
- Click the Processes tab.
- Select the Windows Explorer service
-
Click the Restart button from the bottom-right corner.

After you complete the steps, you should be able to access the desktop again.
Restart explorer.exe
If the previous steps didn't work, you can terminate and start the process again using these steps:
- Use the Ctrl + Alt + Delete keyboard shortcut to open Task Manager.
- Click the More details button (if in compact mode).
- Right-click the Windows Explorer service, and select the End task option (if available).
- Click the File menu.
- Select the Run new task option.
-
Type the following command and click the OK button.
explorer.exe
Once you complete the steps, you should be able to use your device normally.
How to fix black screen with safe mode on Windows 10
If this is the case of a software-related issue, and you don't have access to the desktop, you will need to use "Advanced startup" to boot Windows 10 in safe mode to troubleshoot and fix the black screen problem.
Open Advanced startup using three-fail boot method
To access the Advanced startup environment, use these steps:
- Start computer.
-
As soon as the Windows logo appears on the screen, press the power button to interrupt the boot sequence.
- Repeat steps No. 1 and 2 two more times.
After the third interruption, Windows 10 will open into the "Automatic Repai" environment, where you can click the Advanced options button, and then you can continue with the steps below to boot in safe mode.
Open Advanced startup using bootable media method
Alternatively, you can use a USB bootable media to access the Advanced startup settings using these steps:
-
Start computer using a USB bootable media.
- Quick tip: If your device isn't starting from the USB flash drive, you'll need to change the motherboard's BIOS settings to make sure it can boot from USB. You can usually access the BIOS by powering up the device and pressing one of the functions, Delete, or ESC keys. However, you may need to check your manufacturer's support website for more specific details.
- Click the Next button.
-
Click the Repair your computer link in the bottom-left corner.

Once you complete the steps, continue with the instructions to access safe mode on Windows 10.
Boot Windows 10 in safe mode
To boot Windows 10 in safe mode while in Advanced startup, use these steps:
- Click the Troubleshoot option.
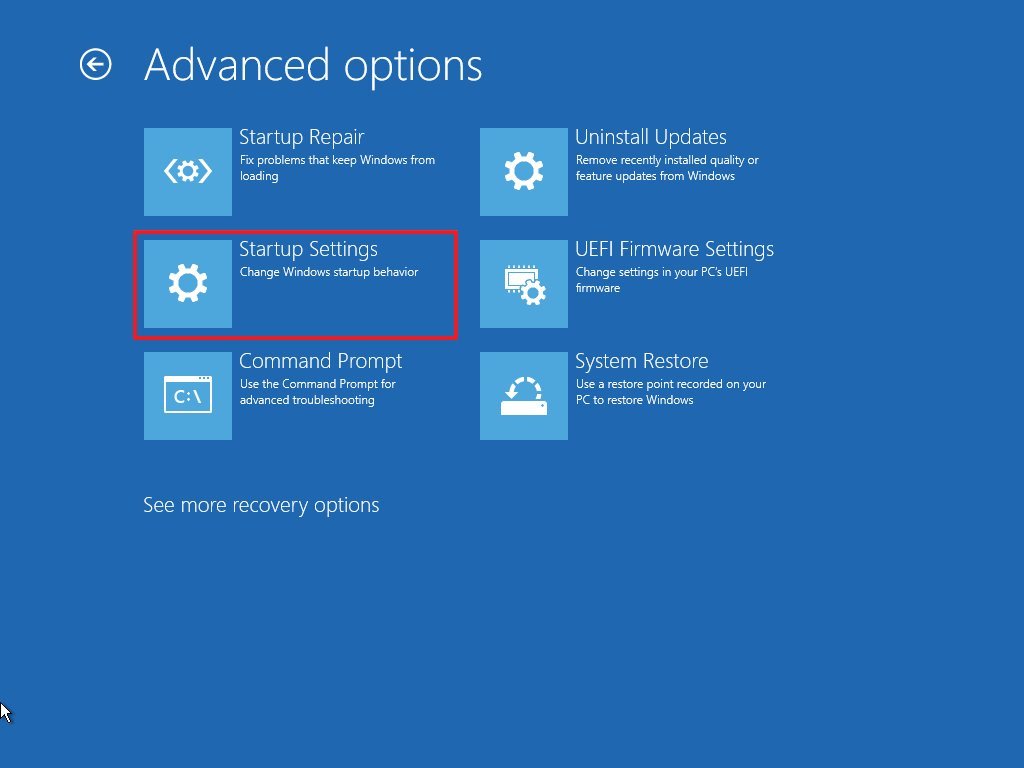
- Click the Advanced options button.
-
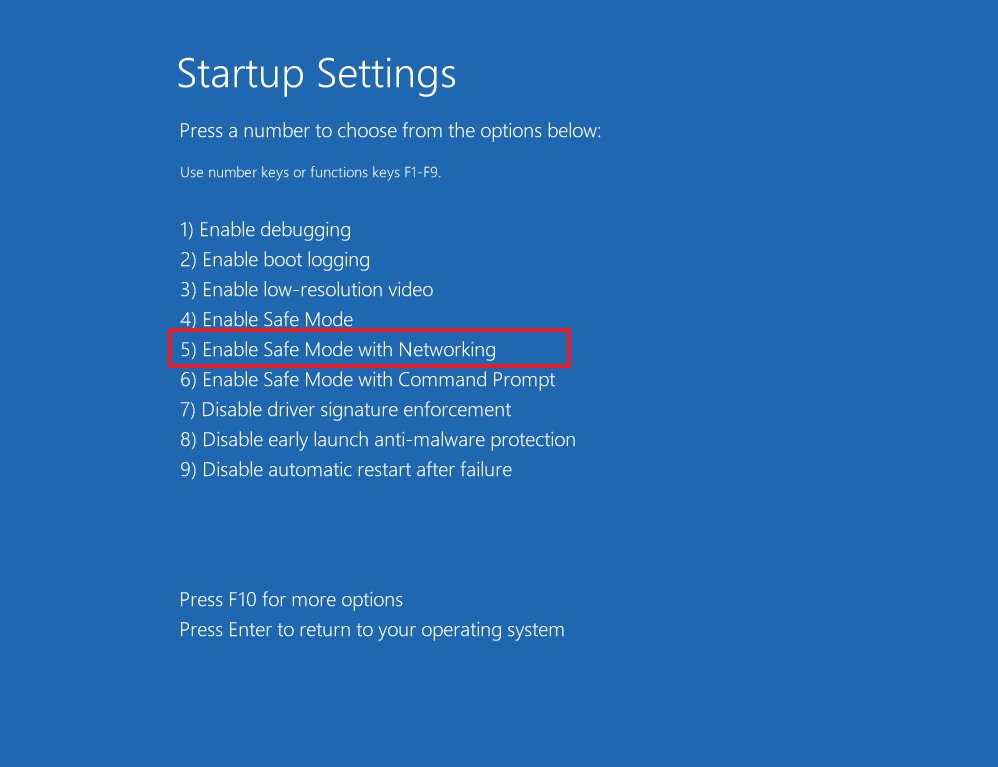
Click the Startup Settings option.
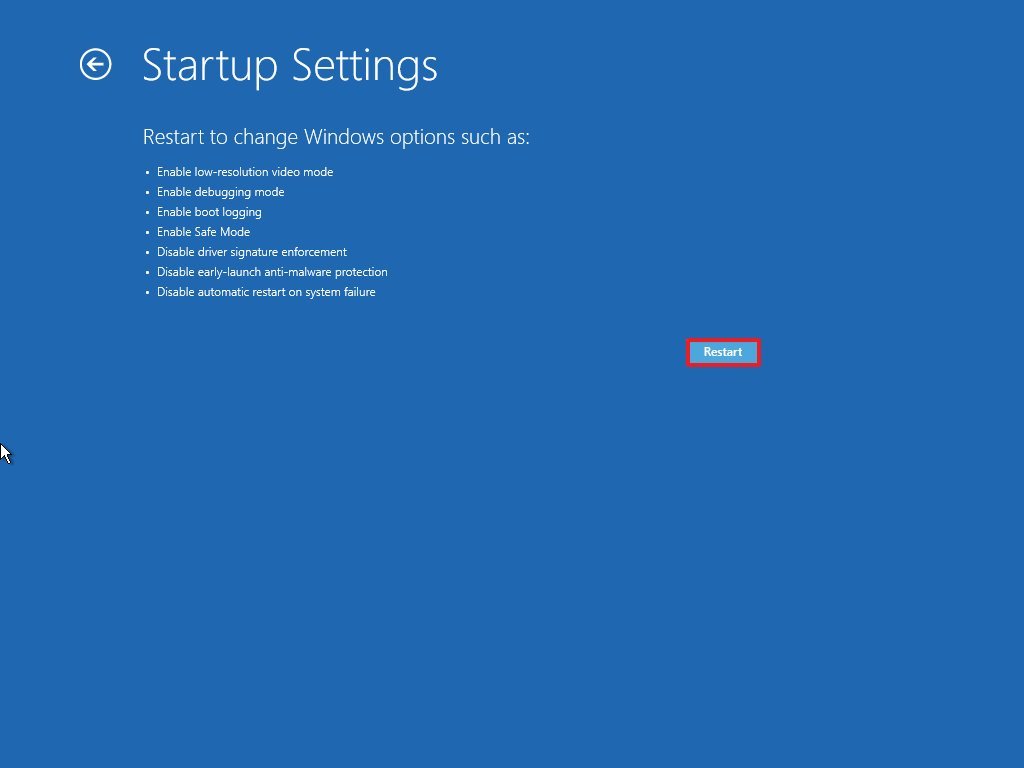
-
Click the Restart button.
-
While in the "Startup Settings," press the 5 or F5 key to select the Safe Mode with Networking option.
After the device starts in safe mode, you can use several troubleshooting steps to help you fix the black screen problem. For example, reinstalling the graphics driver, removing buggy updates, changing system settings, and more (see instructions below).
Perform Windows 10 clean boot
Usually, when the device starts normally, Windows 10 loads a bunch of services, drivers, and applications, which will remain running in the background, if one of them isn't working correctly, it's possible that it will produce a black screen.
A clean boot instructs Windows 10 to start only with a minimal set of services, drivers, and apps, which can help you to figure out if something running in the background is the cause of the screen going completely black.
On Windows 10, a clean boot is similar to safe mode, but it allows you to re-enable one service or software at a time to pinpoint the problem more accurately.
To perform a clean boot on Windows 10, use these steps:
- Open Start.
- Search for msconfig, select the System Configuration item in the result to open the experience.
- Click the Services tab.
- Check the Hide all Microsoft services option.
-
Click the Disable all button.
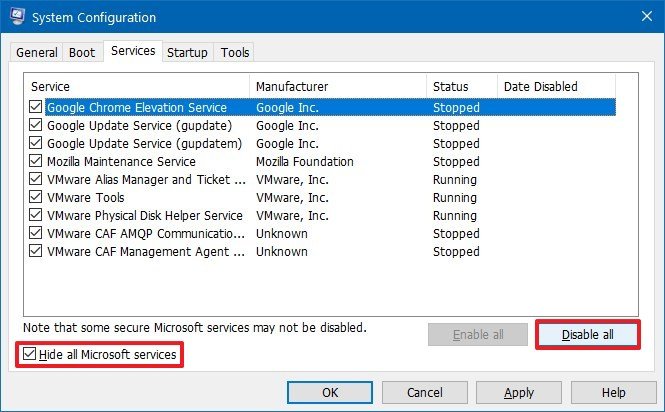
- Click the Apply button.
- Click the Startup tab.
- Click the Open Task Manager option.
- Click the Startup tab.
-
Select each application, and click the Disable button in the bottom-right corner.

- Close Task Manager.
- Click the OK button in the "System Configuration" experience.
- Restart your computer.
Although this process won't fix the issue, it'll give you an idea of where to start looking to resolve the black screen.
If, after restarting your computer, you no longer see a black screen, you will know that there's a problem with one of the background processes.
Troubleshoot black screen using clean boot
In this case, use these steps to re-enable the items (one-by-one), and restart your device to see which one is causing the black screen:
- Open Start.
- Search for msconfig, select the System Configuration item in the result to open the experience.
- Click the Services tab.
- Check the Hide all Microsoft services option.
-
Check one of the services.

- Click the Apply button.
- Click the OK button.
- Restart your computer.
Once you complete the steps, repeat the steps for every item until you can determine the cause of the problem.
Re-enable startup items
If none of the services seem to be the issue, use these steps to re-enable the startup items:
- Open Start.
- Search for Task Manager.
- Click the Startup tab.
-
Select an app and click the Enable button in the bottom-right corner.

- Close Task Manager.
- Restart your computer.
After you complete the steps, repeat the instructions for every item until figuring out the app causing the black screen.
If you want to revert the changes, you can use the same instructions outlined above to perform a clean boot, but on step No. 5, make sure to click the Enable all button, and on step No. 10, click the Enable button for each application that was previously enabled.
Reinstall or rollback graphics driver
Typically, a device may experience a black screen due to a compatibility issue with a graphics driver, which might you have installed manually or through Windows Update.
Other times, the video driver update may not be the problem, but the one already installed on the device may be corrupted, and as a result, you could end up with a black screen.
Reinstall graphics driver
To reinstall the graphics driver, while in safe mode, use these steps:
- Open Start.
- Search for Device Manager and click the top result to open the app.
- Expand the Display Adapters branch.
-
Right-click the video adapter and select the Uninstall device option.

Quick tip: Alternatively, you can also select the Delete the driver software for this device option to remove the driver from the computer. Sometimes, this is recommended, but if Windows 10 can't find the driver online, you'll need to manually download it from your manufacturer support website.
- Click the OK button.
- Restart your computer.
Once the device restarts, Windows 10 will try to reinstall the graphics driver automatically resolving the black screen problem.
If you see a black screen after upgrading to a new version of Windows 10, you may need to download the latest compatible driver from your device or graphics manufacturer's support website to resolve the issue.
Rollback graphics driver
Alternatively, if the problem happens after installing an update, it may be possible to roll back to the driver's previous version.
To roll back a device driver to an earlier version on Windows 10, use these steps:
- Open Start.
- Search for Device Manager and click the top result to open the app.
- Expand the Display Adapters branch.
-
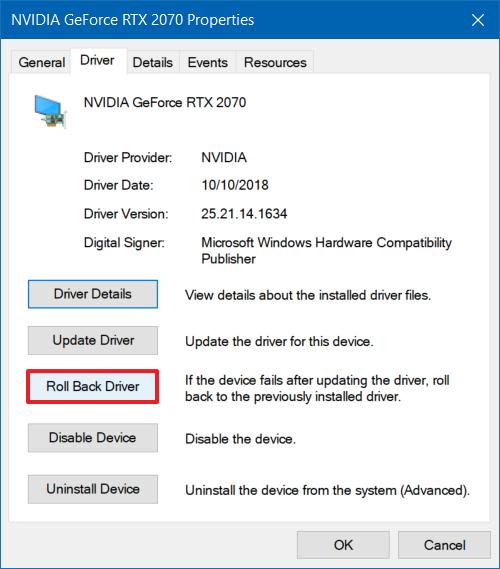
Right-click the graphics card, and select the Properties option.

- Click the Driver tab.
-
Click the Roll Back Driver button.
-
Select a reason to enable the option to rollback (select any option).
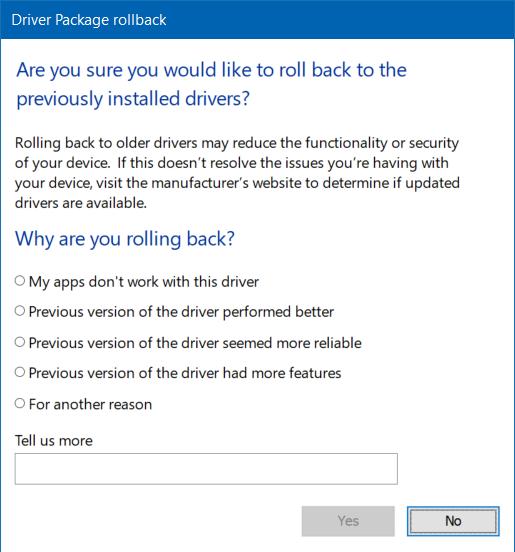
- Click the Yes button.
- Restart your computer.
After you complete the steps, Windows 10 will uninstall the driver, and the previous version will be restored.
If the Roll Back Driver button isn't available, Windows 10 doesn't have a previous driver. If an earlier version of the driver was working without splashing a black screen, you might be able to find and download an older version from your manufacturer's support website, and use their instructions to install the controller.
Disable Fast Startup
Sometimes a black screen will appear because the fast startup feature is enabled on Windows 10. Fast startup is a feature available in some installations with specific hardware configuration, and it allows a device to boot faster. However, if it's causing problems, you may need to disable it.
To disable fast startup, use these steps:
- Open Start.
- Search for Control Panel and click the top result to open the experience.
- Click on System and Security.
- Click on Power options.
-
Select the Choose what the power button does option on the left pane.
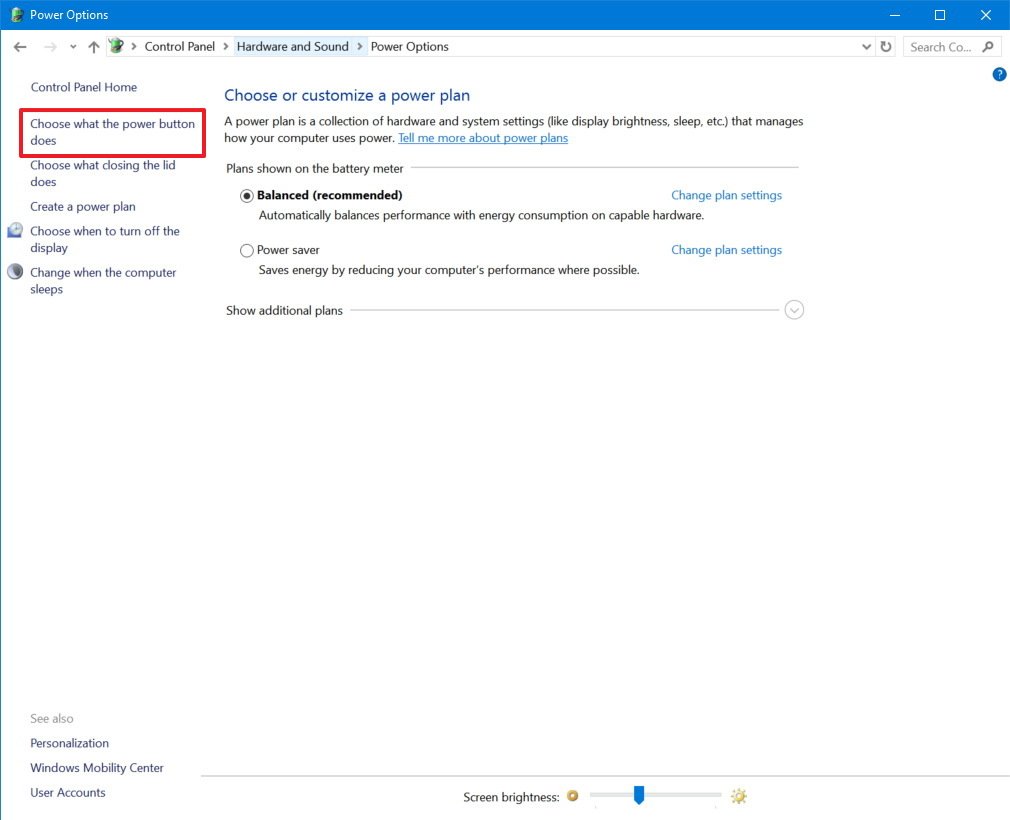
-
Click the Change settings that are currently unavailable option.

-
Clear the Turn on fast startup (recommended) option.
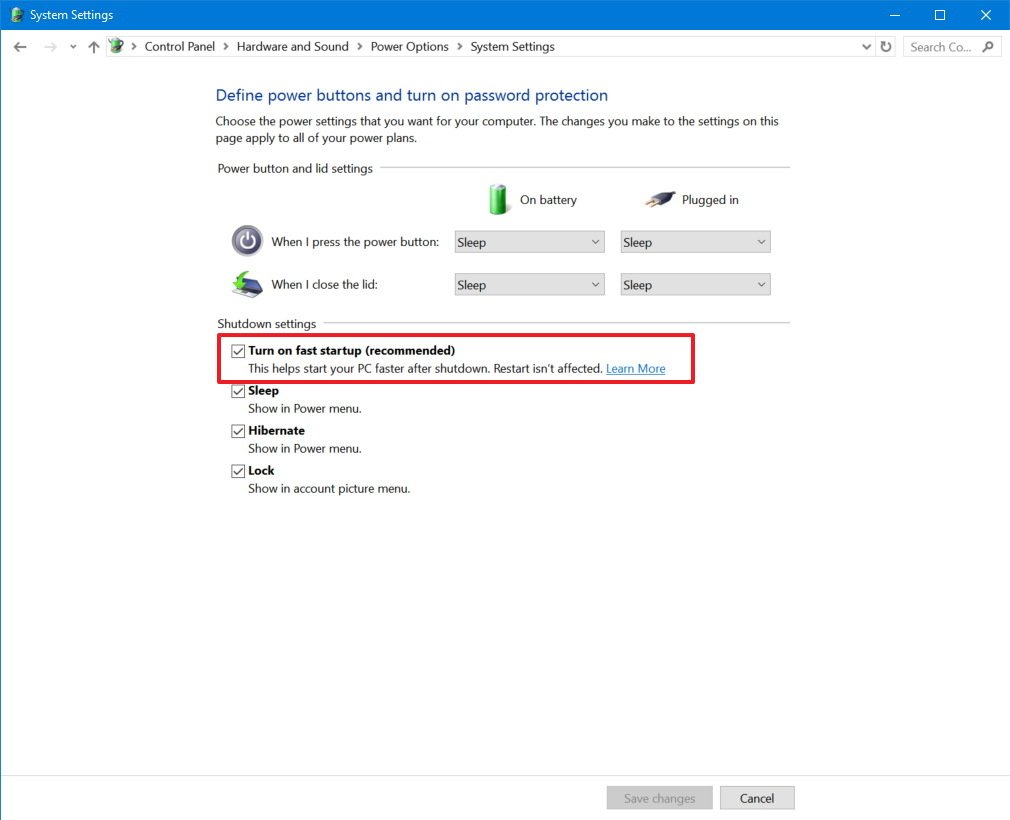
- Click the Save changes button.
- Restart your computer.
If fast startup was the problem, after restarting the device, you should no longer see a black screen.
Disable high contrast
If the computer has the high contrast feature enabled, it could be the reason for the black screen.
To disable high contrast on Windows 10, while in safe mode, use these steps:
- Open Settings.
- Click on Ease of Access.
- Click on High contrast.
-
Turn off the high contrast toggle switch.

Once you complete the steps, restart the device to confirm that disabling the features addresses the black screen problem.
Stop RunOnce process
RunOnce is a feature that allows you to specify commands that Windows 10 can run one time and then deletes, but it can also cause the screen to go black on a computer.
To stop the RunOnce process, use these steps:
- Open Start.
- Search for Task Manager and click the top result to open the app.
- Click the Processes tab.
- Select the RunOnce process and click the End task button.
- (Optional) Click the Services tab (if the process wasn't in the "Processes" tab).
- Right-click the RunOnce item, and select the Stop button.
- Restart your computer.
If the RunOnce process was causing the problem, you should be able to start using your device normally.
Uninstall quality updates
Nowadays, it's not uncommon for quality updates to rollout with bugs and compatibility issues. If an update was recently installed and you're experiencing a black screen, removing it may resolve it.
While in Safe mode, you won't be able to access the "Update & Security" settings to remove a quality update, but you can still use Control Panel.
To uninstall updates in Safe mode, use these steps:
- Open Start.
- Search for Control Panel and click the top result to open the experience.
- Under the "Programs" items, click the Programs and Features option.
-
Click the View installed updates option from the left pane.

- Select the most recent update.
-
Click the Uninstall button.

- Restart your computer.
Once you complete the steps, the update will uninstall, and Windows 10 won't try to install it again until the next update releases.
Uninstall security software
Although security programs are designed to keep your computer and files safe, they can also cause problems like a black screen.
If you're using a third-party antivirus or another security software type, you can temporarily remove it to determine whether the app is causing the problem.
To uninstall an application, while in safe mode, use these steps:
- Open Settings.
- Click on Apps.
- Click on Apps & features.
- Under the "Apps & features" section, select the security app.
-
Click the Uninstall button.

- Continue with the on-screen directions (if applicable).
- Restart your computer.
If you no longer see a black screen on Windows 10, you can reinstall it again, but if the problem re-appears, remove it one more time, and check your software vendor's support website for an updated version or additional support.
Create new Windows 10 account
A problem with your current account could also be the reason for the black screen on Windows 10.
If you want to determine whether your account is causing problems, while in safe mode, you can create a new local account. If it works, you should consider transferring to the new account.
To create a new account in safe mode, use the steps:
- Open Start.
- Search for Command Prompt, right-click the top result, and select the Run as administrator option.
-
Type the following command to create a new account and press Enter:
net user ACCOUNT-NAME /addIn the command, make sure to change "ACCOUNT-NAME" for the name of the account you want to create.
For example, this command creates an account named tempuser:
net user tempuser /add -
Type the following command to change the account type to "Administrator" and press Enter:
net localgroup administrators tempuser /add
- Restart your computer.
- Sign in with the new user account.
If the computer is no longer experiencing a black screen, then the problem is something related to your old user account. Instead of troubleshooting the old account, you should refer to this guide to transfer your files, link your user profile with a Microsoft account, and delete the old account.
How to fix black screen with System Restore on Windows 10
Alternatively, you can also use the System Restore feature to undo system changes using one of the available restore points, which can potentially fix the black screen problem on Windows 10. You won't lose your files, but depending on the current configuration, you may lose some settings, apps, and updates. (System Restore will only work if you have previously enabled and configured the feature.)
Open Advanced startup using three-fail boot method
When the device has a black screen, you won't be able to use System Restore normally, as such, you'll need to manually trigger the recovery environment:
To access the Advanced startup environment, use these steps:
- Start computer.
-
As soon as the Windows logo appears on the screen, press the power button to interrupt the boot sequence.
- Repeat steps No. 1 and 2 two more times.
After the third interruption, Windows 10 will open into the Advanced Startup environment, and then you can continue with the steps below to use System Restore.
Open Advanced startup using bootable media method
Alternatively, you can use a USB bootable media to access the Advanced startup settings using these steps:
-
Start computer using a USB bootable media.
- Quick tip: If your device isn't starting from the USB flash drive, you'll need to change the motherboard's BIOS settings to make sure it can boot from USB. Usually, you can access the BIOS by powering up the device and pressing one of the functions, Delete, or ESC keys. However, you may need to check your manufacturer's support website for more specific details.
- Click the Next button.
-
Click the Repair your computer link in the bottom-left corner.
Once you complete the steps, continue with the System Restore instructions.
Undo changes using System Restore
To restore a computer to an earlier time to fix the black screen problem, use these steps:
- Click the Advanced Startup option.
- Click the Troubleshoot option.
- Click the Advanced options button.
-
Click the System Restore option.

-
Click the Next button.
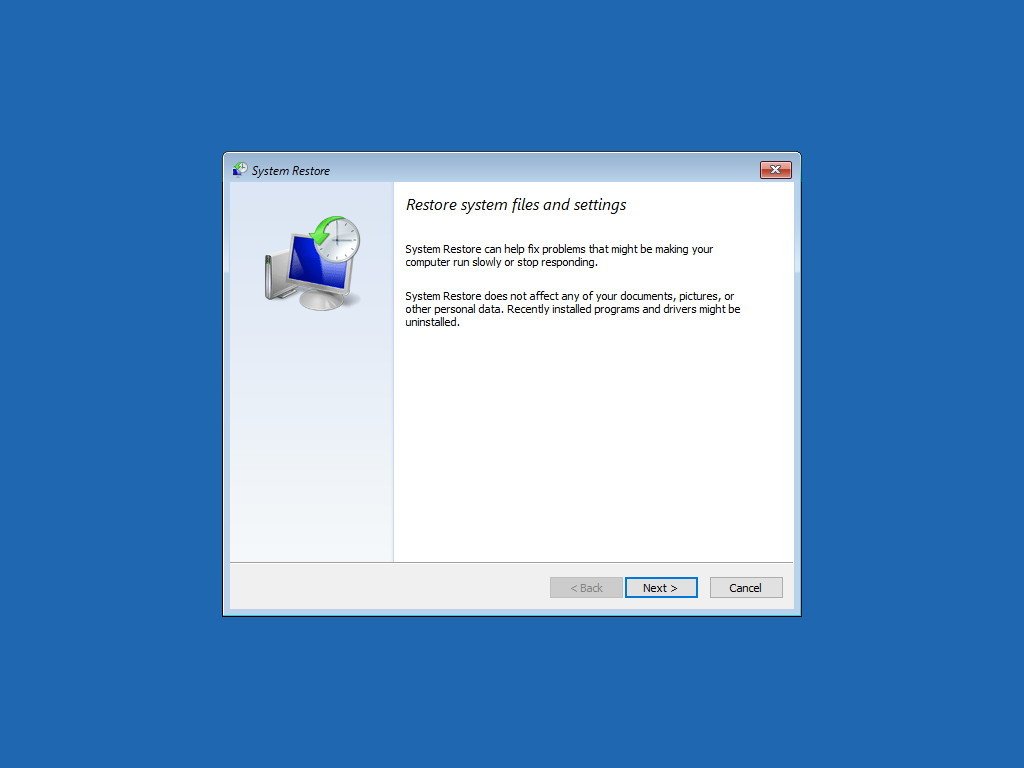
- Select the most recent known working restore point you think will resolve the problem.
- Click the Scan for affected programs button to determine the apps that will be affected after the restore point was created.
- Click the Close button.
- Click the Next button.
- Click the Finish button.
After you complete the steps, System Restore will restore the device to an earlier time removing system changes since the date of the restore point, which may resolve the black screen issue on Windows 10.
How to fix black screen reverting previous version of Windows 10
In the case that you're dealing with compatibility issues with a new version of Windows 10, you can roll back to an earlier release, as long as you do this within the first ten days after the upgrade.
Open Advanced startup using three-fail boot method
When you have a black screen in front of you, it won't be possible to use the recovery options using the Settings app, nor you'll be able to use safe mode from within Windows 10. This means that you'll need to trigger the recovery environment manually.
To access the Advanced startup environment, use these steps:
- Start computer.
-
As soon as the Windows logo appears on the screen, press the power button to interrupt the boot sequence.
- Repeat steps No. 1 and 2 two more times.
After the third interruption, Windows 10 will open into the Advanced Startup environment, and then you can continue with the steps below to rollback.
Open Advanced startup using bootable media method
Also, you can use a USB bootable media to access the Advanced startup settings using these steps:
-
Start computer using a USB bootable media.
- Quick tip: If your device isn't starting from the USB flash drive, you'll need to change the motherboard's BIOS settings to make sure it can boot from USB. Usually, you can access the BIOS by powering up the device and pressing one of the functions, Delete, or ESC keys. However, you may need to check your manufacturer's support website for more specific details.
- Click the Next button.
-
Click the Repair your computer link in the bottom-left corner.
Once you complete the steps, continue with the instructions to revert to an earlier version of Windows 10.
Uninstall latest version of Windows 10
While in the Advanced startup settings page, you can roll back to the previous version using these steps:
- Click the Troubleshoot option.
- Click the Advanced options button.
-
Click the Uninstall Update option.
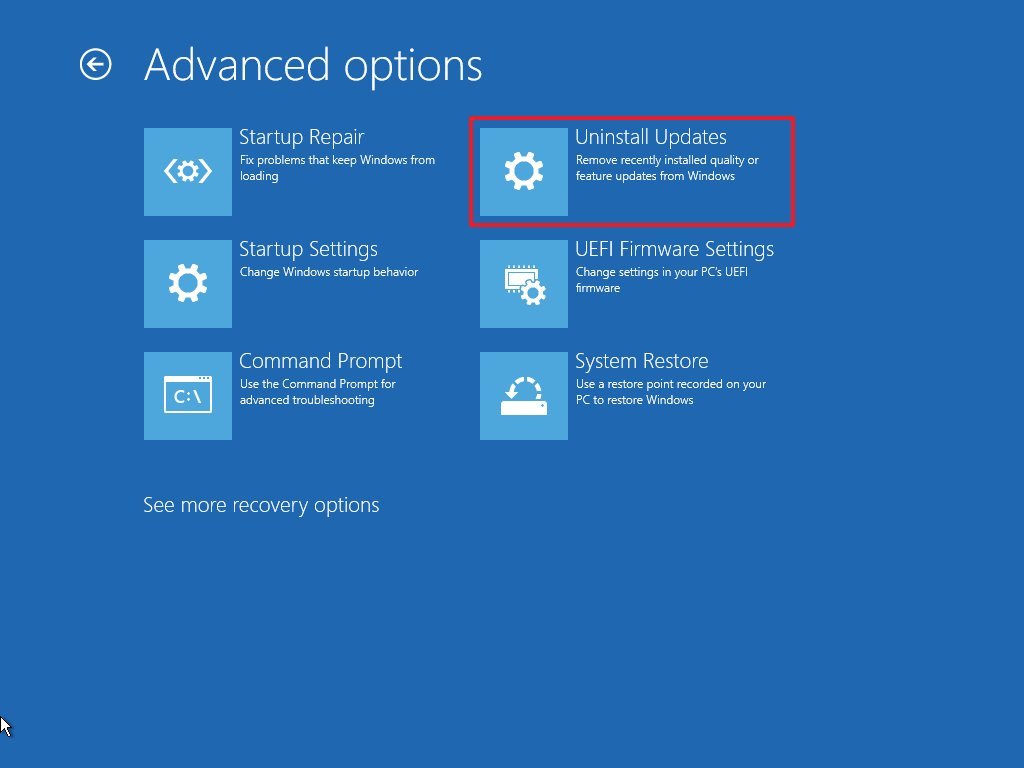
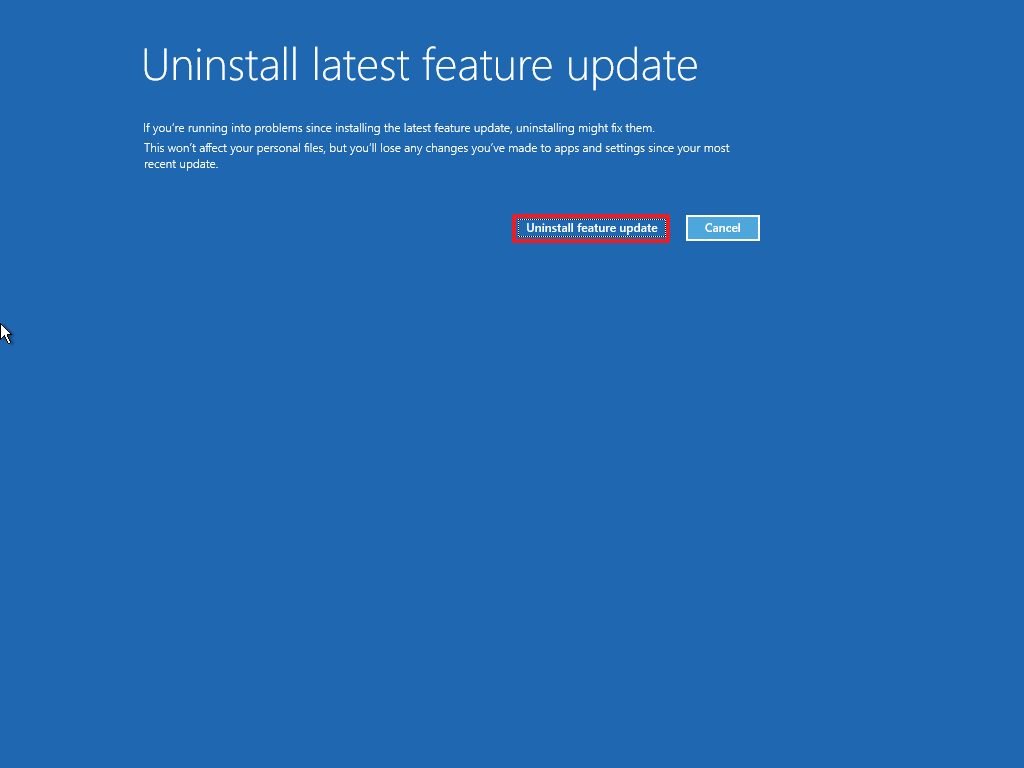
- Select the Uninstall latest feature update option.
- Sign-in with your account credentials.
-
Click the Uninstall feature update button.
If rolling back to a previous version resolves the problem, then you should avoid upgrading again until you know there's a permanent solution for the problem.
How to fix black screen during installation of Windows 10
When the black screen appears during the installation of Windows 10, it's likely that the setup is still working in the background. If this is the case, it could take several hours for the installation to complete the process, but it will eventually complete successfully.
If, after around six hours, the installation continues to be stuck with a black screen, you should try to power off the computer. You can force a shutdown by pressing and holding the power button between five to ten seconds or until the device shuts down. Then unplug the power cable.
In the case that you're using a laptop, it's also a good idea to remove the battery (if possible).
After powering off the computer, disconnect non-essential peripherals, including removable storage, printer, game controller, network cable, docking station, and secondary displays. If you can, also turn off your wireless and Bluetooth adapters. Only leave connected the essentials, such as a mouse, keyboard, and primary monitor.
Wait at least 60 seconds, reconnect the battery and power cable, but do not reconnect any peripherals and power on the device.
If it was a non-critical error, the installation should resume and complete successfully. Once you're on the Windows 10 desktop, remember to reconnect the remaining peripherals.
If it was a critical error, and the system rolls back to the previous version, don't reconnect your peripherals, and manually install the Windows 10 update one more time. If you were trying to upgrade to Windows 10, you could try to upgrade one more time, but this time you can try using a bootable USB flash drive to install Windows 10.
Were you able to fix the black screen problem on your computer? Let us know in the comments below.
More Windows 10 resources
For more helpful articles, coverage, and answers to common questions about Windows 10, visit the following resources:


0 comments:
Post a Comment