
The Start menu is highly customizable, and in this guide, we'll show you the steps to adjust its settings to make it more functional and personal on Windows 10.
On Windows 10, the Start menu is an essential component, as it's the experience you use every day to find apps, settings, and files. Although over the years, the Start menu has gone through many transformations – at one point, it was even removed from the OS–, this version combines the familiarity of Windows 7 with the modern Start screen from Windows 8.x.
Out of the box, the Start menu includes a default layout with elements and settings that usually fit most people. However, if you want to make it more functional and personal, the experience available on Windows 10 is highly customizable.
For instance, you can change the size and color or use the Start menu's full-screen version. You can use folders and groups to optimize the space and organize your apps. You can change various settings to decide how the "All apps" list should appear, and much more.
In this Windows 10 guide, we'll walk you through the easy steps to customize the Start menu on your device.
- How to change size of Start menu
- How to enable full screen for Start menu
- How to change color of Start menu
- How to manage system folders in Start menu
- How to remove suggestions in Start menu
- How to show recently added apps in Start menu
- How to show most used apps in Start menu
- How to disable app list in Start menu
- How to add apps in Start menu
- How to customize app tiles in Start menu
- How to create folders in Start menu
- How to create groups in Start menu
- How to bring back the classic Start menu
How to change size of Start menu
On Windows 10, there are at least two ways to adjust the size of the Start menu to make smaller or larger, you can resize it using the mouse or keyboard shortcut, and you can even enable an option to allow more tiles per row.
Resize manually
To resize the Start menu on Windows 10 manually, use these steps:
- Open Start.
-
Click and stretch the top edge upwards with the mouse to make the menu taller.

-
Click and pull the side edge outwards using the mouse to make it wider.

You can also open the Start menu and then use the Ctrl + arrow keys keyboard shortcut to change the height and width. For example, you can use the Ctrl + up arrow key multiple times to make it taller, or use the Ctrl + right arrow key stretch the menu.
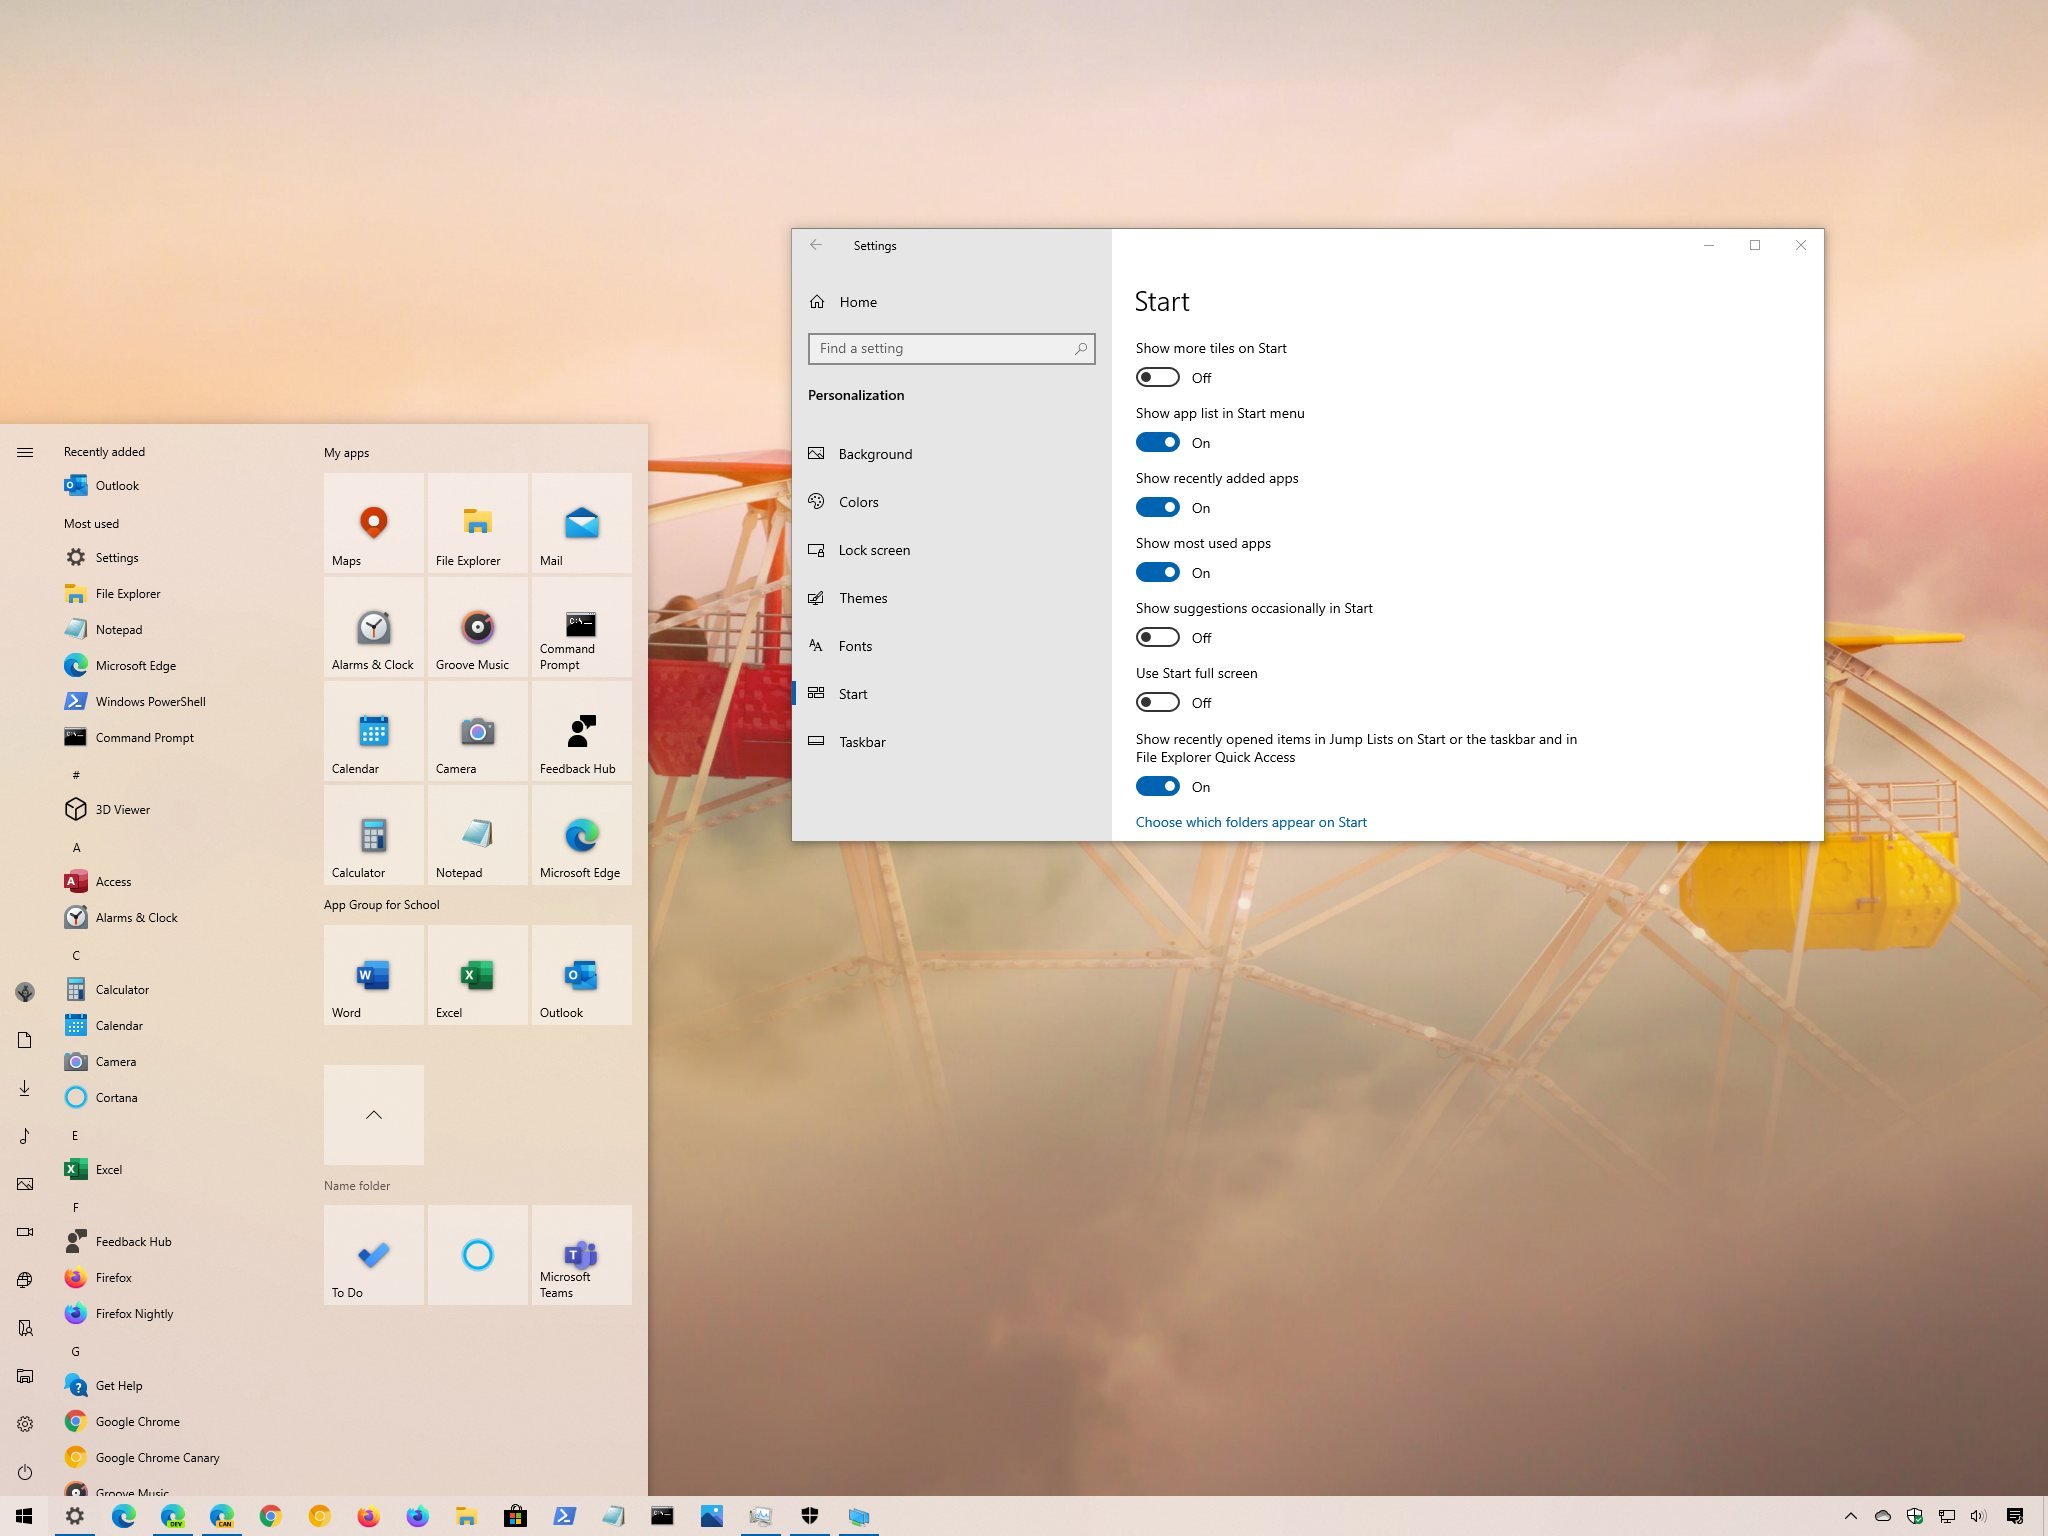
Show more tiles
To add a fourth row of tiles per column to the Start menu, use these steps:
- Open Settings.
- Click on Personalization.
- Click on Start.
-
Turn on the Show more tiles in Start toggle switch.

-
Confirm the change opening Start.

Once you complete the steps, you'll be able to add a fourth row of app tiles on each column.
How to enable full screen for Start menu
To enable the full-screen mode in Start, use these steps:
- Open Settings.
- Click on Personalization.
- Click on Start.
- Turn on the Use Start full-screen toggle switch.
-
Confirm the change opening Start.

After you complete the steps, when opening the Start menu, you'll notice a Windows 8.1 Start screen-like experience that fills out the entire desktop, allowing you to see more groups of items without scrolling.
How to change color of Start menu
To change the Start menu color on Windows 10, use these steps:
- Open Settings.
- Click on Personalization.
- Click on Colors.
-
Under the "Choose your color" section, use the drop-down menu and select the Dark or Custom option with the Dark option for the "Choose your default Windows mode" setting.

-
Under the "Show accent color on the following surfaces" section, check the Start, taskbar, and action center option.

-
Use the "Windows colors" picker to select the color for the Start menu and other elements.

Quick tip: Alternatively, if you want the menu to take the color pattern from the current background, check the Automatically pick an accent color from my background option. Also, if the color you want isn't on the list, you can create a custom color clicking the Custom color button.
-
Confirm the new color opening Start.

Once you complete the steps, the Start menu, as well as the taskbar and action center, will reflect the new color scheme.
How to manage system folders in Start menu
To add and remove the system folders available through Start, use these steps:
- Open Settings.
- Click on Personalization.
- Click on Start.
-
Click the Choose which folders appear in Start option.

-
Select the system folders you want to see in the left rail, including:
- File Explorer.
- Settings.
- Downloads.
- Music.
- Pictures.
- Videos.
- Network.
- Personal folder.

-
Confirm the changes opening Start.

After you complete the steps, you'll be able to find the shortcuts in the left rail of the Start menu above the Power menu.
How to remove suggestions in Start menu
Sometimes, the Start menu can show apps suggestions. For example, when you open the menu, you may see recommendations of apps in the "All apps" list. Or if you perform a search for "Chrome" or "Firefox," you might get a suggestion recommending to use Microsoft Edge instead alongside the result. Although they're not ads, they kind of behave like if they were. If you rather stop this behavior, you can disable the option.
To stop getting app suggestions in Start, use these steps:
- Open Settings.
- Click on Personalization.
- Click on Start.
-
Turn off the Show suggestions occasionally in Start toggle switch.

Once you complete the steps, the Start menu will no longer try to show app suggestions when you're using the experience.
How to show recently added apps in Start menu
To see a list of recently added apps in the Windows 10 Start menu, use these steps:
- Open Settings.
- Click on Personalization.
- Click on Start.
-
Turn on the Show recently added apps toggle switch.

-
Confirm the list of recently added apps in Start.

After you complete the steps, you'll see recently added apps at the top of the "All apps" list.
How to show most used apps in Start menu
To get quick access to your most frequent apps in Start, use these steps:
- Open Settings.
- Click on Personalization.
- Click on Start.
-
Turn on the Show most used apps toggle switch.

-
Confirm the list of recently added apps in Start.

Once you complete the steps, the top six most frequent apps you use on Windows 10 will appear at the top of the "All apps" list.
How to disable app list in Start menu
To disable the all apps list in Start, use these steps:
- Open Settings.
- Click on Personalization.
- Click on Start.
-
Turn off the Show app list in Start toggle switch.

-
Confirm the app list is disabled opening Start.

After you complete the steps, the "All apps" list will no longer appear by default in the Start menu. However, if you ever need to reaccess the list, you can switch between the "Pinned tiles" and "All apps" view using the buttons on the top-left corner.
How to add apps in Start menu
On Windows 10, you can quickly add and remove apps from the tiles section.
Pin apps
To pin apps to the tiles section, use these steps:
- Open Start.
- Right-click an app from the app list.
-
Select the Pin to Start option.

- Repeat step No. 2 and No. 3 to pin additional apps.
Once you complete the steps, the apps will appear in the Pinned tiles section.
Unpin apps
To unpin apps from Start, use these steps:
- Open Start.
- Right-click an app from the app tiles section on the right side.
-
Select the Unpin to Start option.

After you complete the steps, the app will be removed from the Pinned tiles section.
How to customize app tiles in Start menu
On Windows 10, to better organize the experience, you can customize the app tiles in several ways. You can change their size, round them up into groups, and group them into folders to optimize the space in the menu.
Resize tiles
To change the size of an app tile, use these steps:
- Open Start.
- Right-click an app tile from the right side.
-
Select the Resize submenu and choose one of the available sizes:
- Small.
- Medium.
- Wide.
- Large.

Once you complete the steps, the size of the tile will change to the one you specified.
While the Start menu offers four different tile sizes, not all the apps support all the formats.
Turn off Live Tiles updates
Although Microsoft already showed signs that the Start menu could eventually remove Live Tiles, you can still decide whether to see app updates on apps.
To disable live updates for app tiles, use these steps:
- Open Start.
- Right-click an app tile from the right side.
-
Select the More submenu and choose the Turn Live Tile off option (or Turn Live Title on option).

After you complete the steps, the tile will no longer show live updates about the app.
How to create folders in Start menu
On the Start menu, folders are another way to group tiles to optimize the space to fit more apps.
To create a folder on the Start menu, use these steps:
- Open Start.
- Drag and drop an app tile on top of another.
-
Drag and drop more tiles inside the folder as necessary.

-
Click the "Name folder" header and specify a custom name for the folder—for example, Work apps.

If you want to remove the folder, simply drag and drop each tile outside of the folder. After removing all the tiles, the folder will delete automatically.
How to create groups in Start menu
You can also organize the Start menu tiles into groups. For example, you can create a group to round up all your work applications, group your frequent apps, or group your favorite games.
To create groups on the Start menu, use these steps:
- Open Start.
-
Drag and drop an app tile on an empty space.
Quick note: As you drag the tile, a visual element should appear indicating the end of the current group and the beginning of the new one.
-
Drag and drop more app tiles to the section as necessary.

- Hover over the header of the group and click the Name group option.
-
Specify a custom name for the group. For example, App Group for School.

Once you complete the steps, you can create additional groups to organize your apps more logically.
Rearrange tiles
To rearrange apps in the Windows 10 Start menu, use these steps:
- Open Start.
-
Drag a tile to the location you want in Start.

After you complete the steps, you can repeat the steps to rearrange other apps.
If the location you want to position the app is occupied by another tile, drag the tile over to make the other tiles to make them move to make the space.
How to bring back the classic Start menu
If you prefer a more classic look, you can remove all the app tiles to get only a view of the app apps list, which is similar to the menu style available on Windows 7.
To get a menu similar to the one on Windows 7, use these steps:
- Open Start.
- Right-click a tile and select the Unpin from Start option.
-
Repeat step No. 2 to unpin all the tiles.

Once you complete the steps, you'll end up with a Start menu similar to the classic look available in previous versions.
More Windows 10 resources
For more helpful articles, coverage, and answers to common questions about Windows 10, visit the following resources:


0 comments:
Post a Comment