Are you having issues using an HDR display? In this guide, we'll show you several troubleshooting steps to resolve most common problems on Windows 10.
On Windows 10, you can play high dynamic range (HDR) content on an HDR10 compatible built-in display or external monitor (or TV) connected to your computer.
HDR is a technology that has been designed to improve the contrast and color of the content you see on the screen. Unlike standard dynamic range (SDR), high dynamic range offers brighter, more vibrant, and a wide range of color details for better image quality on supported videos, games, and apps.
Although on capable smart TVs, the HDR technology just works, on desktop computers and laptops running Windows 10, it's not that simple. You have to make sure that your device meets the minimum requirements. You have to turn on HDR on display and the OS manually, and you may come across several problems.
In this Windows 10 guide, we'll walk you through the steps to resolve common problems using HDR displays for games and apps.
- How to fix HDR display not working on Windows 10
- How to fix HDR option not available on Windows 10
- How to fix HDR color not showing correctly on Windows 10
- How to fix HDR color problems with night light on Windows 10
- How to fix HDR brightness problems on Windows 10
- How to fix SDR brightness problems on HDR display on Windows 10
How to fix HDR display not working on Windows 10
Before you can start using your display for HDR content, you have to make sure the display is HDR-compatible, and you have to enable the feature on the external display (if applicable) and on Windows 10.
Confirm HDR compatibility
To check if the display is capable of HDR content on Windows 10, use these steps:
- Open Start.
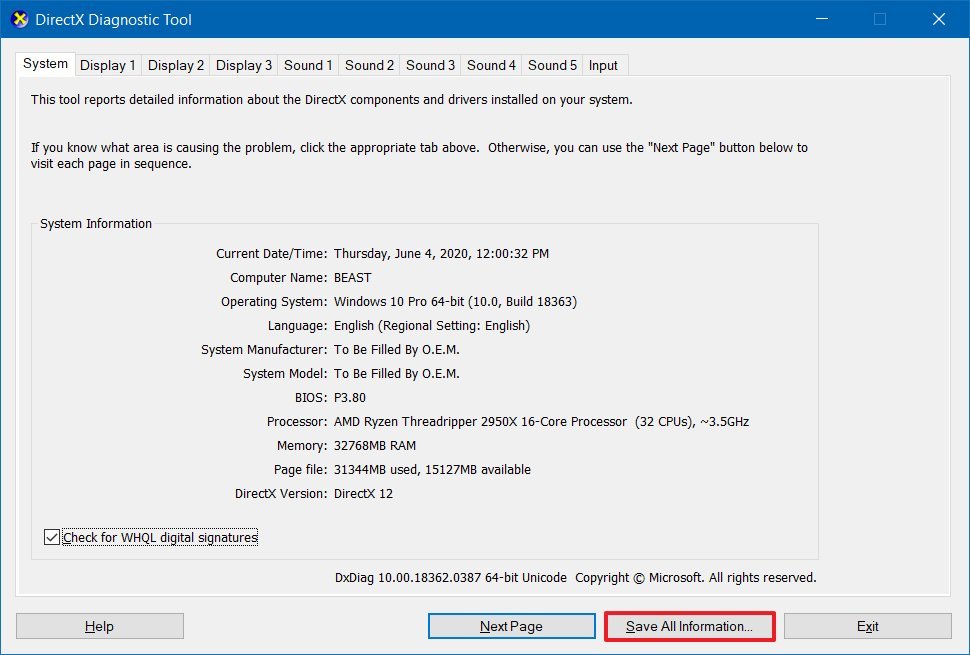
- Search for dxdiag and click the top result to open the app.
- Click the System tab.
-
Click the Save All Information button.
- Select a location to save the output file.
- Click the Save button.
- Open the file with Notepad.
-
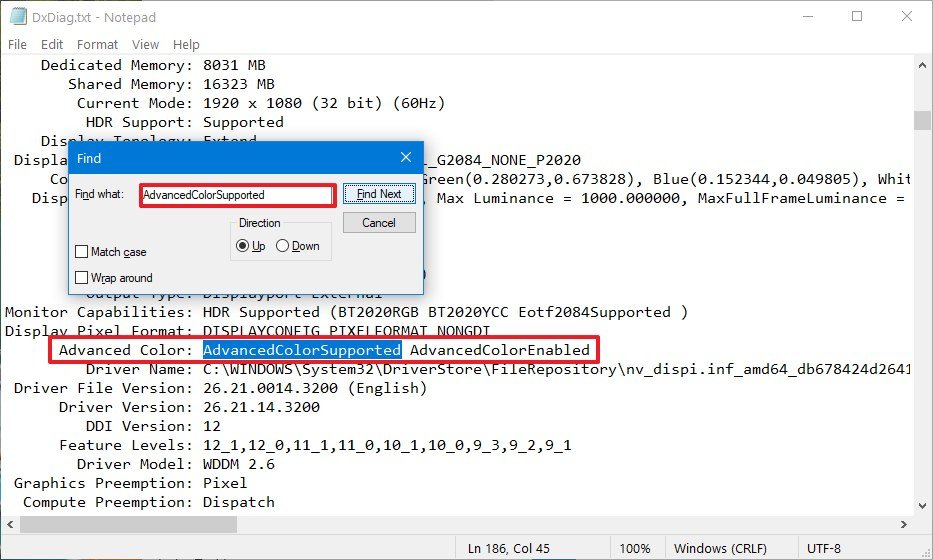
Search for Advanced Color and determine if HDR is supported:
- AdvancedColorSupported – indicates display driver with support for HDR10 is installed.
- AdvancedColorEnabled – indicates that HDR is enabled.
Quick tip: To search on Notepad, use the Ctrl + F keyboard shortcut, type the search query in the "Find what" box, and click the Find Next button. You can also use the "Direction" option to look up or down from where you're in the file.
-
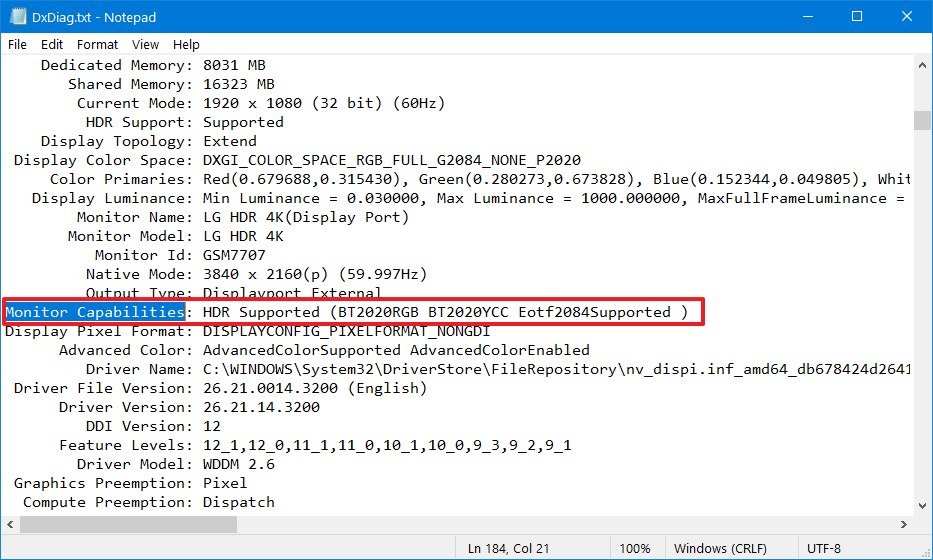
Search for Monitor Capabilities and confirm it reads HDR Supported to determine that HDR10 is supported. If one or more requirements are missing, then you'll see the HDR Not Supported message.
Quick note: If you also see "BT2020RGB" or "BT2020YCC", then the panel is capable of HDR10, and the "Eotf2084Supported" indicates that the display is capable of HDR.
Once you complete the steps, you can check and enable high dynamic range on the screen and Windows 10.
If the display isn't ready for HDR, Microsoft recommends choosing from VESA Certified DisplayHDR displays.
Minimum requirements for HDR
The minimum requirements to stream HDR video on Windows 10 are:
On a laptop:
- The built-in display needs to have a minimum resolution of 1080p and a max brightness of 300 nits (more is better).
- The integrated graphics card has to have PlayReady support and codecs for 10-bit video decoding.
On a PC:
- The monitor has to support HDR10, and HDMI 2.0 or DisplayPort 1.4 or higher.
- The graphics card has to have PlayReady 3.0 support. For example, AMD Radeon RX 400 series or higher, NVIDIA GeForce 1000 series or higher, or Intel UHD Graphics 600 series or higher support the HDR requirements.
- Windows 10 must-have codecs for 10-bit video decoding and latest graphics drivers (WDDM) installed.
Enable HDR on display
If the panel isn't showing HDR, then make sure to enable the feature on the peripheral.
The steps to enable HDR on a monitor is different per manufacturer and even per model. As a result, you'll need to check your manufacturer support website for more specific details.
Enable HDR on Windows 10
In the case of Windows 10, you can enable HDR using these steps:
- Open Settings.
- Click on System.
- Click on Display.
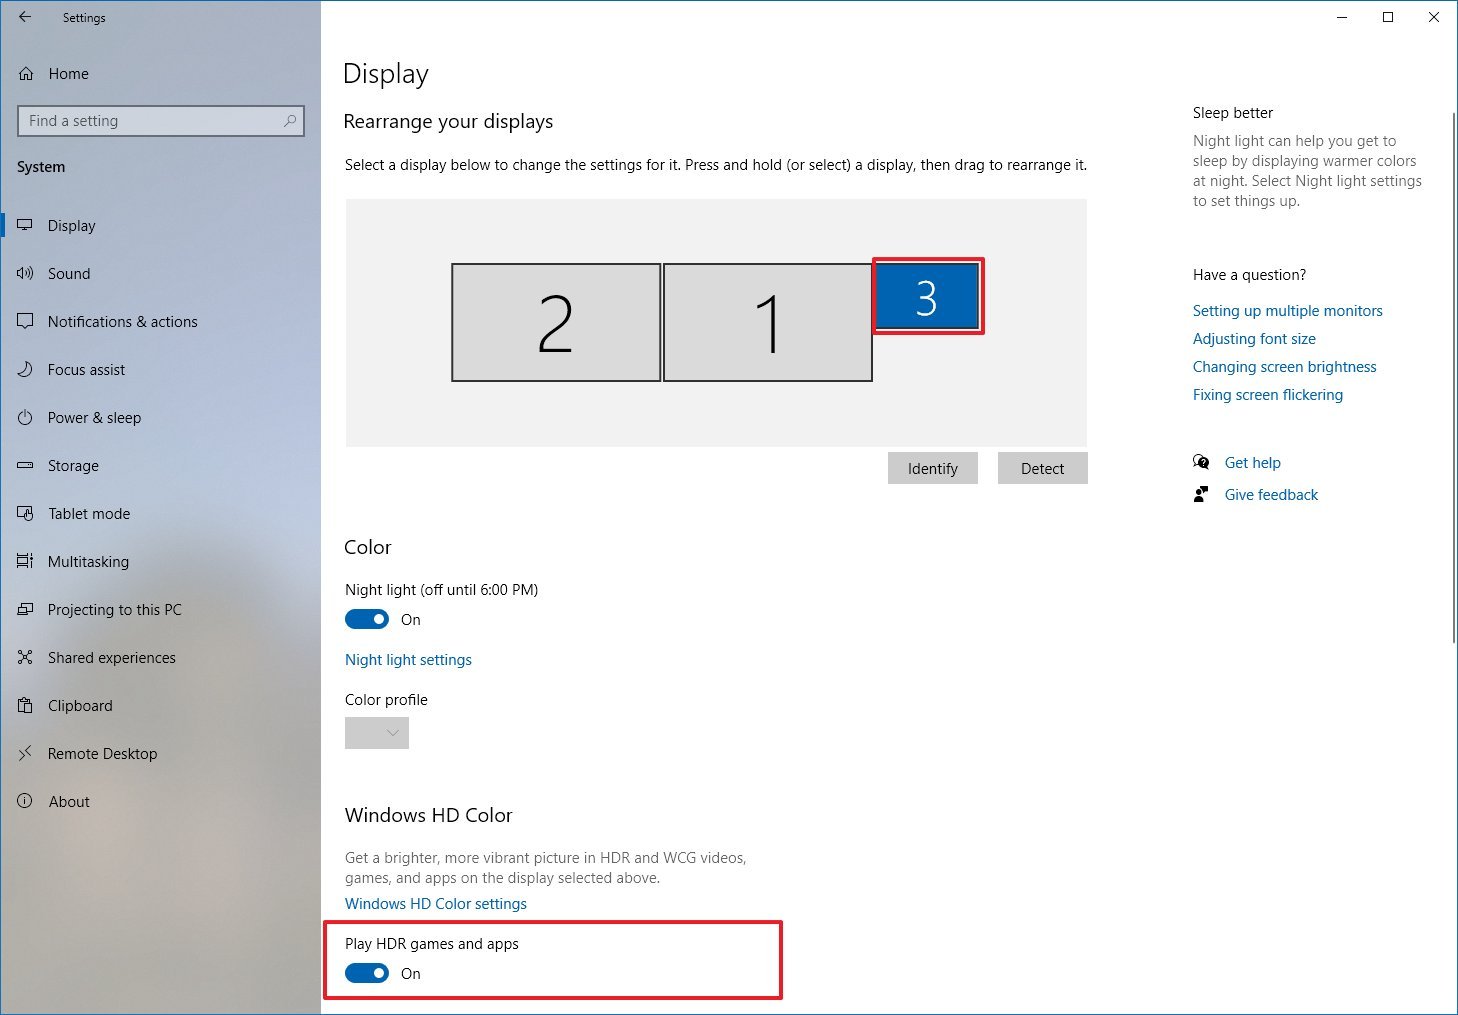
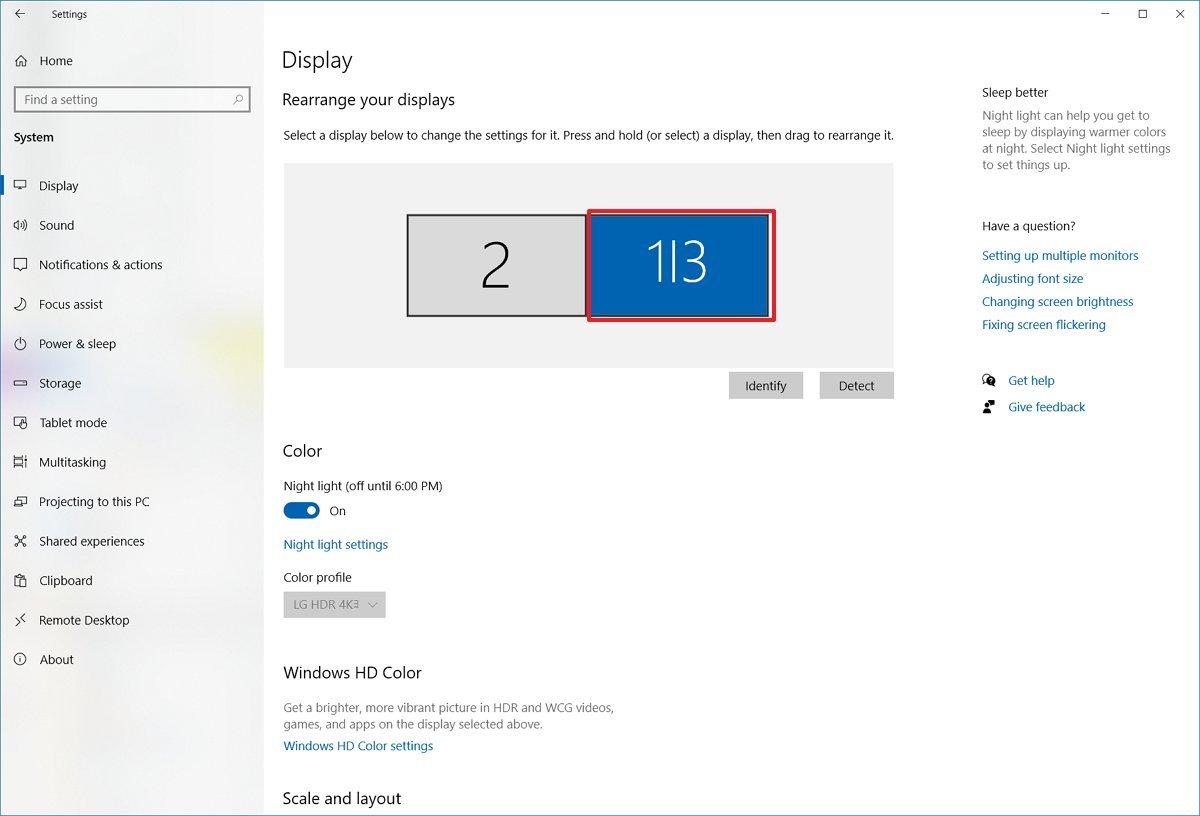
- Under the "Rearrange your displays" section, select the external monitor.
-
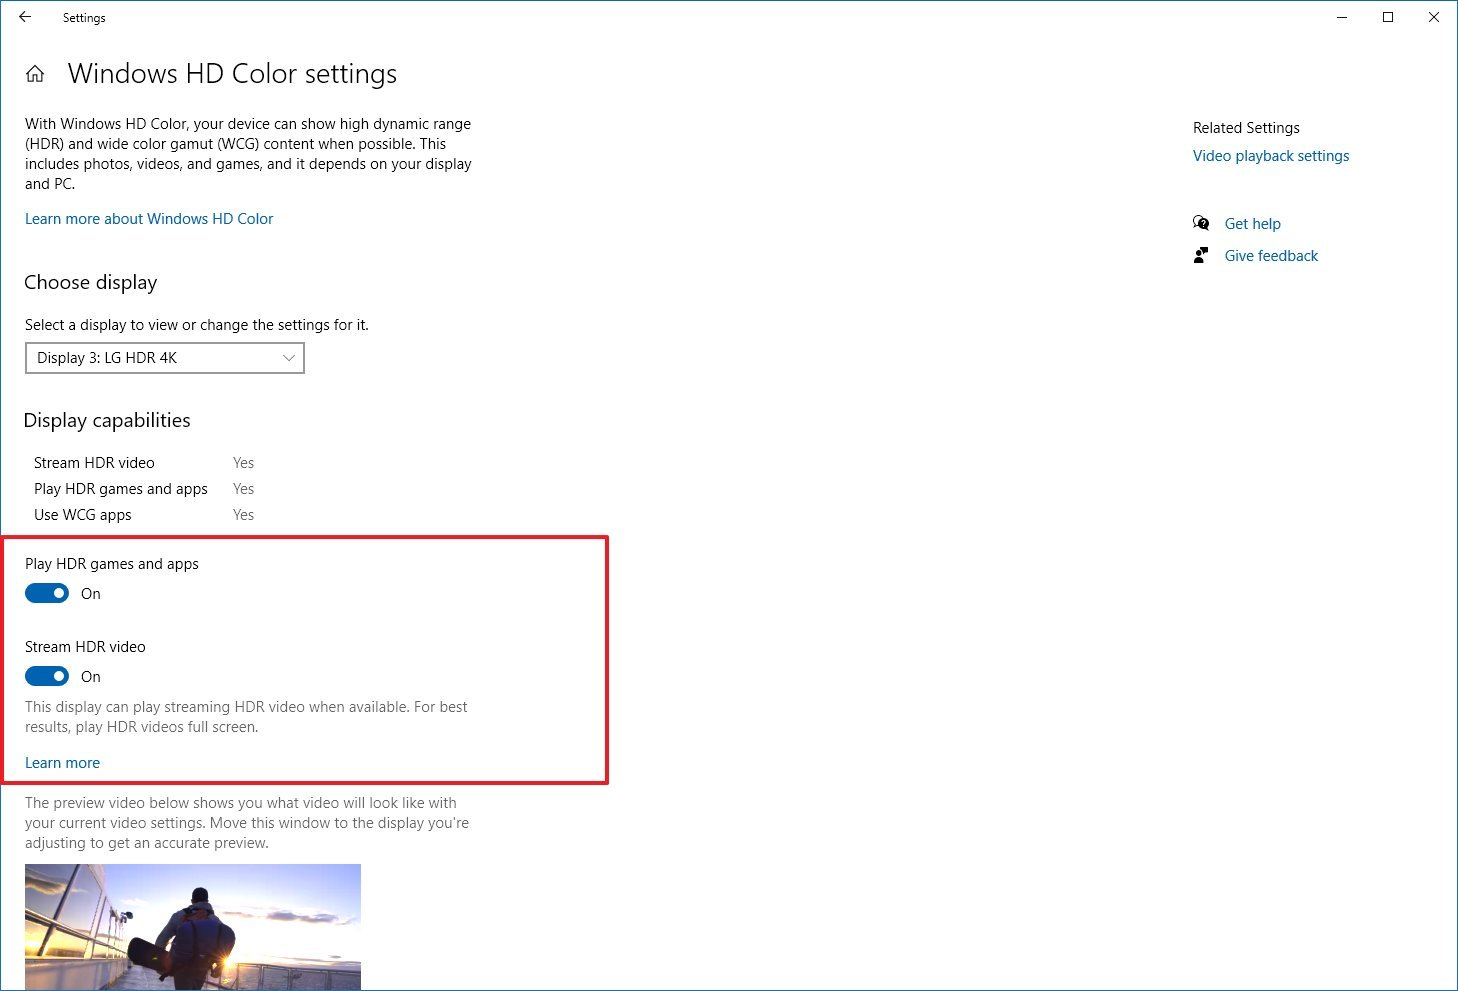
Under the "Windows HD Color" section, turn on the Play HDR games and apps toggle switch.
After you complete the steps, HDR will enable allowing you to play compatible games and apps.
How to fix HDR option not available on Windows 10
When trying to turn on high dynamic range from the Windows HD Color settings, you might see the option. However, it'll appear grayed out. Or the option won't be available after connecting an external HDR-capable monitor.
Multi-monitor setup HDR not available
If you connected an external HDR display, and you don't see the option to enable HDR in the Windows HD Color settings, then it is likely because Windows 10 is duplicating the desktop on both screens, which is not a supported configuration.
To play HDR content on the external monitor, use these steps:
- Open Settings.
- Click on System.
- Click on Display.
-
Under the "Rearrange your displays" section, select the external monitor.
-
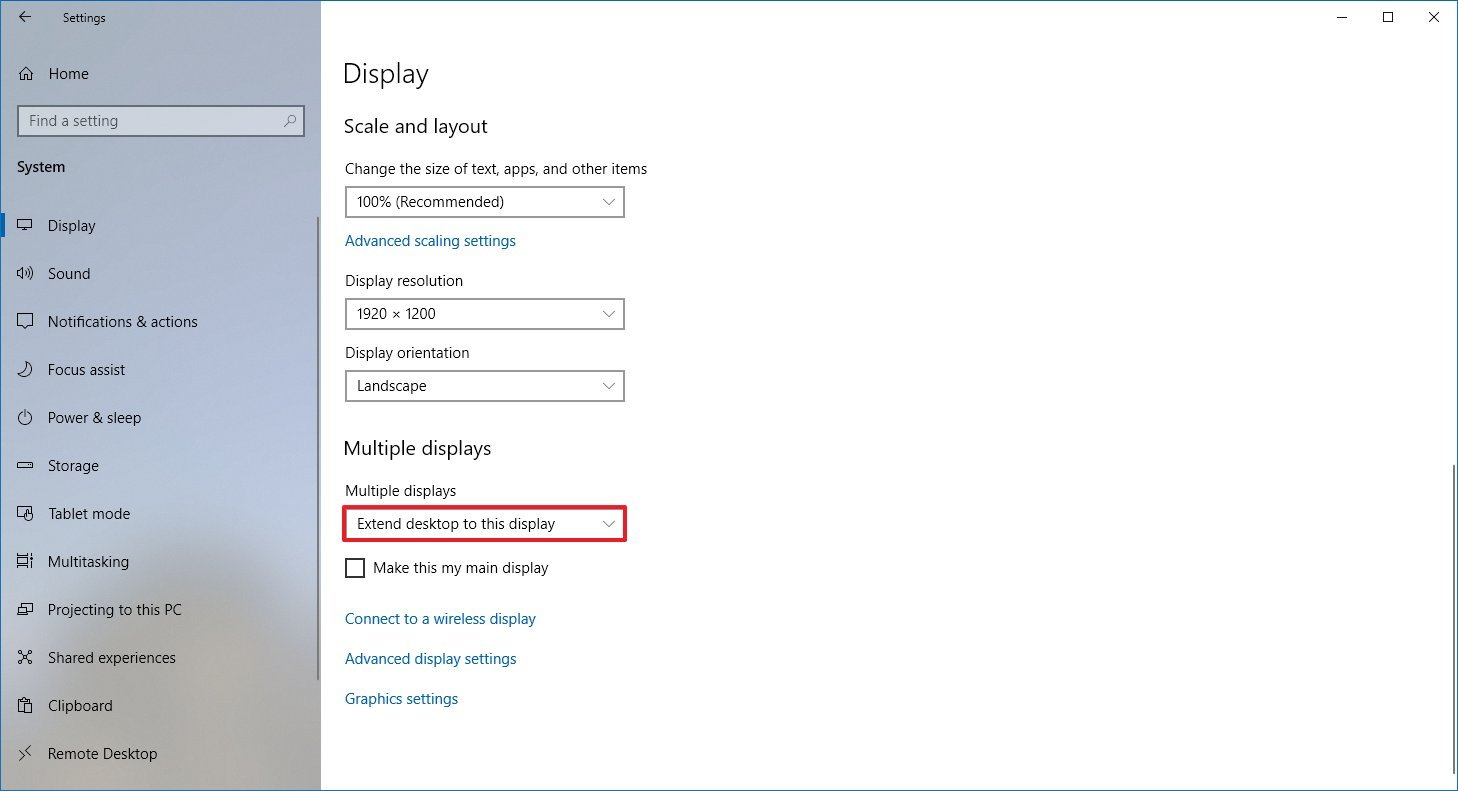
Under the "Multiple displays" section, select the Extend these displays option.
-
Click the Windows HD Color settings option.
-
Turn on the Play HDR games and apps toggle switch.
- Turn on the Stream HDR video toggle switch (if applicable).
Once you complete the steps, you should now be able to turn on the monitor's HDR feature.
Grayed-out HDR option
If the Windows HD Color settings page shows that the built-in display of a laptop with support for HDR, but the option to enable the feature isn't accessible, then it's because the power default settings are disabling HDR when running on battery.
To resolve this issue, connect the laptop to a power source, or change the settings to allow HDR content to play while on battery.
To turn on HDR while a laptop is running on battery, use these steps:
- Open Settings.
- Click on System.
- Click on Display.
- Click the Windows HD Color settings option.
-
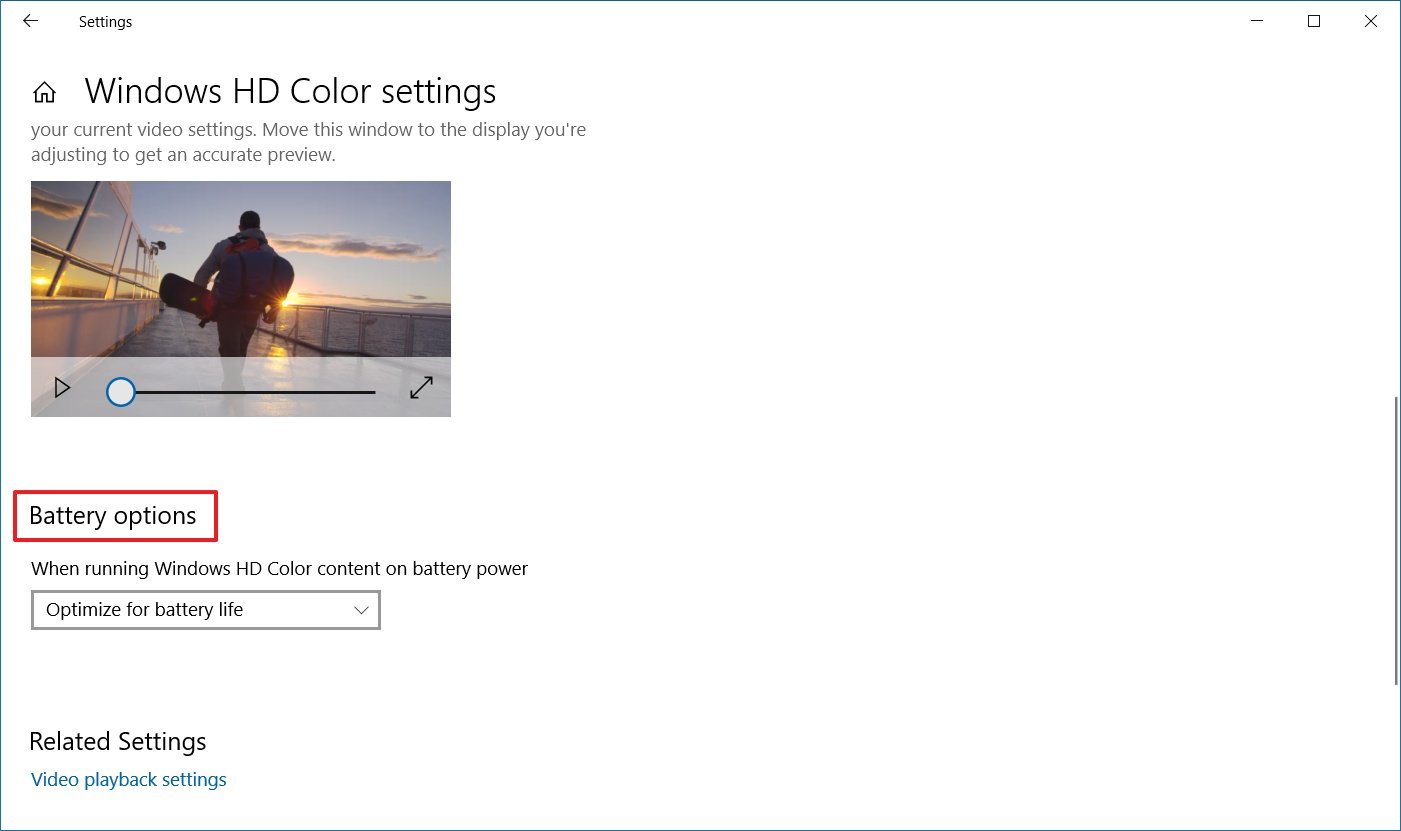
Under the "Battery options" section, clear the Don't allow HDR games and apps on battery option.
Quick note: If you don't see the option, the feature isn't available on the device.
After you complete the steps, you should be able to turn on HDR on the laptop.
How to fix HDR color not showing correctly on Windows 10
When using an HDR display on a desktop computer, you may see problems displaying colors. For example, black text not rendering correctly on a white background.
If you're experiencing color problems with an external monitor, you should check your computer to determine if the latest graphics driver is installed. If you need assistance updating the video driver, you can use these steps.
It's always recommended to use a DisplayPort connection to connect an HDR monitor instead of an HDMI connection.
If you're stuck with an HDMI connection, you can reduce the frame rate to 30Hz with these steps:
- Open Settings.
- Click on System.
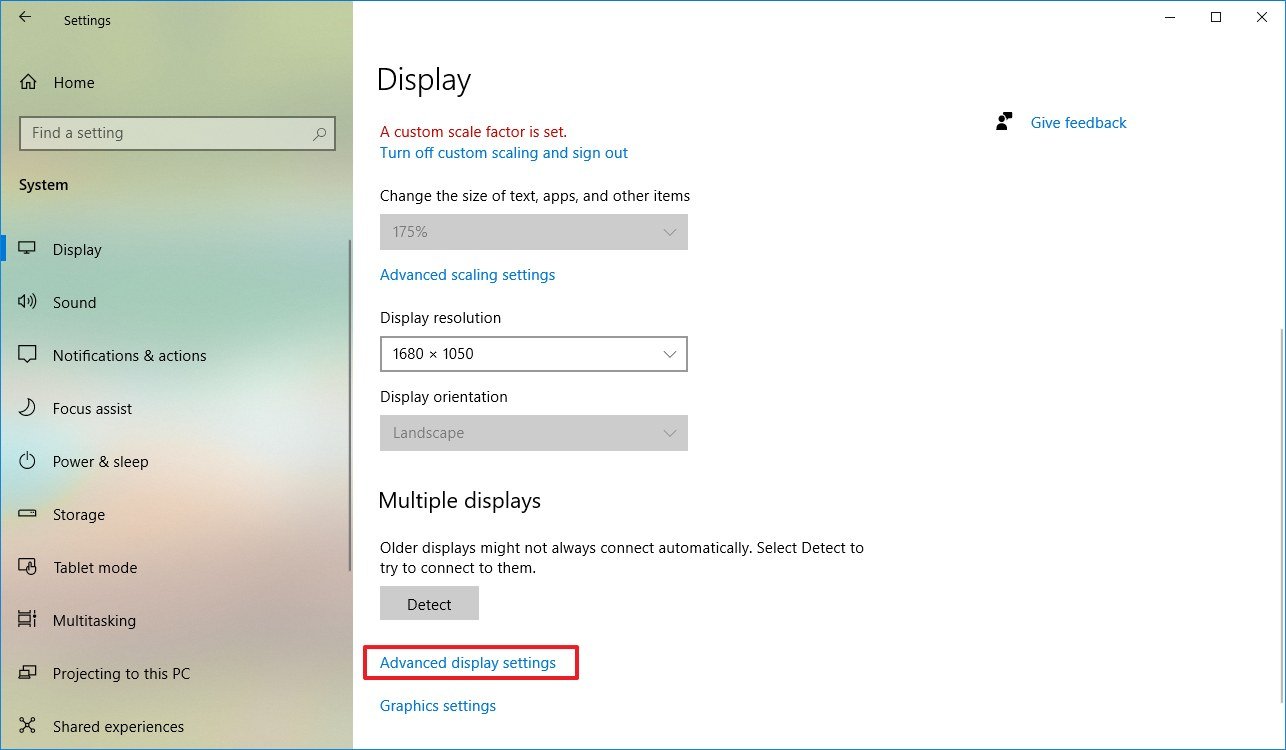
- Click on Display.
-
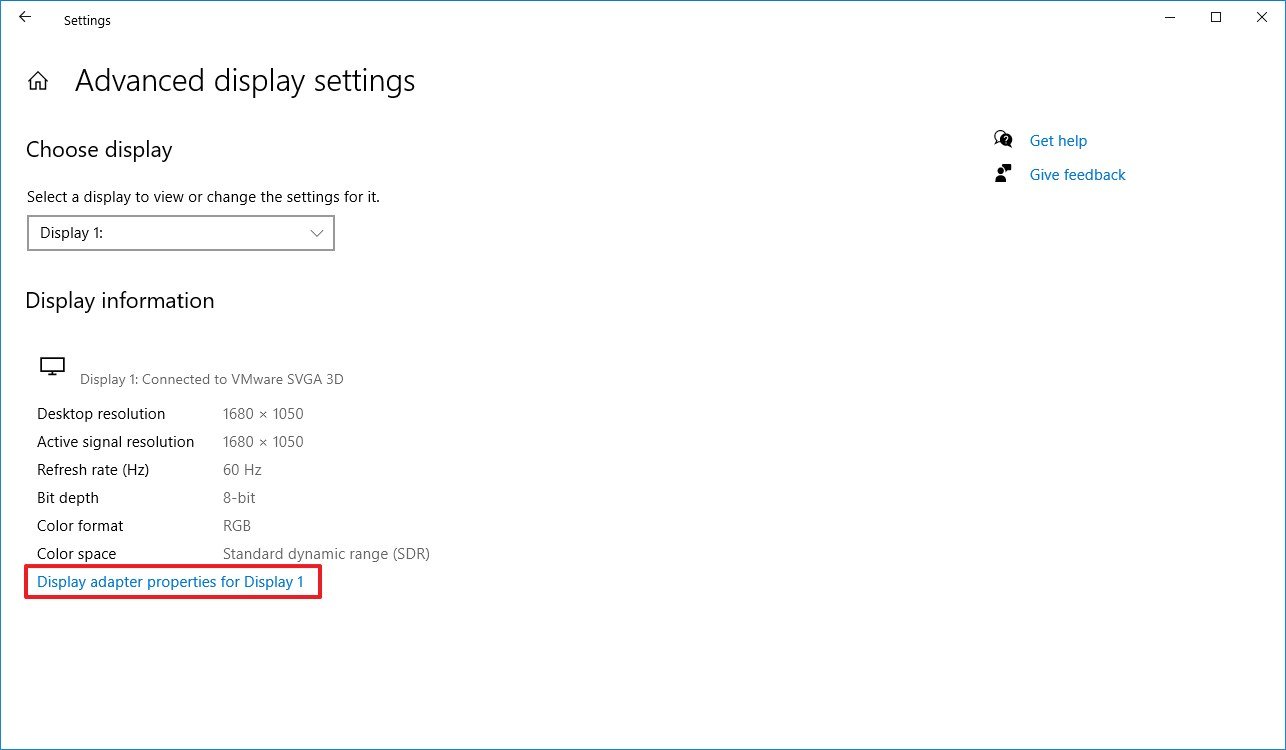
Click the Advanced display settings option.
-
Click the Display adapter properties option.
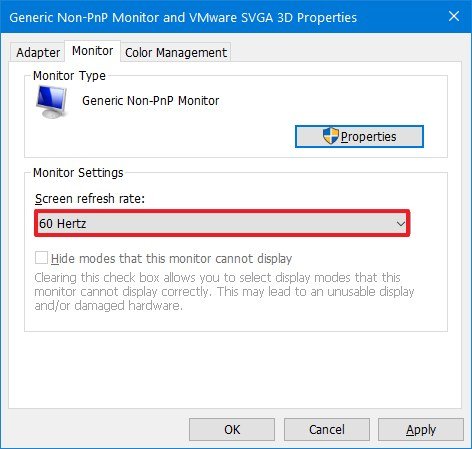
- Click the Monitor tab.
-
Use the "Screen refresh rate" drop-down menu and select the 30 Hertz option (if available).
- Click the Apply button.
- Click the OK button.
Once you complete the steps, the HDR display will start rendering colors more accurately.
How to fix HDR color problems with night light on Windows 10
On Windows 10, if the night light feature is enabled, colors on the screen may look red tint making content unreadable.
The solution is to adjust the night light strength or disable the feature when using HDR content with these steps:
- Open Settings.
- Click on System.
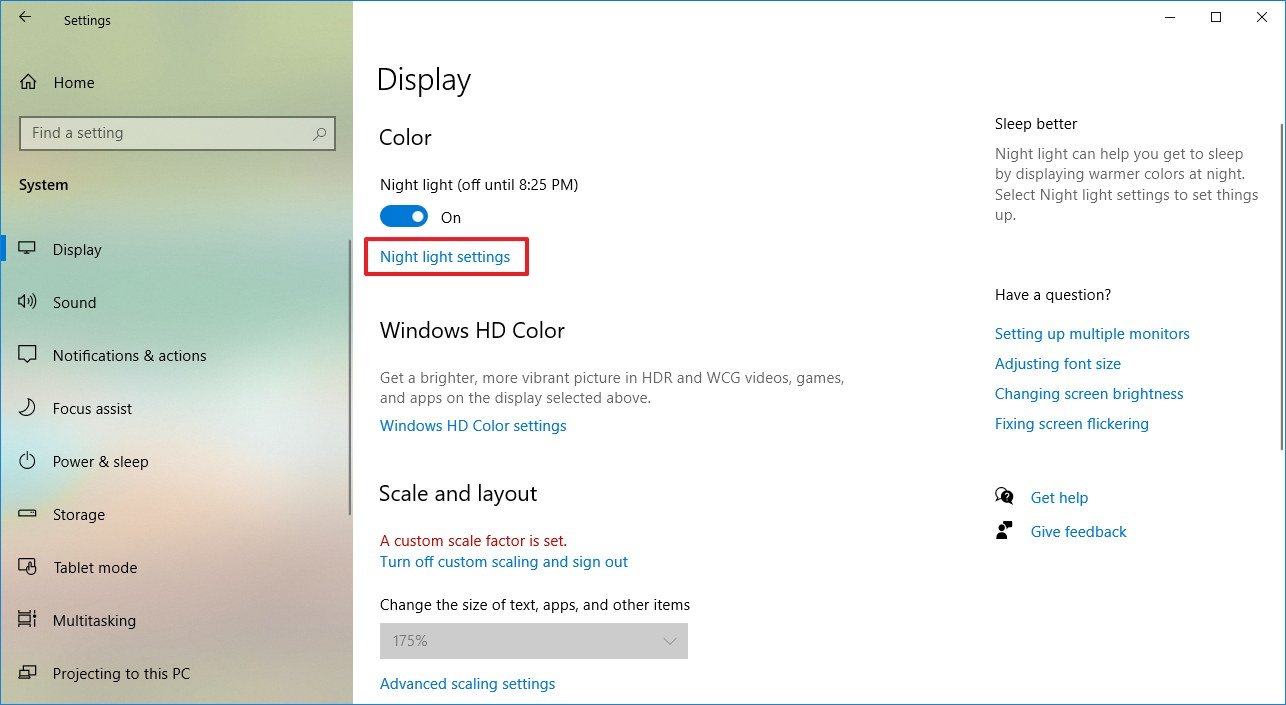
- Click on Display.
-
Click the Night light settings option.
-
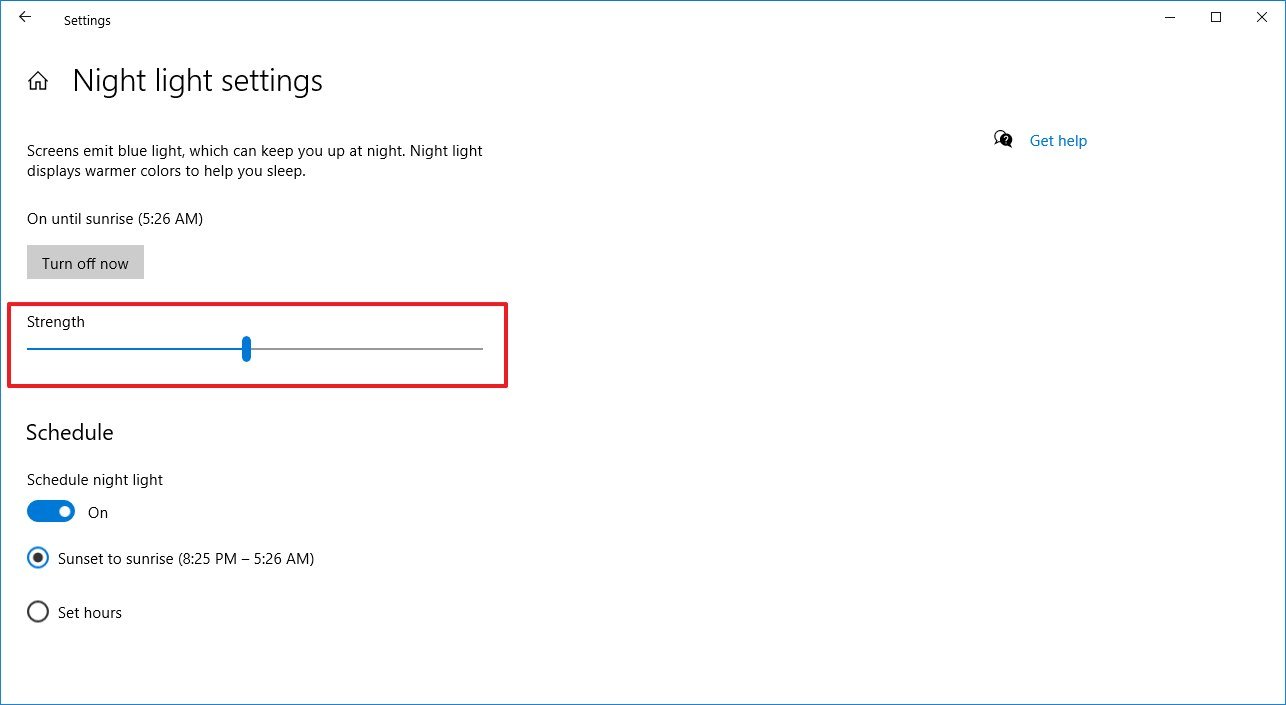
Use the slider to minimize the strength of night light to improve HDR on Windows 10.
- (Optional) Click the Turn off now button.
After you complete the steps, content in the HDR display will not be readable, and without red tint, depending on the resolution you applied.
How to fix HDR brightness problems on Windows 10
When you use a laptop with an HDR screen, you may run into several brightness issues depending on how the system is configured and whether it's plugged into a power source or running on battery.
Laptop with battery saver on
In the case that the battery saver feature is enabled and brightness changes unexpectedly on a laptop, for example, a screen turns brighter or brightness level changes on wake when running on battery, then you'll need to adjust the brightness settings manually.
To mitigate these issues, use these steps:
- Open Settings.
- Click on System.
- Click on Display.
-
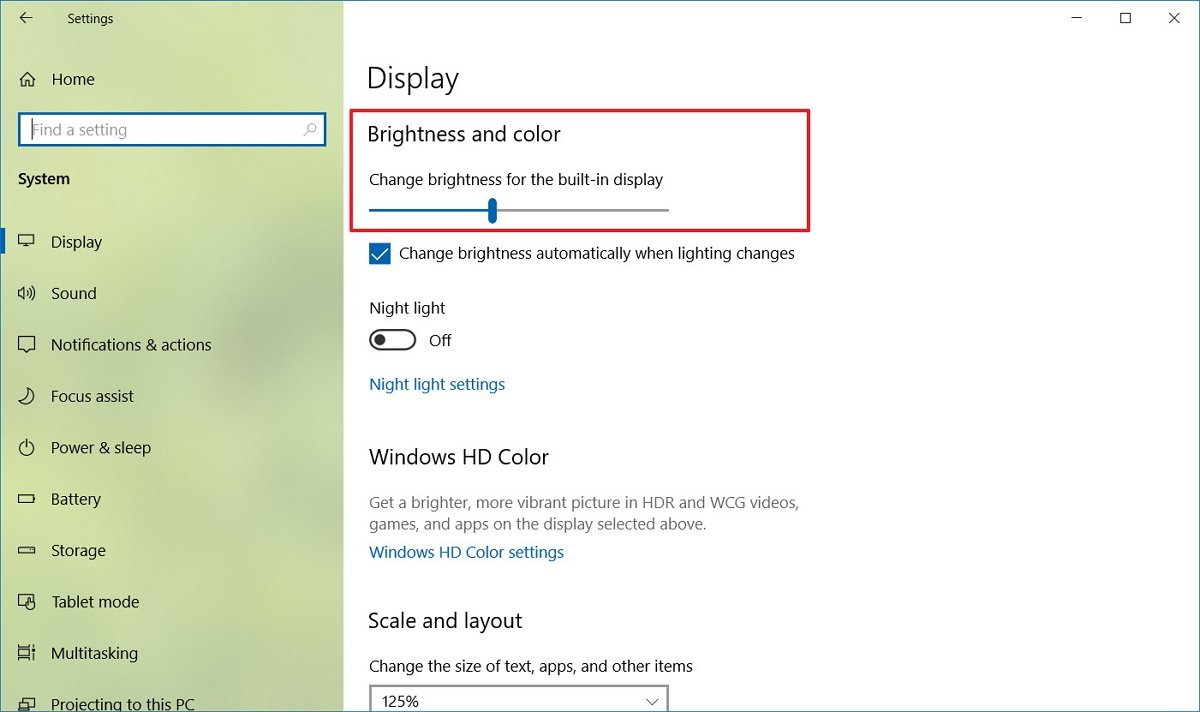
Use the "Brightness and color" slider to lower the brightness on the HDR screen.
Or if you see a sudden change of brightness level, you can disable battery saver feature on Windows 10 using these steps:
- Open Settings.
- Click on System.
- Click on Battery.
-
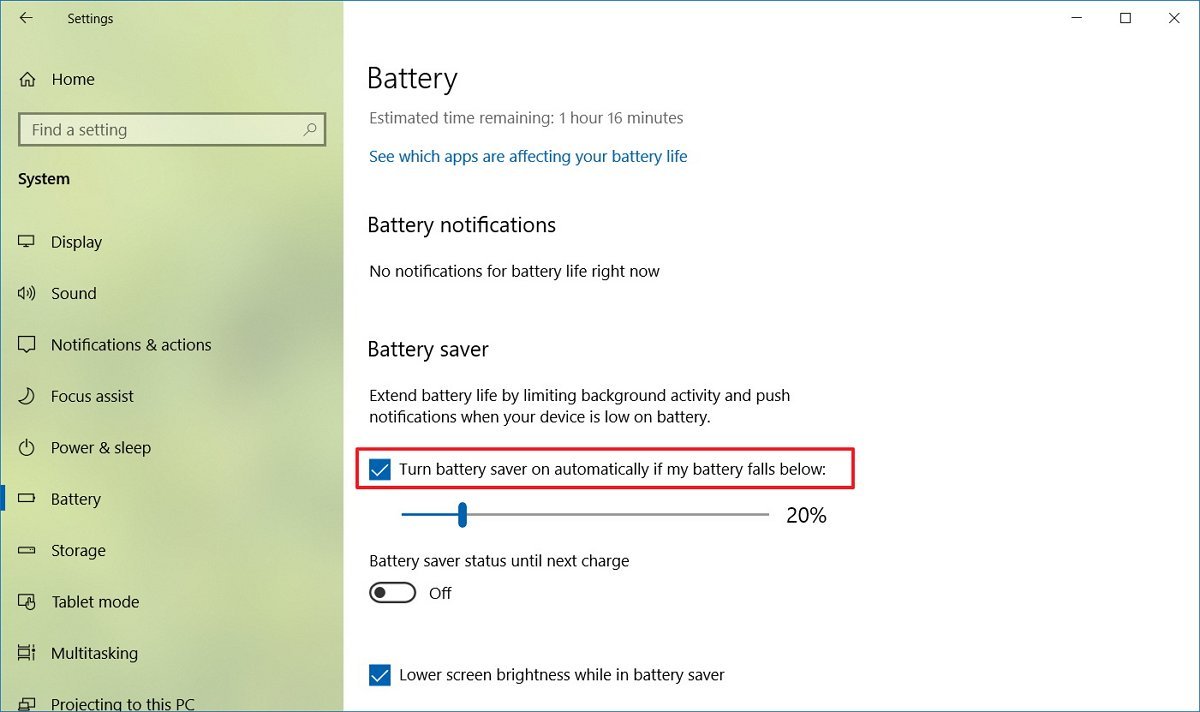
Clear the Turn battery saver on automatically if my battery falls below option.
Once you complete the steps, the brightness problem due to the battery saver option should now be resolved.
Laptop with do nothing when closing lid
If you have the option to close the lid on a laptop to "Do nothing," then you may experience lower brightness on the built-in HDR screen while the brightness setting still showing the level unchanged.
To resolve this issue set a different option for closing the lid with these steps:
- Open Settings.
- Click on System.
- Click on Power & sleep.
-
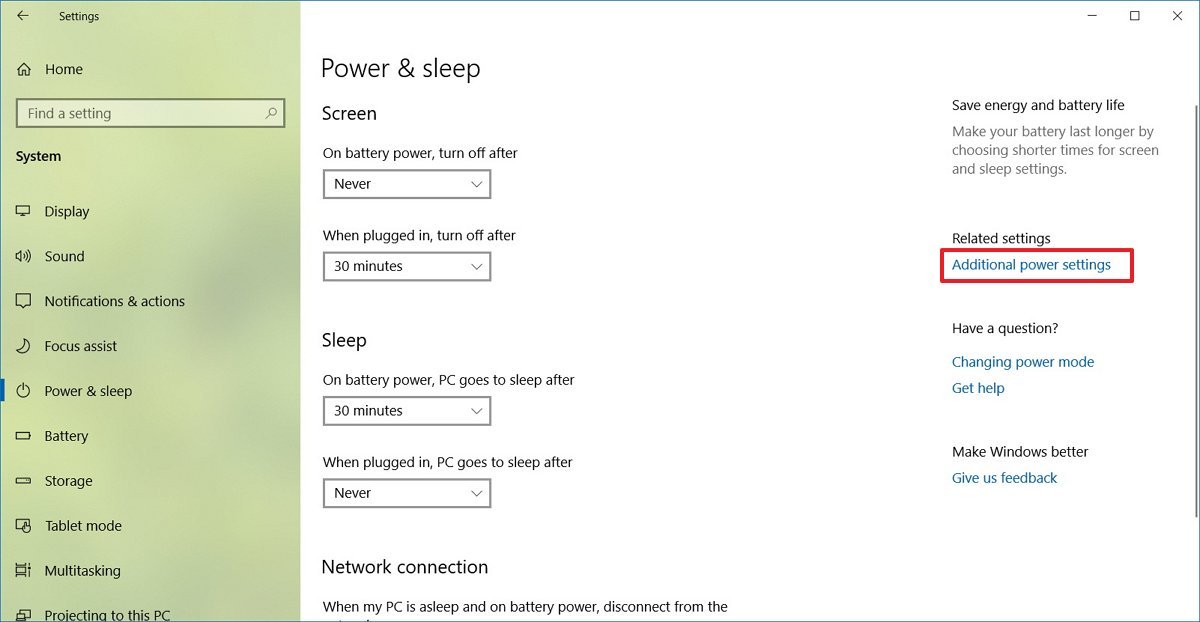
Under the "Related settings" section, click the Additional power settings option.
-
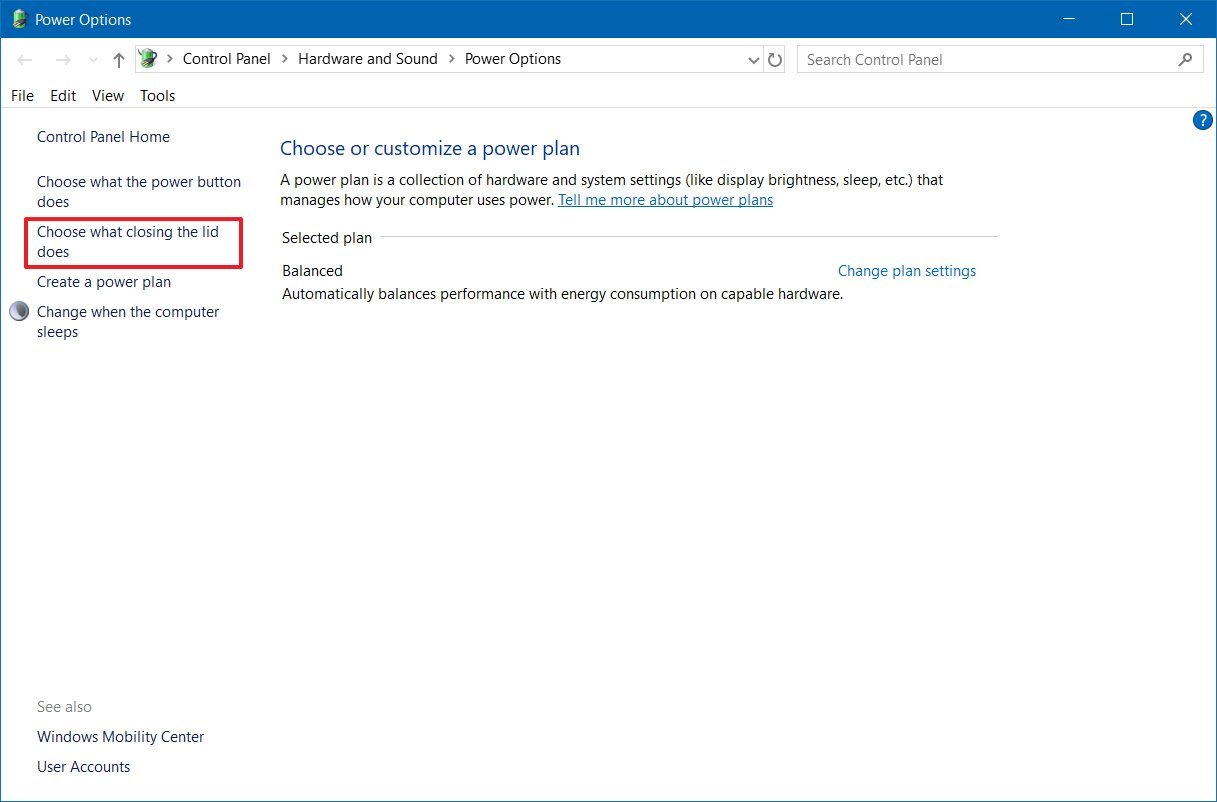
Click the Choose what closing the lid does option from the left pane.
-
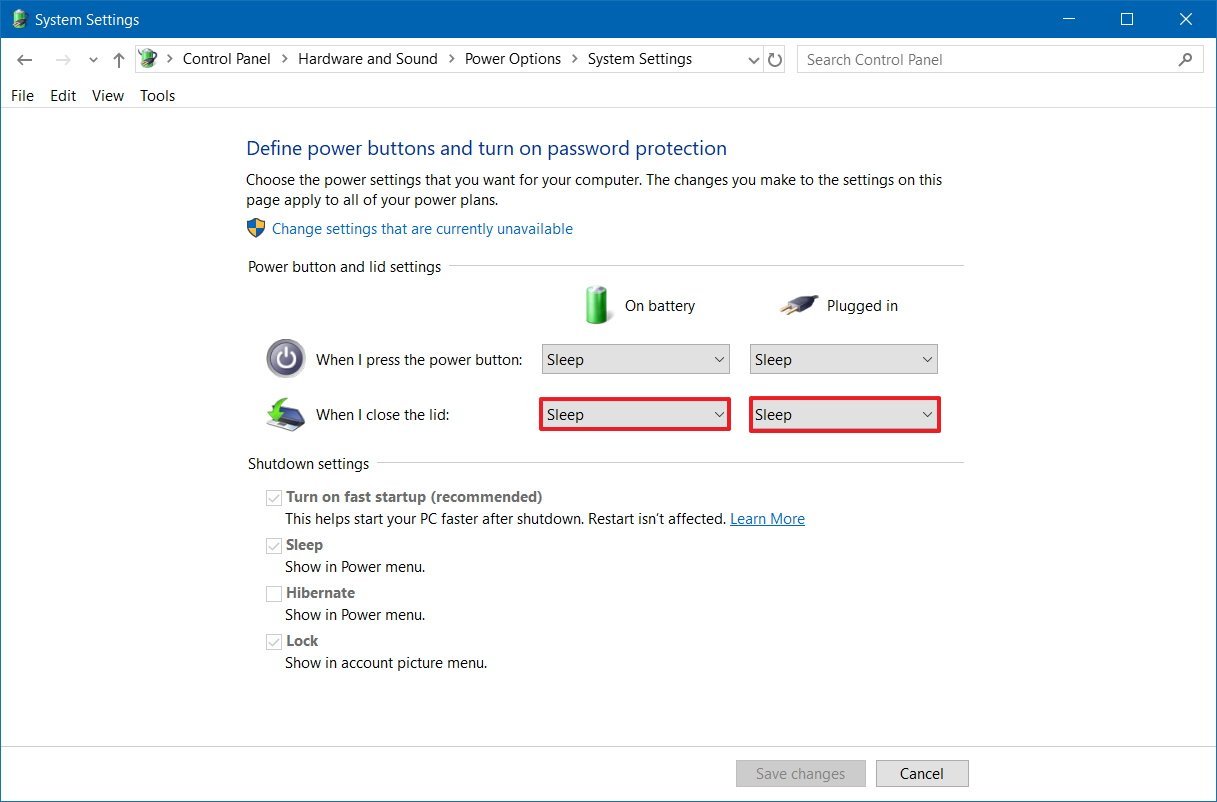
Use the When I close the lid drop-down menus and select another option other than "Do nothing."
- Click the Save changes button.
Also, to correct the screen brightness, use these steps:
- Open Settings.
- Click on System.
- Click on Display.
-
Use the "Brightness and color" slider to adjust the brightness to the desired level.
After you complete the steps, the brightness should no longer change when closing the laptop lid.
Laptop with switch from DC to AC power
On an HDR display, the brightness can suddenly change when switching from battery power to outlet power.
To resolve this issue simply adjust the brightness manually:
- Open Settings.
- Click on System.
- Click on Display.
-
Use the "Brightness and color" slider to adjust the brightness on the HDR screen to the desired level.
Once you complete the steps, you may need to repeat the steps in the future, if you run into the same situation.
How to fix SDR brightness problems on HDR display on Windows 10
When you use an HDR display, standard dynamic range (SDR) content may appear with very low or very high brightness. This happens because displays identify SDR and HDR signals differently, which can cause brightness problems.
All SDR content and apps
To resolve this problem, you need to adjust the relative brightness with these steps:
- Open Settings.
- Click on System.
- Click on Display.
-
Click the Windows HD Color settings option.
-
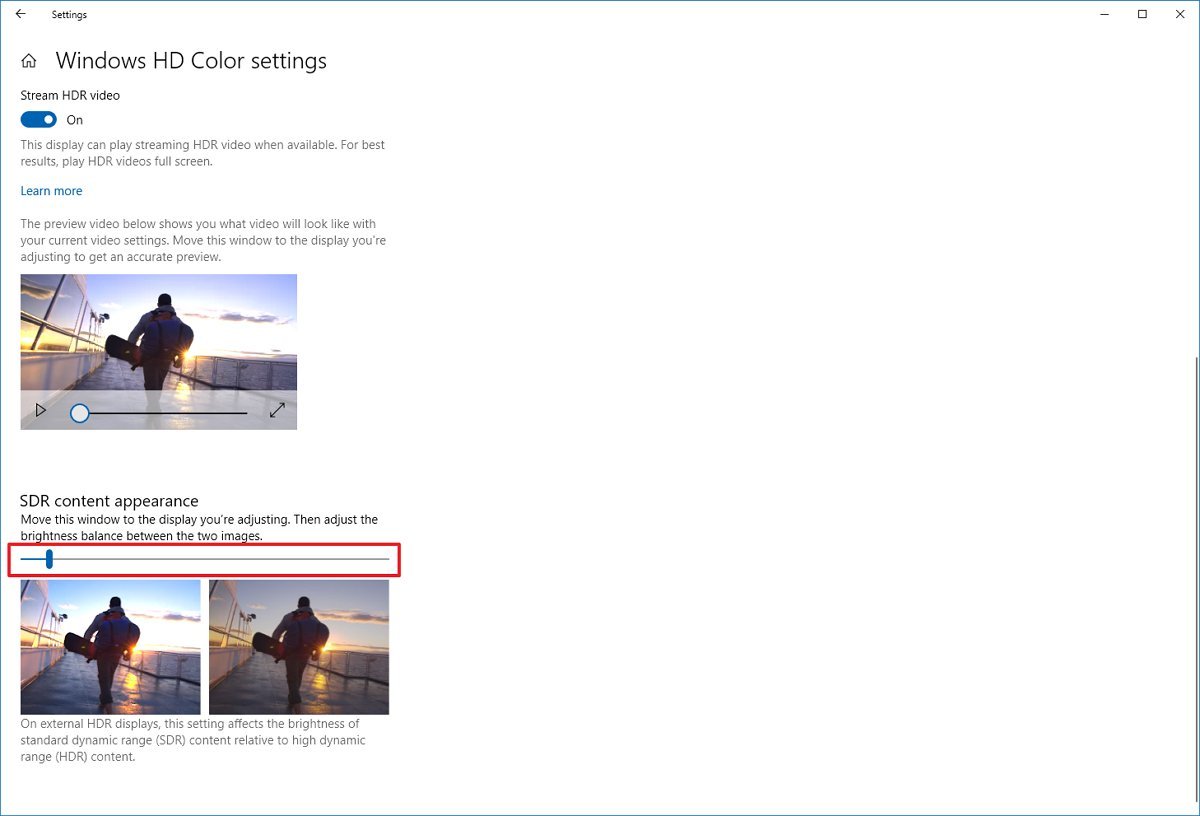
Under the "Windows HD Color" section, use the SDR content appearance slider to adjust the brightness until you find the right balance.
Once you complete the steps, SDR content should appear with an improved brightness level.
Some SDR apps appear darker
Sometimes, apps that haven't been designed to work with the HDR brightness settings will cause them to appear darker on HDR displays.
One solution to this problem is to run the SDR apps on an SDR display. If you have a multi-monitor setup, you can disable HDR on one of the displays to make apps brighter.
If you have an HDR-compatible display, you can try lowering the SDR content appearance brightness level using these steps:
- Open Settings.
- Click on System.
- Click on Display.
-
Click the Windows HD Color settings option.
-
Under the "Windows HD Color" section, use the SDR content appearance slider to lower the brightness until the SDR content looks brighter.
- (Optional) Use the monitor's on-screen settings to increase the brightness to the preferred level.
After you complete the steps, apps should no longer look dimmed.
More Windows 10 resources
For more helpful articles, coverage, and answers to common questions about Windows 10, visit the following resources:






0 comments:
Post a Comment